Cache memory can consume a lot of memory on your drive partitions which are also usually irretraceable to delete while attempting to do it manually. Accumulation of cache memory consists mostly of temp files from websites and applications especially, when you use internet browsing and ads cookies with all the cookies accepted. Cache memory folders are also hidden in our system partition drives amongst the non-clearable memory. Today we’ll be talking about all the possible ways through which cache memory deletion will be possible and easy to repeat in the future too. Read on to know more about clear cache in Windows 11.

- 14 Ways to Clear Cache in Windows 11
- Method 1: Clear Local Cache from Temp Folder
- Method 2: Remove Cache from Storage Settings
- Method 3: Use Disk Cleanup Utility
- Method 4: Delete DNS Cache
- Method 5: Clear Microsoft Store Cache
- Method 6: Erase Browser Cache
- Method 7: Clear Location History
- Method 8: Clear Activity History
- Method 9: Delete Prefetch Files
- Method 10: Clean File Explorer Cache
- Method 11: Delete System Restore Cache
- Method 12: Delete Display Cache
- Method 13: Clear Clipboard Cache
- Method 14: Set-up Deletion of Unused Content via Storage Sense
14 Ways to Clear Cache in Windows 11
Before we escalate to the methods, let’s understand what is cache and cache memory in the first place.
- A cache is a high-speed hardware or software component that caches frequently requested data and instructions . It allows websites, apps, services, and other aspects of your system to load faster . Cache makes the data that is used the most easily accessible . PNGs , icons , logos , shaders , and other files that are often used in various programs are known as cache files . These files are normally hidden and are saved on your hard drive space.
- Cache memory is a memory that is faster than main memory and/or RAM . Because it is placed closer to your CPU than your RAM and is faster, it greatly reduces data access time . It assists your CPU in speeding up calculations , resulting in a quicker PC.
The method to clear cache on Windows 11 depends on the type of cache that needs to be cleared. For example, browser cache can be deleted from the web browser while local cache through Temp folders saved in C drive . Implement all the given methods to clear all kinds of cache to clear memory space & increase system speed.
Method 1: Clear Local Cache from Temp Folder
All the temporary/cache files can be cleared with this simple old school method which can also help you with other Windows versions like 7, 8, and 10. Here’s how to perform this cache memory deletion process:
Press the Windows + R key combination to open the Run dialog box.
Type %temp% and press Enter key to open App Data Local Temp folder.

- Press Ctrl + A key combination to select all the files, and click the Delete option from the top pane to delete the selected files.

- A popup titled Folder Access Denied will appear. Click on Continue to proceed forward.

Note: There may be another prompt for certain files which can’t be deleted . Tick mark the option Do this for all current items and click on Skip to move forward. Do the same if you find any more such prompts in the process.

The app cache files will be deleted from your Windows 11 PC.
Method 2: Remove Cache from Storage Settings
It is also a very suitable method that Windows 11 interface provides for cache memory deletion.
- Open the Windows Settings application through the Start menu as shown.

- Click on the Storage option from the Settings window.

- The storage statistics will appear. Click on the Temporary files option shown highlighted.

- Under the Temporary files section, you will see a list of all the folders and files stored on the system with a brief description. Scroll down to choose the files to be deleted according to your choice and click on the Remove files option to delete the cache files.

- Confirm the deletion process by clicking on Continue . The temporary cache will be cleaned from your system.

Method 3: Use Disk Cleanup Utility
Disk cleanup is another way to easily clean the cache memory in Windows 11. To use Disk Cleanup cache memory deletion process,
- Type Disk Cleanup in the Start menu search bar and click on Run as administrator to open it.

- A Disk Cleanup: Drive Selection window will pop up. Select C: drive from the Drives dropdown menu and click OK .

- Disk cleanup will calculate and open a list of possibly deletable files stored along with the temporary cache files. Scroll down and select the required files according to your choice and click on OK as depicted below.

- In the following pop-up, click on the Delete Files button to confirm the deletion.

Method 4: Delete DNS Cache
The Domain Name System (DNS) functions as a directory for the websites you browse on your computer. DNS converts domain names (such as www.google.com) to IP addresses (8.8.8.8). While the DNS cache assists your computer in quickly loading websites, it’s conceivable that the amount of cache files has expanded over time. In the worst-case scenario, you may experience DNS cache poisoning when a malicious attack occurs and modifies the recorded IP addresses. In order to prevent that, follow the given steps to clear DNS cache in Windows 11:
- Type Command Prompt in the Windows search bar and click Open .

- Type ipconfig /flushdns in the Command Prompt window as shown below, and press Enter key.

Upon execution of the command, all DNS cache will be cleaned from your PC.
Method 5: Clear Microsoft Store Cache
Microsoft Store, like other applications, stores cached data on your system. Its cache deletion can help sort problems with purchases, downloads, or Store apps that simply won’t load. To clear your Microsoft Store cache, follow the steps below:
Press Windows + R key combination from the keyboard to open the Run dialog box.
Type wsreset.exe and press Enter key to execute the command.

- An empty Command Prompt window will appear on the screen. Wait for a few seconds until this window gets automatically closed. Soon after, Microsoft Store will open after clearing all the cache.

Method 6: Erase Browser Cache
Web browsers save static assets of frequently visited web pages on your computer so you can access them faster on subsequent visits. Static assets, to put it another way, are website assets that are more or less the same on each visit. However, the cached data of a website kept on your computer may be out of date. It can cause problems every time you try to access this particular website. Clearing your browser cache may be the best solution in this scenario.
Note: For illustration purposes, we’ve considered Google Chrome browser. Verify with your browser before making any changes.
- Open Chrome browser and press the button combination Ctrl + Shift + Delete to open Clear browsing data settings pop up.

- Click on the Time range dropdown menu and choose the All time option.

- U ntick all the options except the Cached images and files and click on Clear data .

Method 7: Clear Location History
Using the PC location service brings a lot of cache to the PC, if frequently used. Clearing the location history can help clear cache in Windows 11 as follows:
- Open the Windows Settings application through the Start menu .
- Click Privacy & security tile.

- Click on the Location option as shown below.

- Here , find the Location history option and click Clear button as depicted below.

Method 8: Clear Activity History
Just like the location service, active hours on the system gather up some cache as you perform various tasks on the PC. You can clear this cache by implementing given steps:
Follow Steps 1-2 of Method 7 to open the Privacy & security menu.
Click on the Activity history option under Windows permissions .

- Check or uncheck the option marked Store my activity history on this device , as suited. Then, click on Clear under the Clear activity history title as shown highlighted.

Method 9: Delete Prefetch Files
Prefetch files, first introduced with Windows XP, are used to speed up the startup of your Windows PC. If your system is infected with malicious software and you’re experiencing problems on start-up, it’s completely conceivable that you’ll want to remove the prefetch files.
Note: Prefetch files are used for reducing the boot time of the system. Deleting them can affect the booting of your PC, so consider this before making any changes to your system.
- Open Run dialog box as before. Type prefetch and hit Enter .

- In the Windows Prefetch folder, press Ctrl + A keys to select all the files and press the button combination Shift + Delete to permanently delete the selected files.

- Confirm the deletion process by clicking on Yes in the Delete Multiple Items prompt.

Method 10: Clean File Explorer Cache
The Quick Access option is a good example of how File Explorer remembers the files and locations you frequently use on your system. Windows lets you erase the File Explorer cache files that contain this information. Here’s how to do the same:
- Open File Explorer through the Start menu as shown.

- In the File Explorer window, click on the Three dotted icon > Options as depicted.

- From the Folder Options window, click on Clear under the Privacy section.

- The File Explorer cache memory will get cleared and you can exit by clicking on OK .
Method 11: Delete System Restore Cache
When you remove system restore points in Windows 11 , the cache files connected with them will get deleted, and it would free up some memory on your system.
Note: This method includes removing restore points stored on your system, which will prohibit you from restoring Windows in the future if you get a blue screen of death (BSOD) error. So, be very careful while implementing this cache memory deletion process.
- Open Windows Settings and click the About option, as illustrated below.

- Click on the Advanced system settings from the Related links section as shown.

- Switch to the System Protection tab in the System Properties window. Then click Configure option from the Protection Settings section.

- In the System Protection for Local Disk (C:) window, click on Delete beside the message Delete all restore points for this drive as shown highlighted.

- A System Protection popup will appear for the confirmation, click on Continue .

The restore points will be deleted along with the cache memory associated with them.
Method 12: Delete Display Cache
On Windows 11, the display cache stores information about your system display. This information might include everything from the previous resolution you utilized to the color mode you chose, among other things. Display cache is not immune to the problems that plague other cache types. If you’re having problems with your system’s display, you may wish to clear the cache and reset your display settings as follows:
- Open the Run dialog box, type regedit command and press Enter to launch Registry Editor .

- Paste HKEY_LOCAL_MACHINE\SYSTEM\CurrentControlSet\Control\GraphicsDrivers in the address pane on the top as shown.

- In the left pane, right-click on the Configuration folder and click on Delete as depicted below.

- Delete the folders Configuration and ScaleFactors in the same way.

- Restart your PC and the cache will be cleared.
Method 13: Clear Clipboard Cache
Windows clipboard also stores some amount of cache, and it can be cleared easily by following the steps mentioned below:
- Open Windows Settings and scroll down to click on the Clipboard option.

- Here, click on the Clear option from the Clear clipboard data section as shown below.

Method 14: Set-up Deletion of Unused Content via Storage Sense
If you don’t want to perform the cache memory deletion process manually on your computer, Windows 11 includes a built-in tool that will do it for you. Storage Sense is a feature that may be used to remove cache at a predetermined frequency regularly. To use storage sense to clear cache in Windows 11, follow the steps below:
- Open Windows Settings and click on the Storage option from the list as shown.

- Click on the Storage Sense option under Storage management section as illustrated below.

- Check the box under Cleanup of temporary files and make sure the slider under Automatic User content cleanup is turned on.

- Also, check and set the time durations from three drop-down menus under Configure cleanup schedules according to your convenience:
- Run Storage Sense
- Delete files in my recycle bin if they have been there for over
- Delete files in my Downloads folder if they haven’t been opened for more than

Recommended:
- How to Add Music to Kodi
- How to Install Software Without Admin Rights
- How to Print Large Images on Multiple Pages in Windows 11
- How to Reset Windows 11
We hope this article helped you clear cache in Windows 11 PC. Do mention your experience in the comment section below about how much maximum cache you have deleted in one go using cache memory deletion processes listed here.
A0 size papers are the largest size papers available to us as per ISO 216 paper size divisions. But how to print out a high-resolution image of this size? Especially when our systems can only print the largest sizes up to A3. Well, that points to a multi-page printout with combining a couple of pages will help you get the desired image. So this article will help you with how to print large images on multiple pages with understanding how to print image on multiple pages altogether on Windows 10 & 11.

- How to Print Large Image on Multiple Pages in Windows 10/11
- Method 1: With Microsoft Paint
- Method 2: Using Excel Spreadsheet
- Method 3: Via Microsoft Word
- Method 4: Through PDF Format
How to Print Large Image on Multiple Pages in Windows 10/11
Printing large images isn’t directly possible for large poster-sized images. Universally available sizes printable from Windows 10 and 11 are:
- US letter sizes and the US envelop sizes.
- A series (from A3 to A5), B4 to B6 print sizes, C size sheet, D size sheet, E size sheet.
- Envelop sizes, PRC envelops sizes, Japanese Envelop sizes, PRC sizes, Postcard sizes, and many more.
However, A3 is the largest direct printable size for the systems we are using now. And considering allowed print sizes in India, the Bureau of Indian Standards allows the ISO -A series size for drawing and other engineering works. This is why the largest size available in the country is A3x4 paper . After this brief but vital info about paper sizes, let’s move towards learning how to print large images on multiple pages.
Note: The methods and steps represented below are performed on Windows 11. The pictures, interface, and terminologies used are from Windows 11 which closely match Windows 10 too. Do verify before making any changes.
Method 1: With Microsoft Paint
Splitting a large image into numerous ones and printing it onto multiple pages can be easily done through Microsoft Paint. It is one of the ways to know how to print large image on multiple pages in Windows 10 and 11. To do so, follow these steps:
Locate your desired image in the File Explorer .
Right-click on it, and from the context menu, click the Open with > Paint app as depicted below.

- As the image opens in Paint, click on the File menu option from the top left corner.

- From the given list, select the Print option and then click on Page setup as shown.

- In the Page Setup window, choose your desired paper size from the Size: drop-down menu option.

6A. Adjust and verify the Orientation and Centring sections as per your output image preference.
6B. Type the number of pages required for the image to be split in the Fit to option box under the Scaling section. As shown below, if the image is required to be split into 16 separate images, type 4 by 4 page(s) in the boxes.

- After customization, click on the OK button.

- Next, click File > Print > Print as illustrated below.

Click on the printer you want to print with under the Select Printer section.
Then, click on Print . The copies will start to print according to the selection made.
Note: For demo purposes, we have selected the Microsoft Print to PDF option under the Select Printer section. Please select the printer available on your system to print your desired images.

Method 2: Using Excel Spreadsheet
Another way to learn how to print large image on multiple pages is by doing it on an Excel spreadsheet. You can print split images of a large one swiftly with Microsoft Excel as follows:
- Type Excel in the Windows search menu and click on Run as administrator .

- In the Excel window, go to Home and click on the Blank workbook option as shown.

- In the new blank workbook, click on the Insert tab.

- Click on the Pictures drop-down option and select This device to browse and pick your required image.

- A File explorer pop-up window will appear. Now, locate your picture and click on Insert .

- After the picture loads on the spreadsheet, click on the picture and hover on any of the corners when you see the cursor turn into an expanding arrow .

- Click and drag the image corners to increase its size.

- After you stretch the image to the desired size depicted in the Size section of the Picture Format ribbon, click on the File option.

9A. Click on the Print option and configure the Settings section as per your output image preferences.
9B. Verify the number of Pages your image will split in as per the size stretched and the Settings made.

Note: You can repeat steps 7, 8, and 9 to adjust the number of print copies you require of the image from the Settings until the desired preview is reached.
- Click on the Printer drop-down menu option to find and select the printer connected with your system.

- After completing these settings, select the number of copies from the Copies drop-down box. Then, click on the Print option to start the print.

Method 3: Via Microsoft Word
Microsoft Word is another alternative for you to know how to print large image on multiple pages. Follow the upcoming steps to do so:
- Type Word in the Windows search bar and click the Open option as shown below.

- Click on the View tab in the blank workbook.

- In the Page Movement section, select the Side to Side option shown highlighted.

- Click on the Insert tab and click the Pictures > This Device option as depicted below.

- Select and insert the desired image from the pop-up window into this Word file.

Right-click on the image and click the Wrap Text option.
To wrap and move the image freely in the Word file, select either Behind Text or In Front of Tex option.

- Then, stretch the image to desired width and height on the first page as shown.

- Similarly, add the same image on the second page and wrap the image as earlier.

- Stretch the second image to a degree where it will connect the first image as shown below.
Note: You can check the desired width and height in the Size section from the top right corner under Picture Format tab.

- Now, follow steps 8-11 from Method 2 for setting the image for printing and then start printing the image on multiple pages.
Method 4: Through PDF Format
PDF is another way with which you can split your larger resolution image into multiple images for printing. To get the answer to how to print large image on multiple pages questions, follow these steps:
Note: The following steps are performed on Adobe Acrobat DC . Make sure to have this software installed in your system before performing the upcoming steps.
Locate your desired image in the File Explorer .
Right-click on it, and from the context menu, click the Open with > Choose another app option as depicted below.
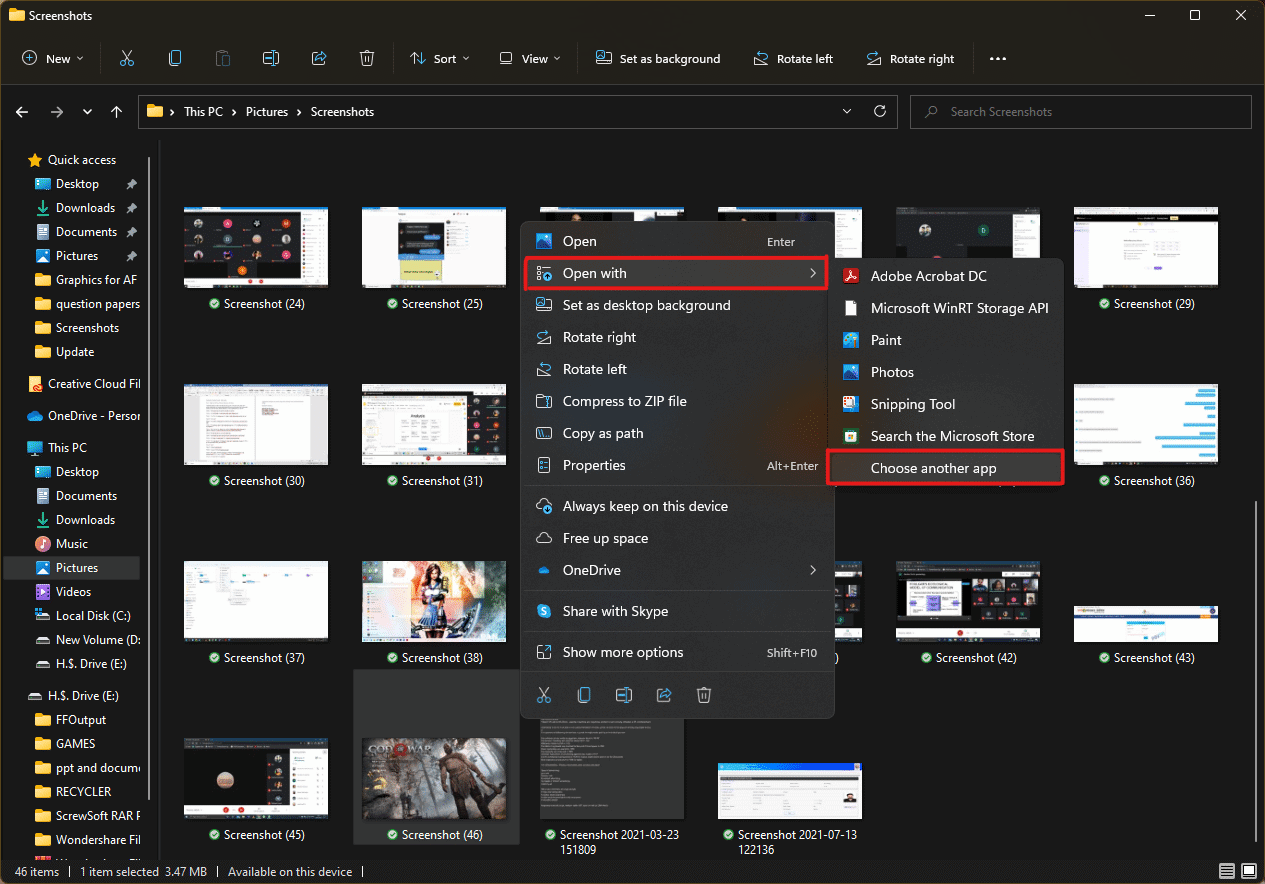
- How do you want to open this file? pop-up will appear with a list of installed apps in the system. Find and select Adobe Acrobat DC and click on OK .
Note: You can click on More apps to further expand the list of apps if you didn’t find Adobe Acrobat earlier.

- After the image opens in Adobe Acrobat, press the key combination Ctrl + P to open the Print window.

- Click on the Poster tab to split images.

- Click on the Page setup… button to configure the page sizes of the split images.

- Configure the Orientation settings and Paper size settings through the drop-down menu and click on OK .

- Select the printer a ttached to your system from the Printer drop-down menu option from the top left corner and click the Print option to start the printing process.

Recommended:
- How to Create a Hanging Indent in Word and Google Docs
- How to Reset Windows 11
- Fix Local Print Spooler Service Is Not Running
- How to Create PDF File in Windows 11
We hope you understood how to print large images on multiple pages in Windows 10/11 . Share your experiences in the comment section below with your queries and suggestions. Also, let us know which topic you want us to explore next.
