There is no introduction required for YouTube, one of the most popular videos streaming websites. However, sometimes you experience some glitches while watching your favourite videos. One of the most common problems that users experience is “ No Sound ” while watching your video. Indeed, it can irritate you to the extreme level, but there is a solution to this problem too.

Every problem comes with the solutions; all you need to do is find the best one. When it comes to finding the solution to this problem, we should identify the real cause behind no sound on YouTube. There could be several things interfering your YouTube sound such as site setting, browser issues, system sound problems, etc. However, if you follow a systematic approach to narrow down your options to find the problem, you would definitely find the real cause for this problem to isolate the problem instantly. Below are mentioned methods to fix no sound on YouTube issue.
- 5 Ways to Fix No Sound on YouTube
- Method 1 – Check Your System Sounds
- Method 2 – Browser Problem
- Method 3 – Adobe Flash Player Update
- Method 4 – YouTube Setting
- Method 5 – Update the sound card driver
5 Ways to Fix No Sound on YouTube
Make sure to create a restore point just in case something goes wrong.
Method 1 – Check Your System Sounds
The first thing you need to do is to check your system sound, whether it is working properly. It could be possible that the main cause of YouTube no sound problem is your system sound is not working. To check your system sound setting, you need to right-click on the sound icon on the taskbar, choose Sounds, and click on the Test button .
If there is no sound coming, then you need to check your system settings.
- Volume Setting – One problem could be that your volume is muted . You can check it on your taskbar. Once you click on the sound icon , you will see a blue bar, and if it is muted, there will be X mark on the speaker. It will help if you re-enable it.

- Check and Update the Sound Driver – Most of the times, we forget that some drivers want to be updated on time. You need to check the sound driver for this problem. It would help if you opened Device Manager where you will find a sound and video sets. If there is a yellow exclamation mark under this setting, you need to click and update the driver. See the last method to see how to update sound drivers in a step by step way manually.

- Enable the sound driver – It would be possible that mistakenly you have disabled the sound driver. You need to check under the Device Manager and Sound driver. If it is disabled, you simply right click on the Sound Driver and select Enable option.

Method 2 – Browser Problem
If you are running your YouTube video on Chrome browser and there is no sound, you should try opening the same video in the different browser. If the sound works, you can easily understand that the problem was with the browser. Now you need to fix the problem with the same browser. Start with “ right-click ” on the speaker icon on Taskbar, open Volume Mixer and fix the problem with the selected browser. In some cases, the speaker could be muted for particular browsers, so you need to enable it. If you do not have other browser installed, you need to install one to check this option.

Method 3 – Adobe Flash Player Update
If you open a flash video on different video streaming websites and hear the sound, then the problem is with your YouTube setting. However, if there is still a sound problem, then the problem is with the adobe flash player. You need to ensure that your adobe flash player is the latest version recommended for the Windows . If you find that your version is not the latest one recommended for windows, you need to update it or install the latest version of the adobe flash player to Fix No Sound on YouTube Issue.

It would help if you also ensured that the Adobe Flash Player is enabled for your browser in Windows 10. So if you don’t know how to do that, then you should definitely read this article: Enable Adobe Flash Player on Chrome, Firefox, and Edge
Method 4 – YouTube Setting
Somehow you have muted the YouTube sound setting . Yes, it happens with some people that sometimes they mute YouTube and forget to re-enable it again for sound. You need to look at the speaker icon on YouTube Video, and if you see X mark on it, then it is disabled or muted. When you move your mouse over the icon, you can easily enable it again and adjust the volume setting. It would help if you moved the slider right side to increase the volume .

Method 5 – Update the sound card driver
- Press Windows Key + R then type devmgmt.msc and hit Enter to open Device Manager.

- Expand Sound, video and game controllers and then right-click on “ Realtek High Definition Audio ” & select Update driver.

- On the next window, click on “ Search automatically for updated driver software “.

- In case, you already have the updated driver, you will see the message “ The best drivers for your device are already installed “.

If you don’t have the latest drivers, Windows will automatically update Realtek Audio drivers to the latest update available .
Once finished, reboot your PC to save changes.
If you’re still facing the Realtek High Definition Audio Driver Issue, then you need to update the drivers manually, follow this guide.
Again open Device Manager then right-click on Realtek High Definition Audio & select Update driver.
This time click on “Browse my computer for driver software.”

- Next, select “ Let me pick from a list of available drivers on my computer. ”

- Select the appropriate driver from the list and click Next.

- Let the driver installation complete and then restart your PC.
Recommended:
- How to Fix Printer Offline Status in Windows 10
- Youtube Not Working Issue on Chrome [SOLVED]
- Fix Windows Hello isn’t available on this device on Windows 10
- How to Reinstall Realtek HD Audio Manager [GUIDE]
Hopefully, above-mentioned steps will help you to Fix No Sound on YouTube Issue . You need to start with one option to find whether that method works for you or not. One by one, you can check all the mentioned methods, and positively, you will be able to watch your favourite video once again with Sound as usual.
Fix Printer Offline Status in Windows 10: If you are facing some issues with your printer then generally restarting the printer can pretty much fix most of these issues. But if your printer is offline even after being fully connected to the PC then this issue can’t be fixed by a simple restart. Users are complaining that they can’t use the printer because their printer is offline even though their printer in ON, connect to the PC and fully operational.

If your printer is not working, or the print command doesn’t seem to respond then you can check if your device status if offline or not. To verify this, press Windows Key + R then type control printers and hit Enter. Or you could navigate to the Devices and Printers in Control Panel then select the desired printer and under the ribbon, at the bottom, you will see something like this “Status: Offline”. If this is the case then your printer is offline and until you resolve this issue the printer won’t work.
- Why does your Printer Go offline?
- Fix Printer Offline Status in Windows 10
- Method 1: Check Printer Connection
- Method 2: Change the Printer Status
- Method 3: Update Printer Driver
- Method 4: Run Printer Troubleshooter
- Method 5: Restart Print Spooler Service
- Method 6: Add a Second Printer
- Method 7: Reinstall your Printer Drivers
Why does your Printer Go offline?
There is no particular cause for this error but the issue could be caused because of outdated or incompatible drivers, conflict of printer spooler services, a problem with physical or hardware connection of the printer to PC or, The Active Directory Domain Services is Currently Unavailable error .. So without wasting any time let’s see How to Fix Printer Offline Status in Windows 10 with the help of the below-listed tutorial.
Fix Printer Offline Status in Windows 10
Make sure to create a restore point just in case something goes wrong.
Method 1: Check Printer Connection
Before doing anything, first, you should check if the communication between the printer & PC is properly set up. There can be something wrong with the USB cable or USB port, or network connection if connected wirelessly.
1.Shutdown your PC and power off your printer. Remove all the cables connected to the printer (even the power cable) and then press & hold the power button of the printer for 30 seconds.
2.Again connect all the cables and then make sure the USB cable from the printer is properly connected to the USB port of the PC. You could also switch the USB port to see if this resolves the problem.
3.If your PC is connected via Ethernet port then make sure the Ethernet port is working and the connection to your printer & PC is proper.
4.If the printer is connected to PC via a wireless network then make sure the printer is connected to your PC network. Check if this Fixes Printer Offline Status in Windows 10, if not then continue.
Method 2: Change the Printer Status
1.Press Windows Key + R then type control printers and hit Enter to open Devices and Printers.

Note: You could also open Devices and Printers in control panel by navigating to Control Panel > Hardware and Sound > Devices and Printers.
2.Right-click on your printer and select “ Set as default printer ” from the context menu.

3.Then again right-click on your printer and select “ See what’s printing “.

4.You will see the printer queue, see if there are any unfinished tasks and make sure to remove them from the list.

5.Now from the printer queue window, select your Printer and uncheck the “Use Printer Offline” option.

6.Similarly, uncheck the “ Pause Printing ” option, just to make sure everything works fine.
Method 3: Update Printer Driver
1.Press Windows Key + R then type “ services.msc ” and hit enter.

2.Find Print Spooler service then right click on it and select Stop.

3.Again press Windows Key + R then type printui.exe /s /t2 and hit enter.
4.In the Printer Server Properties window search for the printer which is causing this issue.
5.Next, remove the printer and when asked for confirmation to remove the driver as well, select yes.

6.Now again go to services.msc and right-click on Print Spooler and select Start.
7.Next, navigate to your printers manufacturer website, download and install the latest printer drivers from the website.
For example , in case you have an HP printer then you need to visit HP Software and Drivers Downloads page . Where you can easily download the latest drivers for your HP printer.
8.If you’re still not able to fix Printer Offline Status then you can use the printer software that came with your printer. Usually, these utilities can detect the printer on the network and fix any issues that are causing the printer to appear offline.
For example, you can use HP Print and Scan Doctor to fix any issues regarding HP Printer.
Method 4: Run Printer Troubleshooter
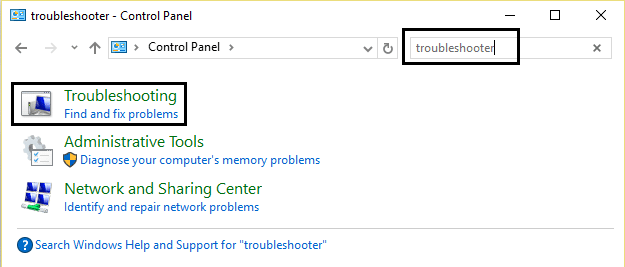
1.Type “troubleshooting” in Control Panel then click on Troubleshooting from the search result.
2.Next, from the left window pane select View all.
3.Then from the Troubleshoot computer problems list select Printer.

4.Follow on-screen instruction and let the Printer Troubleshooter run.
5.Restart your PC and you may be able to Fix Printer Offline Status in Windows 10.
Method 5: Restart Print Spooler Service
1.Press Windows Key + R then type services.msc and hit Enter.
2.Find Print Spooler service in the list and double-click on it.
3.Make sure the Startup type is set to Automatic and the service is running, then click on Stop and then again click on start in order to restart the service.

4.Click Apply followed by OK.
5.After that, again try to add the printer and see if you’re able to Fix Printer Offline Status in Windows 10.
Method 6: Add a Second Printer
NOTE: This method will only work if your printer is connected via a network to the PC (instead of the USB cable).
1.Press Windows Key + I to open Settings then click on Devices.

2.From the left-hand menu click on “ Bluetooth & other devices “.
3.Now from the right window pane click on “ Devices and printers “.

4.Right-click on your printer and select Printer properties from the context menu.

5.Switch to Ports tab then click on the “ Add Port… ” button.

6.Select “ Standard TCP/IP Port ” under Available port types and then click New Port button.

7.On the Add Standard TCP/IP Printer Port Wizard click on Next .

8.Now type in the Printers IP Address and Port name then click Next.

Note: You could easily find the IP address of your printer on the device itself. Or you could find these details on the manual that came with the printer.
9.Once you successfully added the Standard TCP/IP Printer, click Finish.

See if you’re able to Fix Printer Offline Status in Windows 10 Issue , if not then you need to reinstall your printer drivers.
Method 7: Reinstall your Printer Drivers
1.Press Windows Key + R then type control printers and hit Enter to open Devices and Printers.
- Right-click on your printer and select “ Remove device ” from the context menu.

3.When the confirm dialog box appears , click Yes.

4.After the device is successfully removed, download the latest drivers from your printer manufacturer website .
5.Then reboot your PC and once the system restarts, press Windows Key + R then type control printers and hit Enter.
Note: Make sure your printer is connected to the PC via USB, ethernet or wirelessly.
6.Click on the “ Add a printer ” button under Device and Printers window.

7.Windows will automatically detect the printer, select your printer and click Next.

- Set your printer as default and click Finish.

If nothing above helps then follow this guide: Fix Printer Installation Error 0x00000057
Recommended:
- SOLVED: Encrypt Contents To Secure Data Grayed Out In Windows 10
- How to Fix USB Tethering Not Working in Windows 10
- Fix The program can’t start because api-ms-win-crt-runtime-l1-1-0.dll is missing
- Fix Microsoft Visual C++ 2015 Redistributable Setup Fails Error 0x80240017
That’s it you have successfully Fix Printer Offline Status in Windows 10 but if you still have any questions regarding this tutorial then feel free to ask them in the comment’s section.
