Fix WhatsApp Web Not Working: In this digital world, you all are provided with different applications that allow you to communicate with each other, share videos, pictures, etc. And that too with just a click of a button and it doesn’t even matter how far you’re from each other. Once such application, which allows you to communicate with your friends & family is WhatsApp. You can download it from google play store on your phone and create your account and start using it. It is very easy to use and a very convenient app.
WhatsApp has made conversing and sharing of images, videos, documents, etc. more easy and convenient by releasing its computer-based extension for their users. WhatsApp Web is the extension which you can use on your PC without installing. It allows you to send & receive messages from your PC & from your phone. This happens because when you log in on WhatsApp web both the devices i.e. your PC and mobile get synced.
All the messages whether you send or receive will be shown on both the devices, in short, all the activity which will be happening on WhatsApp web & on your phone will appear on both the devices as they are synced with each other. This saves a lot of time of the user as while working on your PC you can simultaneously send or receive messages on your PC without the need of picking up your phone. You can simply open the WhatsApp web on your computer and start talking to anyone in your contacts.

But sometimes the connection between phone and PC doesn’t work and you won’t be able to access WhatsApp Web on your PC. The problem is that WhatsApp on mobile and WhatsApp Web isn’t able to sync, therefore the connection is lost and you would see some kind of error to notify you that WhatsWeb is not working. There are several other reasons as to why you’re not able to use WhatsApp web on your PC which we will discuss in this guide.
- Reasons Why You Can’t Connect To WhatsApp Web?
- Fix WhatsApp Web Not Working
- Method 1 – Check if WhatsApp is down?
- Method 2 – Check Browser Compatibility
- Method 3 – Check for Browser Updates
- Method 4 – Clear Browser Cookies
- Method 5 – Reset Web Browser
- Method 6 – Disable VPN Software
- Method 7 – Resolve the Internet connectivity issue
- Method 8 – Zoom in to WhatsApp Web page to scan the QR code
Reasons Why You Can’t Connect To WhatsApp Web?
There are several reasons why WhatsApp web is not working as it is expected to be and some of them are given below:
- If you do not clear the cookies of your browser regularly or failed to clear them, this may cause the browser to function abnormally and this can be the same reason for the browser not allowing WhatsApp web to run properly.
- While running WhatsApp Web, it is important that both your phone and PC should be connected to the Internet. If any one of the devices fails to connect to the Internet or there is poor quality internet connection then WhatsApp web may not run or work properly .
- There is a possibility that the web browser using which you are using to run WhatsApp is causing an issue especially when your browser is outdated or has not been updated in a while.
Fix WhatsApp Web Not Working
If your WhatsApp web is not working properly then you need to worry as there are several solutions by which you can solve your problem of can’t connect to WhatsApp Web.
Method 1 – Check if WhatsApp is down?
Sometimes, the problem is that WhatsApp web client’s server is down due to which it is not able to work properly. You can check if WhatsApp web client server is down or not using the downdetector website.
To check for WhatsApp status using the downdetector website follow the below steps:
1.Open downdetector.com using any browser and the below page will open up.

2.Scroll down and look for WhatsApp icon.
3.Click on WhatsApp icon.
4.Below page will open up which will show if there is any problem with your WhatsApp or not.

5.Here it shows No problem at WhatsApp.
Note: If it will show there is a problem then you need to wait until the WhatsApp is back again i.e. the problem is solved.
Method 2 – Check Browser Compatibility
To run WhatsApp web it is important to keep in notice that your browser and WhatsApp web should be compatible with each other. So, if your WhatsApp web is not working you should first look for your browser specifications. Google Chrome, Firefox, Opera, Edge are some browsers that WhatsApp web is compatible with , while Vivaldi, Internet Explorer are some browsers that are not compatible with WhatsApp web. So, the users who are trying to run WhatsApp using a browser which is not compatible need to install WhatsApp compatible alternative.

Method 3 – Check for Browser Updates
Even if you’re using WhatsApp web compatible browser then also there is a chance that your WhatsApp web will not work properly as WhatsApp does not support all versions of the Compatible browsers. So if you’re using outdated browser then you need to update your browser to the latest version.
1.Open Google Chrome browser and click on three dot icon available at the top right corner.
2.Click on the Help button.

3.Under Help, click on About Google Chrome.

4.Below page will open up which will show you the current version of Chrome.

5.If your browser is outdated then Chrome will start downloading the latest update for your browser.

6.Once Chrome finished installing the update you will need to click on Relaunch button to restart the browser.

Method 4 – Clear Browser Cookies
If you can’t connect to WhatsApp web then you need to check your browser cookies as sometimes browsers cache & cookies can interrupt the connection. So you just need to delete the browser cookies and cache:
1.Open Google Chrome browser and click on three dot icon available at the top right corner.
2.Click on More Tools option.

3.Under More tools, click on Clear browsing data.

4.Below dialog box will open up.

- Checkmark the box next to Cookies and other site data if it is not already checked.
6.Then click on Clear data button and all your cookies and other site data will be cleared. Now see if you’re able Fix Can’t Connect To WhatsApp Web issue.
Method 5 – Reset Web Browser
If your Web Apps are not working properly then the browser reset option can be used to solve various issues related to the Browser. The Reset options will bring back the default browser settings and will delete all your preferences, will erase all cookies, cache, and other browsing data, passwords, autofill , etc. In short, any changes made to the browser will be reverted, it will be like a fresh installation, so make sure you understand this before proceeding forward.
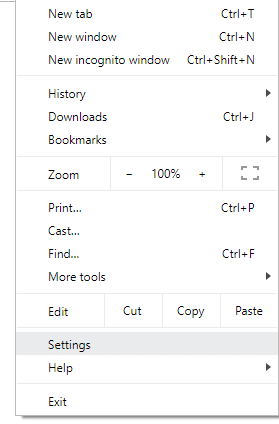
1.Open Google Chrome browser and click on three dot icon available at the top right corner.
2.Click on the Settings from Chrome menu.
3.Scroll down till you reach the Advanced link , click on it to show Advanced options.
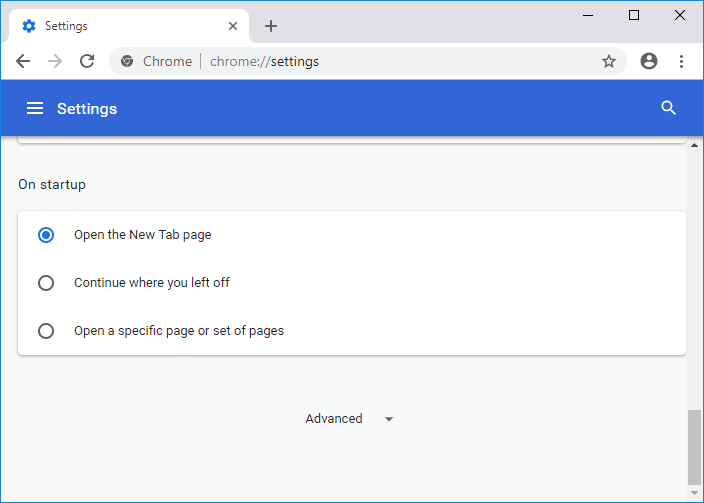
4.Once you click on the Advanced link, the below page will open up.

5.Scroll down and navigate to the bottom of the page where you will see the Reset and clean up section.

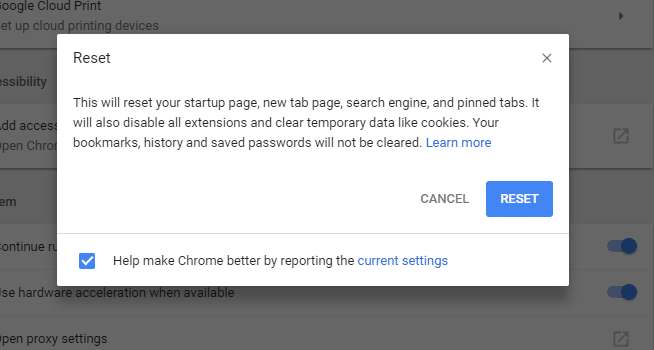
6.Under Reset and clean up option click on Restore settings to their original defaults . Below dialog box will appear.

7.Click on the Reset settings button.
8.This would open a pop window again asking if you want to Reset, so click on Reset to continue.
After completing the above steps, your browser will restore to its original default settings.
Method 6 – Disable VPN Software
If you’re using any VPN software then it may cause connectivity issue and your Whatsapp Web will not able to work properly. So you need to either disable VPN or uninstall it completely before running WhatsApp web.

To disconnect the VPN software follow the below steps:
1.Right-click on the VPN software icon.
2.Click on the Disconnect option.
3.Your software may provide further options to disconnect VPN. Follow them and your VPN will be disconnected.
Method 7 – Resolve the Internet connectivity issue
Sometimes users need to resolve Internet connectivity issues on phones as well as PCs to fix WhatsApp Web Not Working issue.
Resolve Internet connectivity issues of phone
To resolve Internet connectivity issue on phone first, try to turn on the Airplane mode then again turn it off on your phone. To do so follow the below steps:
1.Go to Phone settings.
2.You will see more option there. Click on it. The page below will open up.

3.Toggle ON the Aeroplane mode button and keep it ON for more than a minute.

4.Now turn off the toggle for VPN.
Resolve Internet connectivity issues on PC
To resolve Internet connectivity issue on PCs, run Network or Internet Troubleshooter. To run the Internet connection Troubleshooter follow the below steps:
1.Open Troubleshoot by searching for it using the search bar and hit the Enter button on the keyboard.

2.Now under Troubleshoot click on Internet Connections.

3.Click on Run the troubleshooter button under Internet Connection.

4.Below dialog box will appear showing Detecting problems.

5.On the next screen, you see two options. Make sure to click on Help me connect to a specific web page.

6.Enter the WhatsApp web URL in the given text box: https://web.whatsapp.com/

7.Click on Next button.
8.Then the troubleshooter will provide you some fixes to solve your can’t connect to WhatsApp Web problem.
Method 8 – Zoom in to WhatsApp Web page to scan the QR code
To run the WhatsApp on PC, you need to scan the QR code from your WhatsApp web into your WhatsApp app on your Phone. A low-resolution phone camera does not capture the QR code properly & clearly. So, to ensure the phone will capture QR code clearly, zoom in the WhatsApp web page.
1.Open the WhatsApp web page .

- Zoom in on the web page by pressing the Ctrl and + key together.

Your QR code will be zoomed in. Now again try to scan the QR code and you may be able to fix WhatsApp Web Not Working issue.
Recommended:
- Windows Updates Stuck? Here are a few things you could try!
- Windows 10 Tip: Save Space By Cleaning WinSxS Folder
- Fix Printer Spooler Errors on Windows 10
- How to Reset Mail App on Windows 10
I hope this article was helpful and you can now easily Fix Can’t Connect To WhatsApp Web and WhatsApp Web Not Working issue , but if you still have any questions regarding this tutorial then feel free to ask them in the comment’s section.
Fix Printer Spooler Errors on Windows 10: Isn’t frustrating that you give your printer command to print some important documents and it got stuck? Yes, it is a problem. If your printer is denying to print something, most probably it is printer spooler error. Most of the times when the printer resists printing on Windows 10, it is print spooler service error. Many of us may be not aware of this term. So let’s start with understanding what exactly printer spooler is all about.

Print spooler is a Windows service that manages and handles all printer interactions that you send to your printer. Problems in this service is that it will stop printing operation on your device. If you have tried restarting your device and printer but the problem still persists, you do not have to worry because we have the solutions to fix printer spooler errors on Windows 10.
- Fix Printer Spooler Errors on Windows 10
- Method 1 – Restart the Print Pooler service
- Method 2 – Ensure Print Spooler service is set to Automatic start
- Method 3 – Change the Recovery options for Print Spooler
- Method 4 – Delete Print Spooler Files
- Method 5 – Update Printer Driver
Fix Printer Spooler Errors on Windows 10
Make sure to create a restore point just in case something goes wrong.
Method 1 – Restart the Print Pooler service
Let’s start with restarting the printer spooler service to fix this problem.
1.Press Windows +R and type services.msc and hit Enter or Press OK button.

2.Once the services window open, you need to locate Print Spooler and restart it. To do so, right-click on Print Spooler service and select Restart from the context menu.

Now give the print command to your printer again and check if you’re able to F ix Printer Spooler Errors on Windows 10. Your printer will start working again. If the problem still persists, move to the next method.
Method 2 – Ensure Print Spooler service is set to Automatic start
If print spooler service is not set to automatic, then it would not automatically start when Windows boots up. It means your printer will not work. This could be one of the causes of printer spooler error on your device. You have to manually set it to automatic if it is not already set.
1.Press Windows Key + R then type services.msc and hit Enter.
2.Locate Print Spooler service then right-click on it and choose Properties.

3.From Startup type drop-down select Automatic and then click Apply followed by OK.

Now check if your printer is started working or not. If not then continue with the next method.
Method 3 – Change the Recovery options for Print Spooler
Any incorrect recovery settings configuration of the print spooler service may also cause the issue with your device. Therefore, you need to make sure that recovery settings are correct otherwise Printer spooler will not start automatically.
1.Press Windows + R and type services.msc and hit Enter.
2.Locate Print Spooler then right-click on it and select Properties.
3.Switch to the Recovery tab and ensure that three failure tabs are set to Restart the Service.

- Click Apply followed by OK to save the settings.
Now see if you’re able to Fix Printer Spooler Errors on Windows 10.
Method 4 – Delete Print Spooler Files
If there are several pending printing jobs then this may cause trouble for your printer to run printing command. Thus, deleting print spooler files may solve the error.
1.Press Windows + R and type services.msc and hit Enter.
2.Right-click on the Print Spooler service then select Properties.

3.Click on Stop in order to stop the Print Spooler service then minimize this window.

4.Press Windows + E to open Windows File Explorer.

5.Navigate to the following location under the address bar:
C:\Windows\System32\spool\PRINTERS:
If Windows prompts you Permission, you need to click on Continue.
6.You need to delete all files in the PRINTER folder. Next, check if this folder is completely empty or not.
7.Now open Control Panel on your device. Press Windows + R and type Control and hit Enter.

8.Locate the View Devices and Printers.
9.Right-click on the Printer and select Remove Printer option to remove the printer from your device.

10.Now open the Services window again from the taskbar.
11.Right-click on the Print Spooler service and choose Start.

12.Return back t o Device and Printer section inside the control panel.
13.Right-click on the blank area under the above window and select Add a Printer option.

- Now follow the on-screen instructions carefully to add a printer on your device.
Now you can check if your printer has started working again or not. Hopefully, this will Fix Printer Spooler Errors on Windows 10.
Method 5 – Update Printer Driver
One of the most common and forgetful areas of this cause is an obsolete or older version of the printer driver. Most of the people forget to update the Printer driver. To do this, you need to open Device manager on your device
1.Press Windows + R and Type devmgmt.msc to open device manager window.

2.Here you need to locate the printers section and right-click on it to select Update Driver option.

Windows will automatically find the downloadable files for the driver and update the driver.
Recommended:
- Google Chrome Not Responding? Here Are 8 Ways To Fix It!
- Disable the User Account Control (UAC) in Windows 10
- Fix Cannot Create HomeGroup On Windows 10
- How To Delete Temporary Files In Windows 10
Hopefully, above mentioned all methods will Fix Printer Spooler Errors on Windows 10 . If you still experience any trouble regarding this guide then feel free to ask any questions in the comment’s section.
