How to Clear Clipboard in Windows 10: You might have not noticed that you use clipboard on a daily basis on your devices. In a layman language, when you copy or cut some content to paste somewhere, it is stored on RAM memory for a short period until you copy or cut another content. Now if we talk about clipboard , you will get some idea of what it is and how it works. However, we will explain it in a more technical way so that you can get a better grasp of this term and follow the steps to clear clipboard in Windows 10.
- What is clipboard?
- How Does Clipboard Work?
- Can we see clipboard content?
- Why should we bother to clear clipboard?
- Clear Clipboard using Command Prompt or Shortcut in Windows 10
- Method 1 – Clear Clipboard Using Command Prompt
- Method 2 – Create Shortcut to clear clipboard
- Assign a global hotkey to Clear Clipboard in Windows 10
- How to Clear Clipboard in Windows 10 1809?
What is clipboard?
Clipboard is a special zone in RAM used to store temporary data – images, text or other information. This RAM section is available for the current session users in all programs running on Windows. With the clipboard, users have the opportunity to copy and paste the information easily wherever users want.
How Does Clipboard Work?
When you copy or cut some content from your system, it stores in clipboard enabling you to paste it where you want. Thereafter, it transfers the information from clipboard to the place where you want to paste it. The point that you need to keep in mind that clipboard only stores 1 item at a time.
Can we see clipboard content?
In the previous version of the Windows operating system, you could have the option to see the clipboard content. The latest version of the operating system does not have this option.
However, if you still want to see your clipboard content, the easiest way is to paste the content that you have copied. If it is text or image, you can paste it on a word document and see your clipboard content.
Why should we bother to clear clipboard?
What is wrong with keeping the clipboard content on your systems? Most of the people do not bother to clear their clipboard. Is there any problem or risk associated with this? For example, if you are using a public computer where you just copied some sensitive data and forget to clear it, anybody who uses that system again later can steal your sensitive data easily. Isn’t it possible? Now you got the idea why it is important to clear your system clipboard.
Clear Clipboard using Command Prompt or Shortcut in Windows 10
Make sure to create a restore point just in case something goes wrong.
Now we will start with the instructions to clear the clipboard. We will follow some simple methods that can help you clear clipboard instantly.
Method 1 – Clear Clipboard Using Command Prompt
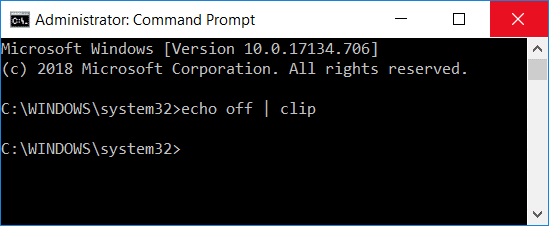
1.Start with launching the Run dialog box by pressing “ Windows + R ”.
2.Type cmd /c echo.|clip in the command box
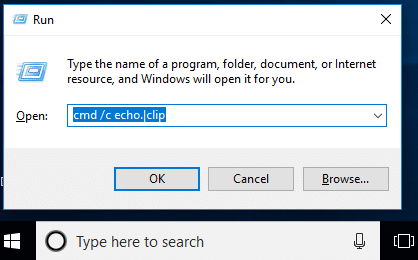
3.Press enter and that’s it. Your clipboard is clear now.
Note: Do you want to find another easy way? Ok, you can simply copy another content from the system. Suppose, if you have copied sensitive content and pasted it, now before turning off your session, copy any other file or content and that’s it.
Another way is to ‘ Restart ’ your computer because once the system is restarted your clipboard entry will be automatically cleared. Moreover, if you press the print screen (PrtSc) button on your system, it will take a screenshot of your desktop by clearing your previous clipboard entry.
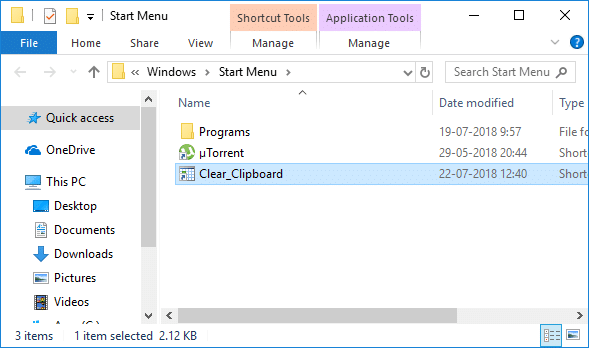
Method 2 – Create Shortcut to clear clipboard
Don’t you think that running the command of cleaning clipboard takes time if you use it frequently? Yes, what about creating a shortcut to clear clipboard so that you can use it instantly, the steps to do this are:
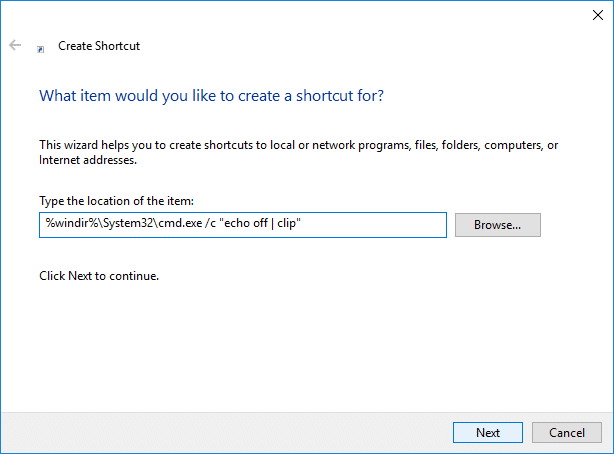
Step 1 – Right-click on Desktop and click on New and then choose Shortcut from the context menu.

Step 2 – Here in the location item section you need to paste below-mentioned command and click ‘Next’.
%windir%\System32\cmd.exe /c “echo off | clip”
Step 3 – Now you need to give a name to this shortcut whatever you want such as “Clear Clipboard” and click Finish.

If you want to keep it handier, keep it pinned on your taskbar. So that you can instantly access this shortcut from the taskbar.

Assign a global hotkey to Clear Clipboardin Windows 10
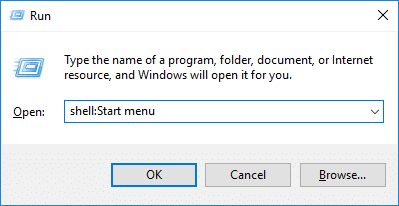
1.Press Windows + R and type below-mentioned command and press enter
shell:Start menu
2.The shortcut you created in the previous method, you need to copy it in the opened folder.
3.Once the shortcut is copied, you need to right-click on the shortcut and select ‘ Properties ’ option.

4.In the new open tab, you need to navigate to the Shortcut tab and click on the Shortcut Key option and assign a new key.
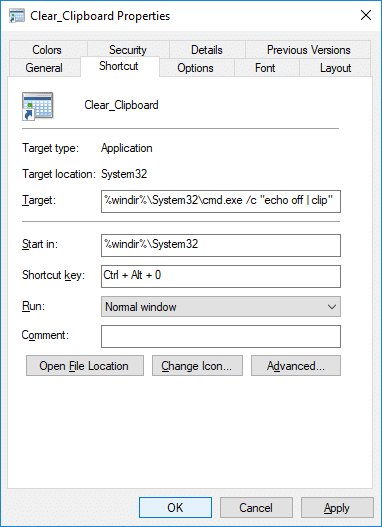
5.Click Apply followed by OK to save changes.
Once it is done, you can use the hotkeys to clear the clipboard directly with the shortcut keys.
How to Clear Clipboard in Windows 10 1809?
If your Windows operating system is updated with the Windows 10 1809 (October 2018 Update), in this one you can find the Clipboard feature. It is a cloud-based buffer which allows users to synchronize contents of the clipboard.
Step 1 – You need to navigate to Settings > System > Clipboard.
Step 2 – Here you need to click on the Clear button under Clear Clipboard Data section.

If you want to do it quicker, you just need to press “ Windows + V ” and press clear option, and this will clear your clipboard data in Windows 10 build 1809. Now there will be no temporary data saved on your Clipboard RAM tool.
Recommended:
- How to Change Default System Font in Windows 10
- Get Your Printer Back Online in Windows 10
- Increase Microphone Volume in Windows 10
- Run Android Apps on Windows PC
I hope this article was helpful and now you can easily Clear Clipboard using Command Prompt or Shortcut in Windows 10 , but if you still have any questions regarding this tutorial then feel free to ask them in the comment’s section.
How to Get Your Printer Back Online: There may be situations where you need to print any file for an urgent meeting and you need to submit those files in 30 minutes. So what you usually do is open the file and go to print option to print the document. But suddenly you noticed that in the bottom right corner of your system the status of your printer is showing as offline. This is a usual problem for users because even when your Printer is clearly ON and ready to print, the status is showing offline.
This is caused by the communication error viz The Active Directory Domain Services is Currently Unavailable error of the printer with your system. There is no particular cause for this error but the issue could be caused because of outdated or incompatible drivers, conflict of printer spooler services, a problem with physical or hardware connection of the printer to PC, etc. So without wasting any time let’s see How to Get Your Printer Back Online in Windows 10 with the help of the below-listed tutorial.
- How to Get Your Printer Back Online in Windows 10
- Method 1: Check Your Printer Connection
- Method 2: Update Printer Driver
- Method 3: Change the Printer Status
- Method 4: Restart Print Spooler Service
- Method 5: Use a Second Printer
- Method 6: Reinstall your Printer Drivers
How to Get Your Printer Back Online in Windows 10
Make sure to create a restore point just in case something goes wrong.
Method 1: Check Your Printer Connection
When there is an error showing your status of the printer as offline, the system wants to tell users that there is something wrong with the communication established between the printer and the system through the USB cable or network connection. To solve this issue the steps are:
- To restart your printer, off the power supply of the printer & then switch it ON again.
- Now again check the connection of your printer.
- If the connection of your system with the printer is made using a USB cable, make sure your cable is working properly and the connections to the ports are fitted tight. You could also switch the USB port to see if this resolves the problem.
- If the connection of your system with the printer is made through wired networks, check whether the connection to your cable is properly done or not. Also, you can check whether the signal to your printer is flashing or not.
- If the connection of your system with the printer is made through a wireless network, make sure your printer is connected to your computer network & the wireless icon will lit-up to show that you are connected.
If nothing works then you should try to run Printer Troubleshooter:
1.Type “troubleshooting” in Control Panel then click on Troubleshooting from the search result.
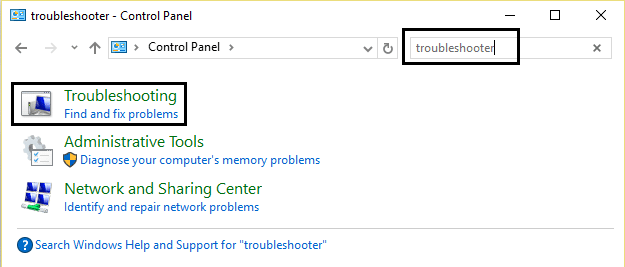
2.Next, from the left window pane select View all.
3.Then from the Troubleshoot computer problems list select Printer.

4.Follow on-screen instruction and let the Printer Troubleshooter run.
5.Restart your PC and you may be able to Get Your Printer Back Online in Windows 10, if not then continue with the next method.
Method 2: Update Printer Driver
1.Press Windows Key + R then type “ services.msc ” and hit enter.

2.Find Print Spooler service then right click on it and select Stop.

3.Again press Windows Key + R then type printui.exe /s /t2 and hit enter.
4.In the Printer Server Properties window search for the printer which is causing this issue.
5.Next, remove the printer and when asked for confirmation to remove the driver as well, select yes.

6.Now again go to services.msc and right-click on Print Spooler and select Start.

7.Next, navigate to your printers manufacturer website, download and install the latest printer drivers from the website.
For example , in case you have an HP printer then you need to visit HP Software and Drivers Downloads page . Where you can easily download the latest drivers for your HP printer.
8.If you’re still not able to fix Printer Offline Status then you can use the printer software that came with your printer. Usually, these utilities can detect the printer on the network and fix any issues that are causing the printer to appear offline.
For example, you can use HP Print and Scan Doctor to fix any issues regarding HP Printer.
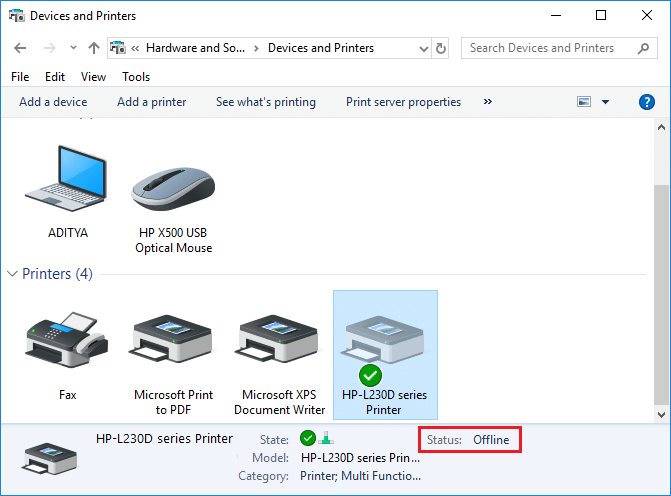
Method 3: Change the Printer Status
1.Turn off your Printer and then again turn it back ON.
2.Now press the key combination Windows Key + I to open Settings.
3.Now click on “ Devices ” then from the left-hand side menu select “ Bluetooth & other devices ” option.

4.Under Related settings click on “ Devices and printers “.

5.Then, you have to right-click on the printer icon with a green check-mark and choose “ See what’s printing ”.

Note: If there is no default printer set, then right-click on your printer and select “ Set as default printer “.

6.You will see the printer queue, see if there are any unfinished tasks and make sure to remove them from the list.

7.Now from the printer queue window, select your Printer and uncheck the “Use Printer Offline” & “ Pause Printer ” option.

Method 4: Restart Print Spooler Service
1.Use the shortcut key combination Windows Key + R to open the Run application.
2.Now type in there “ services.msc ” and hit Enter or click OK.
3.Scroll down to look for “ Print Spooler ” from the service utility window an check whether the status is running or not.
4.If you cannot see the status, you can right-click on Print Spooler and choose “ Start ”.
5.Or else, double-click on Print Spooler service & make sure the Startup type is set to Automatic and the service is running, then click on Stop and then again click on start in order to restart the service.

6.Click Apply followed by OK.
7.After that, again try to add the printer and see if you’re able to Get Your Printer Back Online in Windows 10.
Method 5: Use a Second Printer
This approach of solving the issue will work only when the printer is connected via a network to the PC (instead of the USB cable). Otherwise, you can manually set your IP address for your printer.
1.Press Windows Key + I to open Settings then click on Devices.
2.From the left-hand menu click on “ Bluetooth & other devices “.
3.Now from the right window pane click on “ Devices and printers “.
4.Right-click on your printer and select Printer properties from the context menu.

5.Switch to Ports tab then click on the “ Add Port… ” button.

6.Choose “ Standard TCP/IP Port ” under Available port types and then click on the New Port button.

7.On the Add Standard TCP/IP Printer Port Wizard click on Next .

8.Now type in the Printers IP Address and Port name then click Next.

Note: You could easily find the IP address of your printer on the device itself. Or you could find these details on the manual that came with the printer.
9.Once you successfully added the Standard TCP/IP Printer, click Finish.

See if you’re able to Get Your Printer Back Online in Windows 10 , if not then you need to reinstall your printer drivers.
Method 6: Reinstall your Printer Drivers
1.Press Windows Key + R then type control printers and hit Enter to open Devices and Printers.

- Right-click on your printer and select “ Remove device ” from the context menu.

3.When the confirm dialog box appears , click Yes.

4.After the device is successfully removed, download the latest drivers from your printer manufacturer website .
5.Then reboot your PC and once the system restarts, press Windows Key + R then type control printers and hit Enter.
Note: Make sure your printer is connected to the PC via USB, ethernet or wirelessly.
6.Click on the “ Add a printer ” button under Device and Printers window.

7.Windows will automatically detect the printer, select your printer and click Next.

- Set your printer as default and click Finish.

Recommended:
- How to Change Default System Font in Windows 10
- What is an MKV file and how to open it?
- Fix Destination Path Too Long Error
- How to Find My Router’s IP Address?
I hope this article was helpful and now you can easily Get Your Printer Back Online in Windows 10 , but if you still have any questions regarding this guide then feel free to ask them in the comment’s section.
