OneDrive is Microsoft’s cloud storage service. This is the cloud service where the users can store their files. For the users, there is some amount of space which is given free, but for more space, the users need to pay. However, this feature might be really useful, but some users might want to disabled OneDrive and save some memory & battery life. For most of the Windows users, OneDrive is merely a distraction, and it just bugs users with an unnecessary prompt for Sign in and whatnot. The most notable issue is the OneDrive icon in the File Explorer which the users want to somehow hide or remove completely from their system.

Now the problem is Windows 10 doesn’t include an option to hide or remove OneDrive from your system, and that’s why we have put together this article which will show you how to remove, hide or uninstall OneDrive completely from your PC. Disabling one drive in windows 10 is fairly a simple process. There are several methods to disable the OneDrive on Windows 10, and they are discussed here.
- Disable OneDrive on Windows 10 PC
- Method 1: Uninstall OneDrive in Windows 10
- Method 2: Delete the OneDrive folder Using Registry
- Method 3: Use Local Group Policy Editor to Disable OneDrive
- Method 4: Disable OneDrive by Unlinking your account
- Method 5: Uninstall OneDrive using Command Prompt (CMD)
Disable OneDrive on Windows 10 PC
Make sure to create a restore point just in case something goes wrong.
Method 1: Uninstall OneDrive in Windows 10
OneDrive always sends occasional notifications to the users asking about uploading the files to the one drive. This can get irritating for some users, and the lack of OneDrive space or OneDrive Error 0x8007016a might take users to the point where they want to uninstall OneDrive . Uninstalling OneDrive is a very simple process, so to uninstall one drive follow these steps.
Click on the Start or press the Windows Key.
Type Apps & features then click on the same in the best match list.

- Look for the search list and type Microsoft OneDrive in there.

- Click on Microsoft One Drive.

Click on Uninstall, and it will ask for your confirmation.
Click on it, and the OneDrive will be uninstalled.
This is how you can easily uninstall Microsoft OneDrive in Windows 10, and now it won’t bother with you any prompts anymore.
Method 2: Delete the OneDrive folder Using Registry
To remove the OneDrive folder from your computer, you have to go into the Windows Registry and do it from there. Also, keep in mind that a registry is a powerful tool and doing unnecessary changes or playing with it can cause serious damage to your operating system. Please back up your Registry just in case something goes wrong then you will have this backup to restore your system. To remove the OneDrive folder, follow the instructions stated below and you will be good to go.
- Press Windows Key + R then type regedit and hit Enter to open Registry Editor.

- Navigate to the following registry key:
HKEY_CLASSES_ROOT\CLSID{018D5C66-4533-4307-9B53-224DE2ED1FE6}
- Now select the {018D5C66-4533-4307-9B53-224DE2ED1FE6} key and then from the right window pane double click on System.IsPinnedToNameSpaceTree DWORD.

- Change the DWORD value data from 1 to 0 and click OK.

- Close the Registry Editor and Reboot your PC to save changes.
Method 3: Use Local Group Policy Editor to Disable OneDrive
If you are using Microsoft Windows 10 Professional, Enterprise, or Education Edition and want to get rid of Onedrive, you can use the local group policy editor. It is also a powerful tool, so use it wisely and only follow the instructions stated below to disable the Microsoft Onedrive.
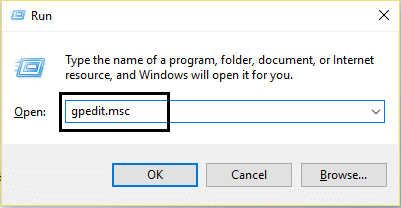
- Press Windows Key + R then type gpedit.msc and hit Enter to open Group Policy Editor.
There will be two panes, the left pane and the right pane.
From the left pane, navigate to the following path in the gpedit window:
Computer Configuration > Administrative Templates > Windows Components > OneDrive

In the right pane, click on Prevent the usage of OneDrive for file storage.
Click on Enabled and apply the changes.

- This will completely hide OneDrive from File Explorer and users won’t access it anymore.
From now on you will see empty OneDrive folder. If you want to revert this setting, then come to the same settings and click on Not Configured . This will make OneDrive work as usual. This method saves the OneDrive from getting uninstalled and also saves you from the unwanted hassle. If after some time you want to use the OneDrive, then you can revert and start using OneDrive again without any issue.
Method 4: Disable OneDrive by Unlinking your account
If you want that OneDrive should remain in your system but you don’t want to use it right now and want to disable only it’s a function then follow these instructions.
- Look for the OneDrive icon in the taskbar.
- Right-click on the icon and select Settings .

A new window will pop up with multiple tabs.
Switch to the Account tab then click on Unlink this PC link.

- A confirmation message will be displayed, so click on “ Unlink account ” button to continue.

Method 5: Uninstall OneDrive using Command Prompt (CMD)
To uninstall OneDrive from Windows 10 follow these steps.
Click on the Start or press the Windows key.
Type CMD and right-click on it and select Run as Administrator .

- To Uninstall OneDrive from Windows 10:
For 32-bit system type: %systemroot%\System32\OneDriveSetup.exe/uninstall
For 64-bit system type: %systemroot%\System64\OneDriveSetup.exe/uninstall

This will completely remove OneDrive from the system.
But if in future, you want to install OneDrive again then open Command Prompt and type the following command:
For 32-bit Windows type: %systemroot%\System32\OneDriveSetup.exe
For 64-bit Windows type: %systemroot%\System64\OneDriveSetup.exe
Like this, you can uninstall and can also install the OneDrive application.
Recommended:
- Fix Cursor Jumps or moves randomly in Windows 10
- Set up Yahoo email account in Windows 10 Mail App
- How to Check Your CPU Temperature in Windows 10
- Print Screen Not Working? 7 Ways to Fix it!
I hope this article was helpful and now you can easily Disable OneDrive on Windows 10 PC , but if you still have any questions regarding this tutorial then feel free to ask them in the comment’s section.

- What is Print Screen and its uses?
- 7 Ways to Fix Print Screen Not Working in Windows 10
- What To Do If Your Print Screen Key Does Not Work?
- Method 1: Update your keyboard driver
- Method 2: Disable the F Lock or F Mode
- Method 3: Make sure Windows is up to date
- Method 4: Stop Background programs
- Method 5: Perform a Clean Boot
- Method 6: Configure Alternate Hotkeys for the Print Screen key
- Method 7: Use the Snipping Tool
What is Print Screen and its uses?
Basically, Print Screen saves a bitmap image of the current screen or screenshot to the Windows clipboard , while pressing the Alt key in combination with Print Screen (Prt Sc) will capture the currently selected window. This image then can be saved by using the paint or any other editing application. Another use of the Prt Sc key is that when pressing in combination with both the left Alt and left Shift key will turn on a high contrast mode .
With the introduction of Windows 8 (also in Windows 10), you can press Windows Key in combination with the Prt Sc key will capture the screenshot and saved this image to the disk (the default picture location). Print screen is often abbreviated as:
Print Scrn

Prnt Scrn

Prt Scrn

Prt Scn

Prt Scr

Prt Sc

Pr Sc
7 Ways to Fix Print Screen Not Working in Windows 10
Before making any changes to your system, make sure to create a restore point . Just in case something goes wrong, you will be able to restore your system to an earlier configuration when everything was working correctly.
What To Do If Your Print Screen Key Does Not Work?
So if you’re not able to take screenshots in Windows 10 or the Print Screen key is not working then don’t worry as today we are going to see how to fix this issue. If the print screen doesn’t work then try Windows Key + PrtSc key and if this also doesn’t worry then don’t panic. So without wasting any time let’s see the resolve Print Screen not working issue with the help of the below-listed troubleshooting guide.
Note: First, try to use the print screen key again, simply press the Print Screen key (PrtSc) then open Paint and press Ctrl + V to paste the captures screenshot, does it work? If it didn’t then sometimes you need to use the function key in addition to the print screen key, so press Fn + PrtSc and see if this works. If it didn’t then continue with the below fixes.
Method 1: Update your keyboard driver
- Press Windows Key + R then type “ devmgmt.msc ” and hit Enter to open Device Manager.

- Expand Keyboard then right-click on Standard PS/2 Keyboard and select Update Driver.

- First, select Search automatically for updated driver software and wait for Windows to automatically install the latest driver.

Reboot your PC and see if you’re able to fix the issue, if not then continue.
Again go back to Device Manager and right-click on Standard PS/2 Keyboard and select Update Driver.
This time select “ Browse my computer for driver software. ”

- On the next screen click on “ Let me pick from a list of available drivers on my computer. ”

Select the latest drivers from the list and click Next.
Reboot your PC to save changes and see if you’re able to fix the Print Screen not working in Windows 10 issue, if not then continue with the next method.
Method 2: Disable the F Lock or F Mode
See if you have an F Mode key or an F Lock key on your keyboard. Because such keys will prevent you from taking screenshots, thus disabling the print screen key. So press the F Mode or F Lock key and again try to use the Print Screen Key.
Method 3: Make sure Windows is up to date
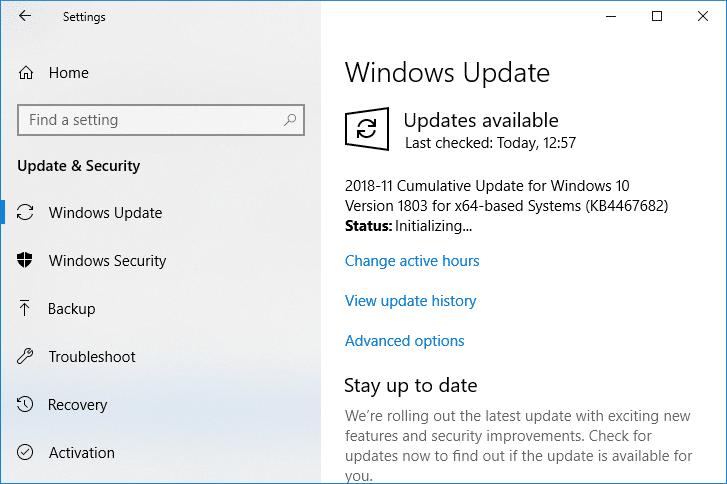
- Press Windows Key + I to open Settings then click on the Update & Security icon.
- Then under Update status click on “ Check for updates. ”

- If an update is found for your PC, install the update and reboot your PC.
Method 4: Stop Background programs
Press Ctrl + Shift + Esc key together to open Task Manager.
Find the following programs then right-click on each of them and select “ End Task “:
OneDrive Dropbox Snippet tool

- Once finished close Task Manager and check if you’re able to fix Print Screen not working issue.
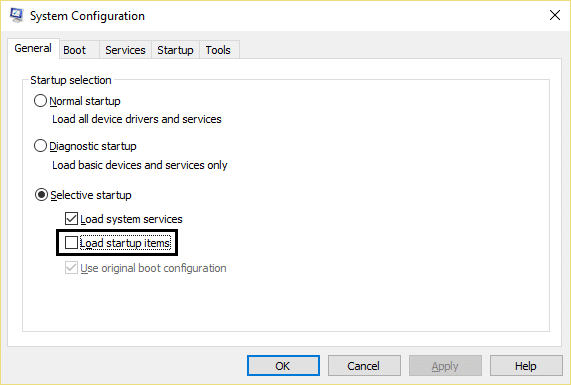
Method 5: Perform a Clean Boot
Sometimes 3rd party software can conflict with the keyboard and can cause the print screen key to not work correctly. In order to fix the issue , you need to perform a clean boot on your PC then try to use the Print Screen key to take a screenshot.
Method 6: Configure Alternate Hotkeys for the Print Screen key
Navigate to this website and download the ScreenPrint Platinum.
Install the program then open the ScreenPrint Platinum program.

- Now click on Setup from the ScreenPrint Platinum menu and select ScreenPrint.

- Click on the Hotkeys button at the bottom of the Configuration window.

- Next, checkmark “ Enable Hotkeys ” then under Global Capture Hotkey, select any character from the dropdown such as P.

Similarly, under Global Capture Hotkey checkmark Ctrl and Alt.
Finally, click the Save button and this will assign the Ctrl + Alt + P keys to substitute for the Print Screen key.
Press Ctrl + Alt + P keys together to capture the screenshot then paste it inside Paint.

Although it didn’t actually fix Print Screen not working issue, it’s a great alternative till you finally found a proper fix for it. But if you don’t want to use a third-party app then you could also use the Windows in-built Snipping Tool.
Method 7: Use the Snipping Tool
If you still failed to take a screenshot by pressing the Print Screen key then you should try to use Snipping Tool in Windows 10. In the Windows Search type snipping and click on the “ Snipping Tool ” from the search result.

This in-built tool in Windows provides a great way to take a screenshot of the portion of the currently active window or the whole screen.

Recommended:
- What is the Difference Between CC and BCC in an Email?
- Fix Cursor Jumps or moves randomly in Windows 10
- Set up Yahoo email account in Windows 10 Mail App
- How to Check Your CPU Temperature in Windows 10
That’s it you have successfully Fix Print Screen Not Working in Windows 10 Issue but if you still have any queries regarding this post then feel free to ask them in the comment section.
