Adobe’s wide range of multimedia and creativity applications has been the primary choice of the majority for the past several years. The most popular Adobe applications include Photoshop for photo editing and manipulation, Premiere Pro for editing videos, Illustrator to create vector graphics, Adobe Flash, etc. The Adobe suite contains more than 50 applications and has proven to be a one-stop solution for all creative minds with availability on both, macOS and Windows (a few of them are also available on mobile platforms), along with effortless integration between all the programs in the family. As of 2017, there were more than 12 million active Adobe Creative Cloud subscriptions. The number would be much higher if it wasn’t for application piracy.
Similar to any paid application, Adobe’s programs are also ripped off and used illegally around the globe. To put an end to the piracy of their programs, Adobe includes the Adobe Genuine Software Integrity service within its applications like Adobe Indesign like Adobe Indesign . The service periodically checks the validity of the installed Adobe application and if evidence regarding piracy, tampering with program files, illegal license/serial code is detected, the ‘Adobe Software you are using is not genuine’ message is pushed to the user and the company is informed about counterfeit copy underuse. The error message stays active in the foreground and thus, prevents the users from properly using the application. Apart from the counterfeit users, the error has also been encountered by many with the official copy of an Adobe program. Improper installation, corrupt system /service files, issues with Adobe updater files, etc. are the likely culprits for the error.
In this article, we have explained multiple methods to resolve the ‘ Adobe software you are using is not genuine ’ error and to get you back to creating a masterpiece.

- 4 Ways to Fix Adobe Software You Are Using Is Not Genuine Error
- Method 1: Terminate the Adobe Genuine Software Integrity Service
- Method 2: Delete Adobe Genuine Software Integrity Process and the AdobeGCIClient folder
- Method 3: Delete AAMUpdater service
- Method 4: Reinstall the Adobe Software
4 Ways to Fix Adobe Software You Are Using Is Not Genuine Error
The ‘Adobe software you are using is not genuine’ error is an easy one to fix. Firstly, users will need to ensure that the installed application is indeed genuine and they are not using a pirated copy of it. To determine the authenticity of the application, visit Adobe’s official website and enter the product/serial code. If the website reports the serial code to be invalid, immediately uninstall the application as it is not genuine. Another way is to check the source from which the installation file was downloaded. Genuine copies of Adobe programs are only available on their official website . So if you received your copy from a third-party website, chances are, it is pirated. Contact the reseller for more info.
If the Adobe application is genuine, users can try deleting the two likely culprit services, Adobe Genuine Software Integrity service, and Adobe Updater Startup Utility service, along with their executable files. Finally, if nothing works, users will need to re-install the faulty Adobe application altogether.
Method 1: Terminate the Adobe Genuine Software Integrity Service
As mentioned earlier, Adobe programs include the Genuine Software Integrity service which regularly checks the authenticity of the programs. Terminating all instances of the said service from the Task Manager will allow you to bypass the checkups and run the Adobe application without encountering the error. You can take this a step forward and also delete the folder containing the executable file of the Genuine Software Integrity process.
Right-click on the taskbar and select Task Manager from the ensuing options menu. You can also use the hotkey combination Ctrl + Shift + Esc to open the application.
Click on More Details to expand the Task Manager.

On the Processes tab, locate the Adobe Genuine Software Integrity process (If the processes are sorted alphabetically, the required process will be the very first one under Background Processes).
Before terminating the process, right-click on it and select Open File Location . Either note down the folder path (For most users- C:\Program Files (x86)\Common Files\Adobe\AdobeGCClient ) or leave the Explorer window open in the background.

- Press the alt + tab keys to switch back to the Task Manager window, select the process, and click on the End task button at the bottom-right corner.

- Delete the AdobeGCIClient folder opened in step 4 (You can also rename the folder instead of deleting it altogether). Restart the computer and check if the issue continues to prevail.

Method 2: Delete Adobe Genuine Software Integrity Process and the AdobeGCIClient folder
The above solution should have resolved the Not genuine error for most users although if it didn’t work for you, try deleting the service and the folder using an elevated Command Prompt window with administrative privileges. This method ensures the complete removal of the Adobe Genuine Software Integrity process.
- Type Command Prompt in the Search bar and select Run As Administrator from the right panel. Click on Yes in the User Account Control pop-up that arrives.

- To delete the service, carefully type sc delete AGSService and press enter to execute.

- Next, we will be deleting the folder, i.e, the AdobeGCIClient folder that contains the service file. The folder is located at ‘ C:\Program Files (x86)\Common Files\Adobe\AdobeGCClient ’. Head down the mentioned path, select the folder, and press the delete key.
Method 3: Delete AAMUpdater service
Along with the Genuine Software Integrity service, an update service known as ‘ Adobe Updater Startup Utility ’ also automatically initiates when the users boot on their computers. As obvious, the service checks for any new available software updates, downloads and installs them automatically. A corrupt/broken AAMUpdater service can prompt the Not genuine error. To fix it, simply delete the service files and also remove them from the Task Scheduler application.
- Open Windows File Explorer by double-clicking on its shortcut icon and head down the following path C:\Program Files (x86)\Common Files\Adobe\OOBE\PDApp\UWA . Delete the UWA folder .

- Again launch Command Prompt window as an Administrator .
- Execute the sc delete AAMUpdater command.

- As mentioned earlier, we should also be deleting the AAMUpdater task from Task Scheduler. Simply search for Task Scheduler in the Start Menu and hit enter to open.

- Expand the Active Tasks list and locate the AdobeAAMUpdater task. Once found, double-click on it.

- On the right-panel, click on the Delete option under the Selected item. Confirm any pop-ups that may arrive.

Method 4: Reinstall the Adobe Software
Ultimately, if the Genuine Integrity service and the Updater Utility aren’t at fault, then it must be the application itself. The only workaround now is to remove the installed copy and replace it with a new, bug-free version. To uninstall the Adobe program:
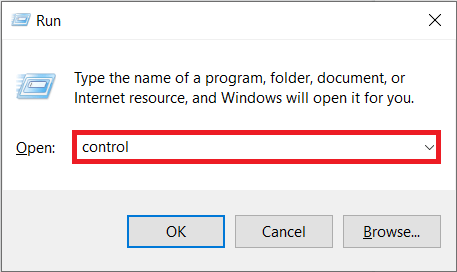
- Press Windows Key + R to open the Run command box. Type Control or Control Panel press enter to open the application.
- Click on the Programs and Features item.

- Locate the faulty/pirated Adobe program, right-click on it, and select Uninstall .

In the following pop-up, click on Yes to confirm your action.
Another pop-up inquiring if you would like to keep the application preferences/settings or remove them as well will appear. Choose the appropriate option and click on Uninstall .
Once the uninstallation process is complete, launch your preferred web browser and visit https://www.adobe.com/in/ . Download the installation files for the programs you need and follow the on-screen instructions to install them. Hopefully, the software not genuine error won’t appear anymore.
Recommended:
- How to Unblock Adobe Flash Player in Google Chrome
- How to Disable Adobe AcroTray.exe at Startup
- Fix USB OTG Not Working On Android Devices
- How To Clear Print Queue In Windows 10?
So those were a few ways users can implement to resolve the ‘ Adobe software you are using is not genuine ’ error. Let us know if there are any more solutions we missed out on and which one worked for you. Also, always purchase the official versions of the applications to support the developers and reap all the (security and feature) benefits without having to worry about fraud that can be carried out through pirated software copies.
If you’re facing issues in printing your PDF files on Adobe Reader then don’t worry as the problem can be easily solved by updating printer’s driver, setting your printer as the default printer, etc. But before continuing you should try to print another PDF file and if you’re able to print successfully then the PDF file you were earlier trying to print was corrupted. But if you still can’t print pdf files from adobe reader then continue with the advanced troubleshooting guide.
- Fix Can’t Print PDF Files from Adobe Reader
- Method 1: Miscellaneous Fixes
- Method 2: Update Printers driver
- Method 3: Set your Printer as the Default Printer
- Method 4: Try to print PDF as an image
- Method 5: Save another copy of the PDF file
- Method 6: Reinstall your Printer Drivers
- Method 7: Re-install Acrobat Reader
Fix Can’t Print PDF Files from Adobe Reader
Make sure to create a restore point just in case something goes wrong.
Method 1: Miscellaneous Fixes
1.Try to print the webpage you’re currently on, press Ctrl + P and print the document and see if you’re able to.

2.Instead of PDF file try to print a text or images file , if you’re are able to print then the problem is with Adobe Reader and updating it might fix the issue.

3.Power Cycle the Printer:
- Restart your PC and power off the Printer then disconnect it from the PC.
- Don’t start the Printer, just press and hold the power button of the printer for 10 seconds.
- Now connect the printer to the PC then power ON the PC and once the system starts, you can power ON your printer.
Method 2: Update Printers driver
To update the printer driver follow these steps.
1.Press Windows key + X then select Device Manager.

2.Expand Print queues then select the printer for which you want to update the drivers.
3.Right-click on the selected Printer and select Update driver.

4.Select Search automatically for updated driver software.

5.Windows will automatically install the latest drivers available for your printer.

Manually Install the Latest Printer Drivers
1.Press Windows Key + R then type “ services.msc ” and hit enter.

2.Find Print Spooler service then right-click on it and select Stop.

3.Again press Windows Key + R then type printui.exe /s /t2 and hit enter.
4.In the Printer Server Properties window search for the printer that is causing this issue, select it and then click on the Remove button.
5.Next, remove the printer and when asked for confirmation to remove the driver as well, select yes.

6.Now again go to services.msc and right-click on Print Spooler and select Start.

7.Next, navigate to your printer manufacturer’s website like HP , Dell , Canon , download and install the latest printer drivers from the website.
For example , in case you have an HP printer then you need to visit HP Software and Drivers Downloads page . Where you can easily download the latest drivers for your HP printer.
8.If you’re still not able to fix slow network printing error or can’t Print PDF Files from Adobe Reader then you can use the printer software that came with your printer. Usually, these utilities can detect the printer on the network and fix any issues that are causing the printer to appear offline.
For example, you can use HP Print and Scan Doctor to fix any issues regarding HP Printer.
Method 3: Set your Printer as the Default Printer
1.Press Windows Key + R then type control and hit Enter to open Control Panel.
2.From the Control Panel click on Hardware and Sound.

3.Next, click on Device and Printers.

- Right-click on your Printer and select Set as default printer.

5.Restart your PC to save changes.
Method 4: Try to print PDF as an image
1.First, open your PDF file in Acrobat Reader.

2.Now from the Adobe Reader toolbar click on the print icon or press Ctrl + P.
3.From the print window, click on the Advanced button.
4.In the Advanced Print Setup window checkmark “ Print As Image ” and click OK.
<img loading=“lazy” src=“https://techcult.com/wp-content/uploads/2019/10/From-the-print-window-click-on-the-Advanced-button.png" onerror=“this.onerror=null;this.src=‘https://blogger.googleusercontent.com/img/a/AVvXsEhe7F7TRXHtjiKvHb5vS7DmnxvpHiDyoYyYvm1nHB3Qp2_w3BnM6A2eq4v7FYxCC9bfZt3a9vIMtAYEKUiaDQbHMg-ViyGmRIj39MLp0bGFfgfYw1Dc9q_H-T0wiTm3l0Uq42dETrN9eC8aGJ9_IORZsxST1AcLR7np1koOfcc7tnHa4S8Mwz_xD9d0=s16000';" alt=“In the Advanced Print Setup window checkmark “Print As Image” and click OK - 33”>
5.Next, click the Print button and see if you’re able to print the PDF file as an image.

Method 5: Save another copy of the PDF file
1.Open the PDF file in Acrobat Reader then press Shift + Ctrl + S to open Save As dialog box.

Note: From the Acrobat Reader menu click on File and select Save As.
2.Navigate to where you want to save the file, type a new name and click Save.

3.Now try to print this newly created PDF and see if you’re able to Fix Can’t Print PDF Files from Adobe Reader.
Method 6: Reinstall your Printer Drivers
1.Press Windows Key + R then type control printers and hit Enter to open Devices and Printers.

- Right-click on your printer and select “ Remove device ” from the context menu.

3.When the confirm dialog box appears , click Yes.

4.After the device is successfully removed, download the latest drivers from your printer manufacturer website .
5.Then reboot your PC and once the system restarts, press Windows Key + R then type control printers and hit Enter.
Note: Make sure your printer is connected to the PC via USB, ethernet or wirelessly.
6.Click on the “ Add a printer ” button under Device and Printers window.

7.Windows will automatically detect the printer, select your printer and click Next.

- Set your printer as default and click Finish.

This is how you can update the driver and after this, you can try to print the documents once again.
Method 7: Re-install Acrobat Reader
1.Press Windows Key + I to open Settings then click on Apps.

2.From the left hand make sure to select Apps & features.
3.Now from the “ Search this list ” box type Acrobat in it.

4.Click on Adobe Acrobat Reader DC then click on the Uninstall button under it.

5.Now download the latest version Adobe Acrobat Reader from the official website .
6.Install the latest version of Acrobat Reader on your PC and Reboot your PC.
7.Again try to print the PDF file and this time you will be able to print it without any issues.
Recommended:
- Fix Windows Media Player Server Execution Failed Error
- 3 Ways to Delete Files Protected by TrustedInstaller
- How to Connect a Bluetooth Device on Windows 10
- How to Format Hard Drive on Windows 10
I hope the above steps were able to help you Fix Can’t Print PDF Files from Adobe Reader but if you still have any queries regarding this guide then feel free to ask them in the comment’s section.
Are you in dire need of printing a document but can’t do so because of a stuck print job in Windows 10? Here are some ways to clear the print queue in Windows 10 easily.
Printers may appear easy to use but can be very flimsy at times. Handling print Queue when you urgently want to use a printer can be quite frustrating. The print queue not only prevents the present document but all future documents from printing. The problem is not hard to detect either. If the message ‘Printing’ remains indefinitely even though the paper is not stuck and the ink is right, then certainly there is a Print queue issue. There are certain ways that can be used to clear the print queue in Windows 10 .

- Why does a print job gets stuck in Windows 10?
- How To Clear Print Queue In Windows 10?
- Method 1: Manually Clearing and Restarting the Print Spooler
- Method 2: Clear Print Queue using a Batch File for the Print Spooler
- Method 3: Clear Print Queue Using Command Prompt
- Method 4: Use the Management Console
Why does a print job gets stuck in Windows 10?
The answer lies in the fact that the printing document isn’t directly sent for printing. The document is first received at the spooler , i.e., a program used to manage and queue the print jobs. This spooler is particularly helpful while rearranging the order of print jobs or deleting them entirely. A stuck print job prevents the documents in the queue from printing, which affects all the documents further down the queue.
Often you can solve the error by deleting the print job from the queue. To delete a stuck print job in Windows 10, go to ‘Printers’ in the setting and click on ‘ Open Queue .’ Cancel the print job causing a problem, and you are good to go. If you can’t delete a particular print job, then try deleting the entire print queue. If this doesn’t work either, then try restarting all your devices. Unplug all your connections and plug them to reboot your device completely. This is the first approach that you should have for a stuck print job. If these traditional methods don’t work, then here are some other detailed methods for clearing a print job in Windows 10.
How To Clear Print Queue In Windows 10?
There are a few methods that can be employed to clear a print job in Windows 10. Clearing and restarting the Print Spooler is one of the best methods to use for fixing the stuck print job. It doesn’t delete your documents but creates an illusion that the documents are being sent for the first time to the printer. The process is done by stopping the Print Spooler until you clear the entire temporary cache used by the spooler and then starting it again. This can be accomplished by using a manual method or by making a batch file.
Method 1: Manually Clearing and Restarting the Print Spooler
- Type ‘ Services .’ in the Windows search bar and open the ‘ Services ’ app.

- Find ‘ Print Spooler ’ in the menu and double-click to open the Properties .

- Click on ‘ Stop ’ in the Properties tab and minimize the window to use it again later.

- Open ‘ File Explorer ’ and go to the below address location:
C:\Windows\System 32\spool\PRINTERS

You may be asked for permission to access the location. Click on ‘ Continue ’ to move forward.
Once you reach the destination, select all the files and press Delete on your keyboard.
Now go back to the Spooler properties window and click on ‘ Start .’

Click on ‘ Ok ’ and close the ‘ Services ’ app.
This will restart the spooler, and all the documents would be sent to the printer for printing.
Method 2: Clear Print Queue using a Batch File for the Print Spooler
Creating a batch file is a viable option if your print jobs frequently get stuck. Using the Services app every now and then can be a hassle that can be solved by a batch file.
Open a text editor like Notepad on your computer.
Paste the commands below as separate lines.
Net stop spooler

Del/Q/F/S “%windir%\System32\spool\PRINTERS\*.*”

Net start spooler

- Click on ‘ File ’ and choose ‘ Save as .’ Name the file with the extension ‘ .bat ’ at the end and choose ‘ All files (.) ’ in the ‘ Save as type ’ menu. Click on Save , and you are good to go.

- Simply double-click on the batch file, and the work will be done . You can place it at the most accessible place on your desktop for easy access.
Method 3: Clear Print Queue Using Command Prompt
You can delete a stuck print job in Windows 10 by using Command Prompt as well. Using the method will stop and start the print spooler again.
- Type ‘ cmd ’ in the search bar. Right-click on the ‘ Command Prompt ’ app and choose the run as administrator option.

- Type the command ‘net stop spooler ’, which will stop the spooler.

- Again type the following command and hit Enter:
Del %systemroot%\system32\spool\printers\*/Q
This will do the same task as the methods above.
Start the spooler again by typing the command ‘ net start spooler ’ and press enter .
Method 4: Use the Management Console
You can use the service.msc, shortcut in the management console to clear the print queue in Windows 10. This method will stop the spooler and clear it to delete a stuck print job:
Press the Windows Key + R key together to open the run window.
Type ‘ Services.msc ’ and hit Enter .
Note: You can also access the ‘ Services ’ window via Windows Management. Right-click the Windows icon and choose Computer Management. Choose Services and Application then double-click on Services.

- In the Services window, right-click on Print Spooler and select Properties.

- Click on the ‘ Stop ’ button to stop the Print Spooler service.

Minimize the window and open file explorer. Type the address ‘C:\ Windows\ System32\ Spool\ Printers’ or navigate to the address manually.
Select all the files in the folder and delete them. They were the files that were in the print queue at the instance.
Go back to the Services window and click on the ‘ Start ’ button.

Recommended:
- Fix Common Printer Problems in Windows 10
- Fix Printer Driver is unavailable on Windows 10
- How To Lock Or Unlock Cells In Excel?
- How to Fix Whatsapp Images Not Showing In Gallery
We hope the above guide was helpful and you were able to successfully clear the print queue in Windows 10. If you’re still stuck, then there may be compatibility issues with the printer and the data to be printed. Outdated printer drivers can also be an issue. You can also run the Windows Printer Troubleshooter to identify the correct problem. It will help you fix the errors in the print jobs . Follow the methods above to delete a stuck print job and clear the print queue in Windows 10, and you shouldn’t have any problems.
