Fix Cursor Jumps or moves randomly: Many users encounter the issue in the mouse after updating their Windows OS, where the mouse cursor jumps randomly or keeps moving automatically at times. This seems as if the mouse is moving on its own without you controlling the mouse. This horizontal or vertical movement of the mouse automatically annoys the users but there are approaches that can be used to solve this problem. In this article, you will learn about the different approach to solve this issue.

- Fix Cursor Jumps or moves randomly in Windows 10
- Method 1: Checking the hardware of your Mouse
- Method 2: Change Touchpad Delay
- Method 3: Disable the Touchpad
- Method 4: Update your Mouse Drivers
- Method 5: Run Hardware and Devices Troubleshooter
- Method 6: Scan your PC with Anti-Malware
- Method 7: Changing the Mouse Sensitivity
- Method 8: Disable Realtek HD Audio Manager
- Method 9: Update Your Windows
Fix Cursor Jumps or moves randomly in Windows 10
Make sure to create a restore point just in case something goes wrong.
Method 1: Checking the hardware of your Mouse
Before doing any technical tweaks to your system, let us first check whether the hardware i.e. the mouse is working as expected or not. To do this, plug out your mouse & put it into another system & try to check whether the mouse is working fine or not. Also, make sure whether there is any damage to the USB ports or not; buttons of the mouse as well as the wires are intact & working perfectly or not.
Method 2: Change Touchpad Delay
In case you are using a laptop, the touchpad needs a thorough check. As your laptop touchpad, as well as an external mouse, is acting as the pointing device for your system, it may happen that the touchpad may cause the issue. You can try to alter the touchpad delay prior to the working of a mouse click in order to Fix Cursor Jumps or moves randomly in Windows 10. To do this, the steps are –
1.Use the key combination Windows Key + I to open the Settings window.
2.Now choose “ Devices ” from the settings window.

3.From the left-hand window pane select Touchpad.
4.Now alter the Delay or Touchpad sensitivity from the options.

Method 3: Disable the Touchpad
In order to check if the problem lies in your mouse or not, you have to disable your laptop’s touchpad & check whether the issue still remains or not? If the issue remains, you can simply turn the touchpad back on. To do this the steps are –
1.Press Windows Key + I to open Settings then click on Devices.

2.Select Mouse from the left-hand menu & then click on Additional mouse options.

3.Now switch to the last tab in the Mouse Properties window and the name of this tab depends on the manufacturer such as Device Settings, Synaptics, or ELAN etc.


4.Next, select your device then click “ Disable. “
5.Reboot your PC to save changes.
6.After the reboot, confirm whether your mouse moving on its own issue is fixed or not. If it does, enable back your touchpad again. If not, then there was a problem with your touchpad settings.
OR
1.Press Windows Key + I to open Settings then click on Devices.
2.From the left-hand menu select Touchpad.
3.Under Touchpad uncheck “ Leave touchpad on when a mouse is connected “.

4.Reboot your PC to save changes.
Method 4: Update your Mouse Drivers
The problem may because of your outdated or corrupted driver. So, this approach can also help you Fix Cursor Jumps or moves randomly in Windows 10:
1.Press Windows Key + R then type devmgmt.msc and hit Enter to open Device Manager.

2.Expand “ Mice and other pointing devices ” and right-click on your device and choose “ Update Driver ”.

3.Then choose the option “ Search automatically for updated driver software ” which will search on the internet for the updated driver automatically.

4.If this search fails, you can manually go to the website of your device manufacturer and manually download the updated Mouse driver.
OR
1.Press Windows Key + X then select Device Manager.

2.Expand Mice and other pointing devices.
3.Right-click on your device and select Properties.

4.Switch to Driver tab and click on Update Driver.

5.Now select Browse my computer for driver software.

6.Next, select Let me pick from a list of device drivers on my computer.

7.Select the HID-compliant device from the list and click Next.

8.After the driver is installed restart your PC to save changes.
Method 5: Run Hardware and Devices Troubleshooter
1.Go to Start and type “ Control Panel ” and click to open it.

2.From the top right, select View By as “ Large Icons ” & then click on “ Troubleshooting ”.

3.Next, from the left-hand window pane click on “ View All ”.

4.Now from the list which opens choose “ Hardware and Devices ”.

5.Follow on-screen instructions to run the Hardware and Devices troubleshooter.

6.If any hardware issues are found, then save all of your work and click “ Apply this fix ” option.

See if you’re able to fix Cursor Jumps or moves randomly issue or not, if not then continue with the next method.
Method 6: Scan your PC with Anti-Malware
Malware can cause tremendous trouble in various services and programs including the mouse. The possibilities of creating issues by malware are endless. So, it is recommended to download and install applications like Malwarebytes or other anti-malware applications to scan for malware in your system. This may fix the mouse moving on its own, cursor jumps or random mouse movement issue.
1.Download and install CCleaner & Malwarebytes.
- Run Malwarebytes and let it scan your system for harmful files.

3.If malware is found it will automatically remove them.
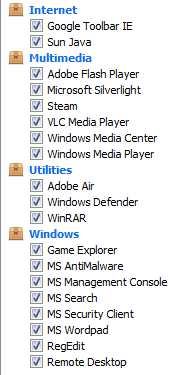
4.Now run CCleaner and in the “Cleaner” section, under the Windows tab, we suggest checking the following selections to be cleaned:
5.Once you’ve made certain the proper points are checked, simply click Run Cleaner, and let CCleaner run its course.
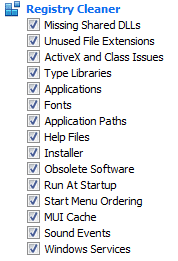
6.To clean your system further select the Registry tab and ensure the following are checked:
7.Select Scan for Issue and allow CCleaner to scan, then click Fix Selected Issues.
8.When CCleaner asks “ Do you want backup changes to the registry? ” select Yes.
9.Once your backup has completed, select Fix All Selected Issues.
10.Restart your PC to save changes.
Method 7: Changing the Mouse Sensitivity
1.Press Windows Key + I to open Settings then click on Devices.
2.Now from the left hand window pane select Mouse.
3.Next, click on “ Additional Mouse Options ” from the rightmost part of the Mouse settings window.
4.This will open Mouse Properties window, here switch to “ Pointer Options ” tab.
5.Under the motion section, you will see a slider. You have to move the slider from high to moderate to low and check if the issue is getting resolved or not.

6.Click Apply followed by OK to save the changes.
Method 8: Disable Realtek HD Audio Manager
Realtek HD Audio Manager deals with your system audio and is responsible to make the PC sound work. But this utility program is also popular for interfering with other drivers of your system. So, you need to disable it in order to Fix Cursor Jumps or moves randomly in Windows 10 issue .
1.Press Ctrl+Shift+Esc key combination together to open Task Manager.
2.Now switch to Startup tab and select Realtek HD Audio Manager then click on Disabl e button.

3.This will disable Realtek HD Audio Manager from automatically launching when the system starts.
Method 9: Update Your Windows
1.Press Windows Key + I to open Settings then click on Update & Security icon.
2.Then under Update status click on “ Check for updates. “

3.If an update is found for your PC, install the update and reboot your PC.
Recommended:
- Kill Resource Intensive Processes with Windows Task Manager (GUIDE)
- Install Group Policy Editor (gpedit.msc) on Windows 10 Home
- What is the Difference Between CC and BCC in an Email?
- Print Spooler Keeps Stopping? Here is how to fix it!
I hope this article was helpful and now you can easily Fix Cursor Jumps or moves randomly in Windows 10 , but if you still have any questions regarding this tutorial then feel free to ask them in the comment’s section.
If you’re facing the error message “ The print spooler service is not running ” when you try to print a document or any file then don’t worry as we are going to see how to fix print spooler keeps stopping on Windows 10 issue . After facing this error, you may try to start the print spooler service but you will notice that it is automatically stopped after a few seconds. It seems like the print spooler service keeps crashing on Windows 10. But before going to fix the issue lets us see what this Print spooler actually is?

What is Print Spooler?
Print spooler is a utility program that comes with the Windows operating system which helps in managing all the print jobs users sent to their printer. The print spooler helps your Windows to interact with the printer, and orders the print jobs in your queue. If the print spooler service isn’t running, your printer won’t work.

Now you might be wondering what is the cause behind this error? Well, there can be many reasons why you’re facing this issue but the main cause seems to be the outdated, incompatible printer drivers. Normally if the print spooler service stops working, it will not pop-up or show any error or warning message. But in this case, you will receive an error message pop-up, so without wasting any time let’s see How to Fix Print Spooler Keeps Stopping Automatically with the help of the below-listed troubleshooting guide.
- Fix Print Spooler Keeps Stopping on Windows 10
- Method 1: Delete content from the Spool folder
- Method 2: Restart your Print Spooler service
- Method 3: Set Print Spooler Service to Automatic
- Method 4: Change the Print Spooler Recovery Options
- Method 5: Update your Printer driver
- Method 6: Take Ownership of spoolsv.exe
- Method 7: Delete unnecessary key from Registry
- Method 8: Reinstall your Printer Drivers
- Method 9: Scan your PC with Anti-Malware
Fix Print Spooler Keeps Stopping on Windows 10
Make sure to create a restore point just in case something goes wrong.
Method 1: Delete content from the Spool folder
Using this approach, you have to delete all the content inside the PRINTERS and drivers folder. This method works for all Windows OS right from Windows 10 till Windows XP. To solve using this approach, the steps are:
1.Open the File Explorer then navigate to the following path: C:\Windows\System32\spool
2.Double-click on “ drivers ” folder then delete all files & folders under it.

3.Similarly, you have to delete all contents from the PRINTERS folder and then restart the “ Print Spooler ” service.
4.Then reboot your system to save changes.
Method 2: Restart your Print Spooler service
In this approach, you have to restart your Print Spooler Services. To do this the steps are –
1.Press Windows Key + R then type “ services.msc ” (without quotes) and hit Enter to open the Services window.

2.Scroll down & look for Print Spooler service and then select it.

3.Right-click on Print Spooler service then select Restart.
4.Now check whether the printer is working or not. If your printer is working then this means you were able to Fix Print Spooler Keeps Stopping on Windows 10 issue.
Method 3: Set Print Spooler Service to Automatic
1.Use the keyboard shortcut key combination Windows key + R to open the Run application.
2.Type “ services.msc ” and hit Enter to open the Services window.

- Right-click Print Spooler & choose the Properties.

4.Change the “ Startup type ” to ‘ Automatic ’ from the drop-down list & then click Apply > OK.

See if you’re able to Fix Print Spooler Keeps Stopping on Windows 10 issue, if not then continue to the next method.
Method 4: Change the Print Spooler Recovery Options
In case the Print Spooler recovery settings are not configured properly, then in case of any failure, the print spooler will not restart automatically. To recover that the steps are –
1.Press Windows Key + R then type service.msc and hit Enter.
2.Right-click Print Spooler & select Properties.
3.Switch to the Recovery tab then make sure the First failure, Second failure, & Subsequent failures are set to “ Restart the Service ” from their respective drop-downs.

4.Then, click Apply followed by OK.
Method 5: Update your Printer driver
1.Press Windows Key + R then type “ services.msc ” and hit enter.
2.Find Print Spooler service then right-click on it and select Stop.

3.Again press Windows Key + R then type printui.exe /s /t2 and hit enter.
4.In the Printer Server Properties window search for the printer which is causing this issue.
5.Next, remove the printer, and when asked for confirmation to remove the driver as well, select yes.

6.Now again go to services.msc and right-click on Print Spooler and select Start.

7.Next, navigate to your printer manufacturer website, download and install the latest printer drivers from the website.
For example , in case you have an HP printer then you need to visit HP Software and Drivers Downloads page . Where you can easily download the latest drivers for your HP printer.
8.If you’re still not able to fix Print Spooler Keeps Stopping issue then you can use the printer software that came with your printer. Usually, these utilities can detect the printer on the network and fix any issues that are causing the printer to appear offline.
For example, you can use HP Print and Scan Doctor to fix any issues regarding HP Printer.
Method 6: Take Ownership of spoolsv.exe
1.Open the File Explorer then navigate to this path: C:\Windows\System32
2.Next, find ‘ spoolsv.exe ’ then right-click on it and select Properties.

3.Switch to the “ Security ” tab.
4.Now under Group and user names choose your user account & then click on the “ Advanced ” button.

5.Now click on “ Change ” next to the current Owner .

6.Now from the “ Select User or Group ” window click on the Advanced button at the bottom.

7.Next, click on Find Now then select your user account then click OK.

8.Again click OK on the next window.

9.You will be again on the Advanced Security Settings window of spoolsv.exe , just click Apply followed by OK.

10.Now under spoolsv.exe Properties window , select your user account (which you selected in step 7) then click on the Edit button.

11.Checkmark “ Full control ” then click Apply followed by OK.

- Restart Print Spooler service (Run > services.msc > Print Spooler).
13.Reboot your system to apply changes and see if you’re able to Fix Print Spooler Keeps Stopping on Windows 10 issue .
Method 7: Delete unnecessary key from Registry
Note: Make sure to back up your Registry just in case something goes wrong then you can easily restore the registry using this backup.
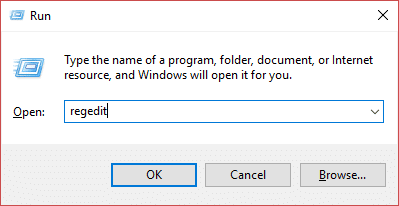
1.Press Windows Key + R then type regedit and hit Enter to open Registry Editor.
2.Now navigate to the following registry key:
HKEY_LOCAL_MACHINE\SYSTEM\CurrentControlSet\Control\Print\Providers
3.Under Providers you will find two default sub-keys which are LanMan Print Services and Internet Print Provider.

4.Above two sub-keys are the default and should not be deleted.
5.Now apart from the above sub-keys delete any other key present under Providers.
6.In our case, there is an additional subkey which is Printing Services.
7.Right-click on Printing Services then select Delete.

8.Close Registry Editor & Restart Print Spooler service.
Method 8: Reinstall your Printer Drivers
1.Press Windows Key + R then type control printers and hit Enter to open Devices and Printers.

- Right-click on your printer and select “ Remove device ” from the context menu.

3.When the confirm dialog box appears , click Yes.

4.After the device is successfully removed, download the latest drivers from your printer manufacturer’s website .
5.Then reboot your PC and once the system restarts, press Windows Key + R then type control printers and hit Enter.
Note: Make sure your printer is connected to the PC via USB, Ethernet, or wirelessly.
6.Click on the “ Add a printer ” button under the Device and Printers window.

7.Windows will automatically detect the printer, select your printer and click Next.

- Set your printer as default and click Finish.

Method 9: Scan your PC with Anti-Malware
Malware can cause tremendous trouble in printing services. It can corrupt system files or may change any values in the registry. The possibilities of creating issues by malware are endless. So, it is recommended to download and install applications like Malwarebytes or other anti-malware applications to scan for malware in your system. Scanning your PC for malware may fix the Print Spooler stopping issue.
1.Download and install CCleaner & Malwarebytes.
- Run Malwarebytes and let it scan your system for harmful files.
3.If malware is found it will automatically remove them.
4.Now run CCleaner and in the “Cleaner” section, under the Windows tab, we suggest checking the following selections to be cleaned:
5.Once you’ve made certain the proper points are checked, simply click Run Cleaner, and let CCleaner run its course.
6.To clean your system further select the Registry tab and ensure the following are checked:
7.Select Scan for Issue and allow CCleaner to scan, then click Fix Selected Issues.
8.When CCleaner asks “ Do you want backup changes to the registry? ” select Yes.
9.Once your backup has completed, select Fix All Selected Issues.
10.Restart your PC to save changes.
Recommended:
- Kill Resource Intensive Processes with Windows Task Manager (GUIDE)
- Clear Clipboard using Command Prompt or Shortcut
- What is a VPN and how it works?
- Install Group Policy Editor (gpedit.msc) on Windows 10 Home
I hope this article was helpful and now you can easily Fix Print Spooler Keeps Stopping on Windows 10 , but if you still have any questions regarding this tutorial then feel free to ask them in the comment section.
