If you’re facing Blue Screen of Death error message “ Faulty hardware corrupted page ” on Windows 10 then don’t panic because today we are going to see how to fix this issue with this guide. When you see this BSOD error message then you don’t have any choice but to restart your PC, where sometimes you are able to boot to Windows, sometimes you don’t. The full error message which you see on the BSOD screen is:
Your PC ran into a problem and needs to restart. We’re just collecting some error info, and then we’ll restart for you. (0% complete) FAULTY_HARDWARE-CORRUPTED_PAGE
Cause of Faulty Hardware corrupted page error?
Well, there can be many reasons as to why you’re facing this issue such as recent hardware or software installation might be causing this issue, virus or malware infection, corrupt system files, outdated, corrupted, or incompatible drivers, Windows registry corruption, faulty RAM or bad hard disk, etc.

As you can see, this error can occur because of a variety of issues, so you are advised to try to follow each method listed below. Each user has a different set of PC configuration and environment, so what may work for one user might not necessarily work for another, so try each of the listed methods. Anyway, without wasting any time let’s see how to fix Faulty Hardware corrupted page BSOD error.
- Fix Faulty Hardware corrupted page error on Windows 10
- Method 1: Update Unknown Drivers in Device Manager
- Method 2: Disable Fast Startup
- Method 3: Test RAM for Bad Memory
- Method 4: Make sure Windows is up to date
- Method 5: Reinstall the problematic driver
- Method 6: Update BIOS
- Method 7: Run Driver Verifier
- Method 8: Update Intel Management Engine Interface (IMEI)
- Method 9: Reset Windows 10
Fix Faulty Hardware corrupted page error on Windows 10
Make sure to create a restore point just in case something goes wrong.
Note: If you have recently installed new hardware or software, then the problem may be caused because of that, so it is advised you remove that hardware or uninstall the software from your PC and see if this fixes the issue.
Method 1: Update Unknown Drivers in Device Manager
The most common problem a Windows user faces is unable to find the right drivers for unknown devices in Device Manager. We all have been there and we know how frustrating it can get dealing with unknown devices, so go to this post to find drivers for unknown devices in Device Manager .

Method 2: Disable Fast Startup
The fast startup combines features of both Cold or full shutdown and Hibernates . When you shut down your PC with a fast startup feature enabled, it closes all the programs and applications running on your PC and also logged out all the users. It acts as a freshly booted Windows. But Windows kernel is loaded and system session is running which alerts device drivers to prepare for hibernation i.e. saves all current applications and programs running on your PC before closing them.

So now you know that Fast Startup is an essential feature of Windows as it saves the data when you shut down your PC and start Windows faster. But this could be also one of the reasons why you’re facing the fatal device hardware error or faulty corrupted page error. Many users reported that disabling the Fast Startup feature has solved this issue on their PC.
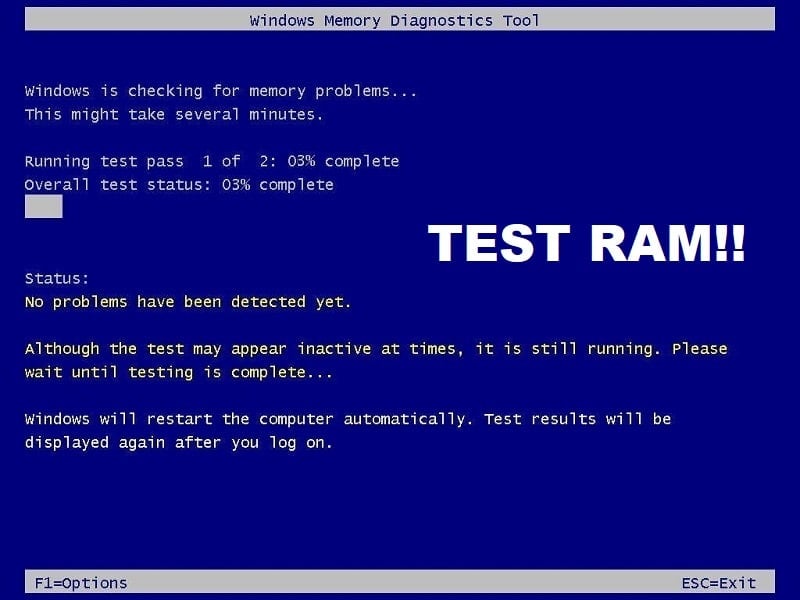
Method 3: Test RAM for Bad Memory
Are you experiencing a problem with your PC, especially th e Faulty Hardware corrupted page error? There is a chance that RAM is causing a problem for your PC. Random Access Memory (RAM) is one of the most essential components of your PC therefore whenever you experience some problems in your PC, you should test your Computer’s RAM for bad memory in Windows . If bad memory sectors are found in your RAM then in order to Fix Faulty Hardware corrupted page error on Windows 10 , you will need to replace your RAM.
Method 4: Make sure Windows is up to date
1.Press Windows Key + I to open Settings then click on Update & Security.
2.From the left-hand side, menu click on Windows Update.
3.Now click on the “ Check for updates ” button to check for any available updates.

4.If any updates are pending then click on Download & Install updates.
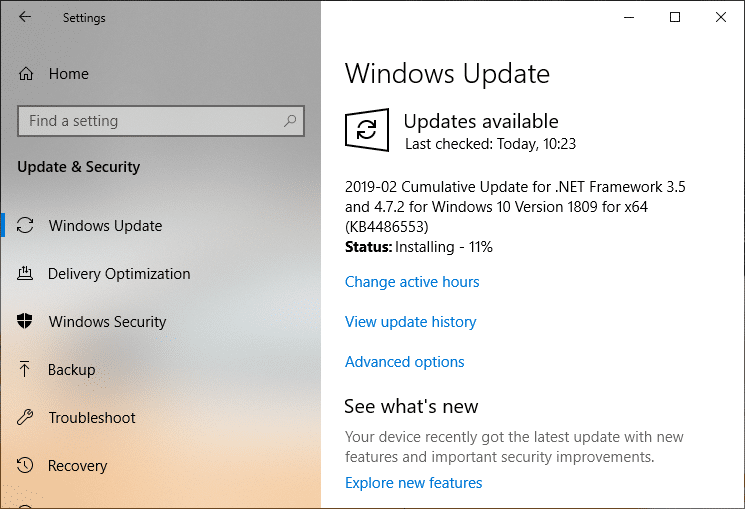
Once the updates are downloaded, install them and your Windows will become up-to-date.
Method 5: Reinstall the problematic driver
1.Press Windows Key + R then type devmgmt.msc and hit Enter to open Device Manager.
2.Expand Display adapters and then right-click on your NVIDIA graphic card and select Uninstall.
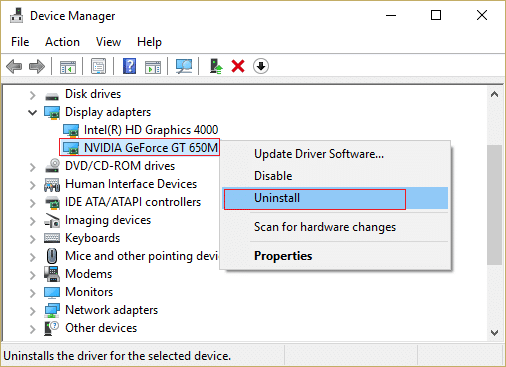
2.If asked for confirmation select Yes.
3.Reboot your PC to save changes.
If you’re still facing the Faulty Hardware corrupted page error then Update Device Drivers on Windows 10 .
Method 6: Update BIOS
BIOS stands for Basic Input and Output System and it is a piece of software present inside a small memory chip on the PC’s motherboard which initializes all the other devices on your PC, like the CPU, GPU, etc. It acts as an interface between the computer’s hardware and its operating system such as Windows 10.

It is recommended to update BIOS as a part of your scheduled update cycle as the update contains feature enhancements or changes that will help to keep your current system software compatible with other system modules as well as provide security updates and increased stability. BIOS updates cannot take place automatically. And if your system has outdated BIOS then it can lead to Faulty Hardware corrupted page error on Windows 10. So it is advised to update BIOS in order to fix the issue.
Note: Performing BIOS update is a critical task and if something goes wrong it can seriously damage your system, therefore, expert supervision is recommended.
Method 7: Run Driver Verifier
This method is only useful if you can log into your Windows normally not in the safe mode. Next, make sure to create a System Restore point . Run Driver Verifier in order Fix Faulty Hardware corrupted page error on Windows 10. This would eliminate any conflicting driver issues due to which this error can occur.

Method 8: Update Intel Management Engine Interface (IMEI)
1.Go to Intel website and download Intel Management Engine Interface (IMEI) .

2.Double-click on the downloaded .exe and follow on-screen instructions to install the drivers.
3.Reboot your PC to save changes.
Method 9: Reset Windows 10
Note: If you can’t access your PC then restart your PC a few times until you start Automatic Repair. Then navigate to Troubleshoot > Reset this PC > Remove everything.
1.Press Windows Key + I to open Settings then click on Update & Security icon.
2.From the left-hand menu select Recovery.
3.Under Reset this PC click on the “ Get Started ” button.

4.Select the option to Keep my files .

5.For the next step you might be asked to insert Windows 10 installation media, so ensure you have it ready.
6.Now, select your version of Windows and click on only the drive where Windows is installed > Just remove my files.
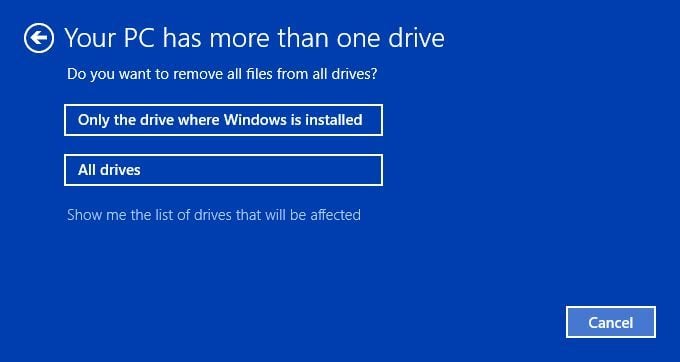
5.Click on the Reset button.
6.Follow the instructions on the screen to complete the reset.
Recommended:
- How to install Internet Explorer on Windows 10
- Fix Printer Driver is unavailable on Windows 10
- How to Fix Computer Shuts Down Randomly
- Fix Logitech Wireless Mouse Not Working
That’s it you have successfully Fix Faulty Hardware corrupted page error on Windows 10 but if you still have any questions regarding this post then feel free to ask them in the comment section.
Fix Printer Driver is unavailable on Windows 10: If you’re not able to use your Printer and you face the error message that says “Driver is unavailable” then this means that the driver installed for your Printer is not compatible, outdated or corrupted. In any case, until you resolve this error you won’t be able to access your Printer. To view this message you need to head over to Devices and Printers then select your Printer and under Status, you will see “Driver is unavailable”.

This error message can be annoying, especially is you need to use the printer urgently. But don’t worry there are few easy fixes which can resolve this error and in no time you will be able to use your printer. So without wasting any time let’s see How to Fix Printer Driver is unavailable on Windows 10 with the help of the below-listed troubleshooting guide.
- Fix Printer Driver is unavailable on Windows 10
- Method 1: Uninstall the Printer Drivers
- Method 2: Make sure Windows is up to date
- Method 3: Verify the Admin Account
- Method 4: Install the Printer Drivers in Compatibility mode
- Method 5: Reinstall your Printer Drivers
- Method 6: Reset your PC
Fix Printer Driver is unavailable on Windows 10
Make sure to create a restore point just in case something goes wrong.
Method 1: Uninstall the Printer Drivers
1.Type control in Windows Search then click on the search result which says Control Panel.

2.From the Control Panel click on Hardware and Sound.

3.Next, click on Device and Printers.

4.Right-click on the printer device which shows the error “ Driver is unavailable ” and select Remove device.

5.Press Windows Key + R then type devmgmt.msc and hit Enter to open Device Manager.

6.Expand Print queues then right-click on your Printer device and select Uninstall.

Note: If you don’t have your device listed then don’t worry as it may already be removed when you remove the printer device from Devices and Printers.
7.Again click on Uninstall to confirm your actions and this will successfully remove the printer drivers from your PC.
8.Now press Windows Key + R then type appwiz.cpl and hit Enter.

9.From the Programs and Features window, uninstall any application related to your printer.

10.Disconnect your Printer from the PC, shut down your PC and router, power off your printer.
11.Wait for a few minutes then plug everything the back as it was earlier, make sure to connect your Printer to the PC using a USB cable and see if you’re able to Fix Printer Driver is unavailable on Windows 10.
Method 2: Make sure Windows is up to date
1.Press Windows Key + I to open Settings then click on Update & Security.
2.From the left-hand side, menu click on Windows Update.
3.Now click on the “ Check for updates ” button to check for any available updates.
4.If any updates are pending then click on Download & Install updates.
Once the updates are downloaded, install them and your Windows will become up-to-date.
Method 3: Verify the Admin Account
1.Press Windows Key + R then type control and hit Enter to open Control Panel.
2.Click on User Accounts then again click on User Accounts.

3.Now click on the “ Make changes to my account in PC settings ” link.

4.Click on the verify link and follow the on-screen instructions to verify your admin account.

5.Once finished, reboot your PC and again install the printer without any issues.
Method 4: Install the Printer Drivers in Compatibility mode
1.Press Windows Key + R then type devmgmt.msc and hit Enter to open Device Manager.
2.Expand Print queues then right-click on your Printer device and select Uninstall.
3.If you’re prompted to confirm then again click on the Uninstall button.
4.Now go to your printers manufacturer’s website and download the latest drivers for your printer.
5.Right-click on the setup file and select Properties.

Note: If the drivers are in a zip file make sure to unzip it then right-click on the .exe file.
6.Switch to the Compatibility Tab and checkmark “ Run this program in Compatibility mode “.
7.From the drop-down select Windows 7 or 8 and then checkmark “ Run this program as an administrator “.

8.Finally, double-click on the setup file and let the drivers install.
9.Once finished, reboot your PC and see if you’re able to fix the issue.
Method 5: Reinstall your Printer Drivers
1.Press Windows Key + R then type control printers and hit Enter to open Devices and Printers.

- Right-click on your printer and select “ Remove device ” from the context menu.
3.When the confirm dialog box appears , click Yes.

4.After the device is successfully removed, download the latest drivers from your printer manufacturer website .
5.Then reboot your PC and once the system restarts, press Windows Key + R then type control printers and hit Enter.
Note: Make sure your printer is connected to the PC via USB, Ethernet or wirelessly.
6.Click on the “ Add a printer ” button under Device and Printers window.

7.Windows will automatically detect the printer, select your printer and click Next.

- Set your printer as default and click Finish.

Method 6: Reset your PC
Recommended:
- Mouse Lags or Freezes on Windows 10? 10 Effective ways to fix it!
- 4 Ways to Clear Clipboard History in Windows 10
- How to Fix Computer Shuts Down Randomly
- Fix Logitech Wireless Mouse Not Working
That’s if you have successfully Fix Printer Driver is unavailable on Windows 10 but if you still have any questions regarding this article then please feel free to ask them in the comment section.
