Gmail is probably your main email hub, handling everything from work messages to online shopping confirmations. But sometimes it starts asking you to verify your identity every single time you try to log in, even on your own trusted devices. What used to be a simple login now feels like a security checkpoint at the airport! This is when you desperately need to fix for Gmail keeps asking for verification, before you lose your mind with all these constant prompts. Don’t worry, we are here to help!
- 13+ Ways to Fix Gmail Keeps Asking for Verification
- Method 1: Verify Your Gmail Password
- Method 2: Select Don’t Ask Again on Device Option
- Method 3: Remove Two-Step Verification
- Method 4: Log Out of Gmail on All Devices
- Method 5: Remove Unrecognised Devices
- Method 6: Review Gmail Security Settings
- Method 7: Disable VPN or Proxy If Not Required
- Method 8: Remove Malware or Viruses
- Method 9: Update Operating System
- Method 10: Use Google Prompt for Sign-In Instead of SMS Codes
- Method 11: Update Recovery Information
- Method 12: Clear Browser Cache and Cookies
- Method 13: Use Google Account Help
13+ Ways to Fix Gmail Keeps Asking for Verification
With these many fixes up your sleeve, you can now easily tackle this problem.
Method 1: Verify Your Gmail Password
If Gmail keeps asking for verification, double-check your password. Make sure you’re typing it correctly and that Caps Lock isn’t on. If you’ve forgotten it, use the “Forgot Password” option to reset it.
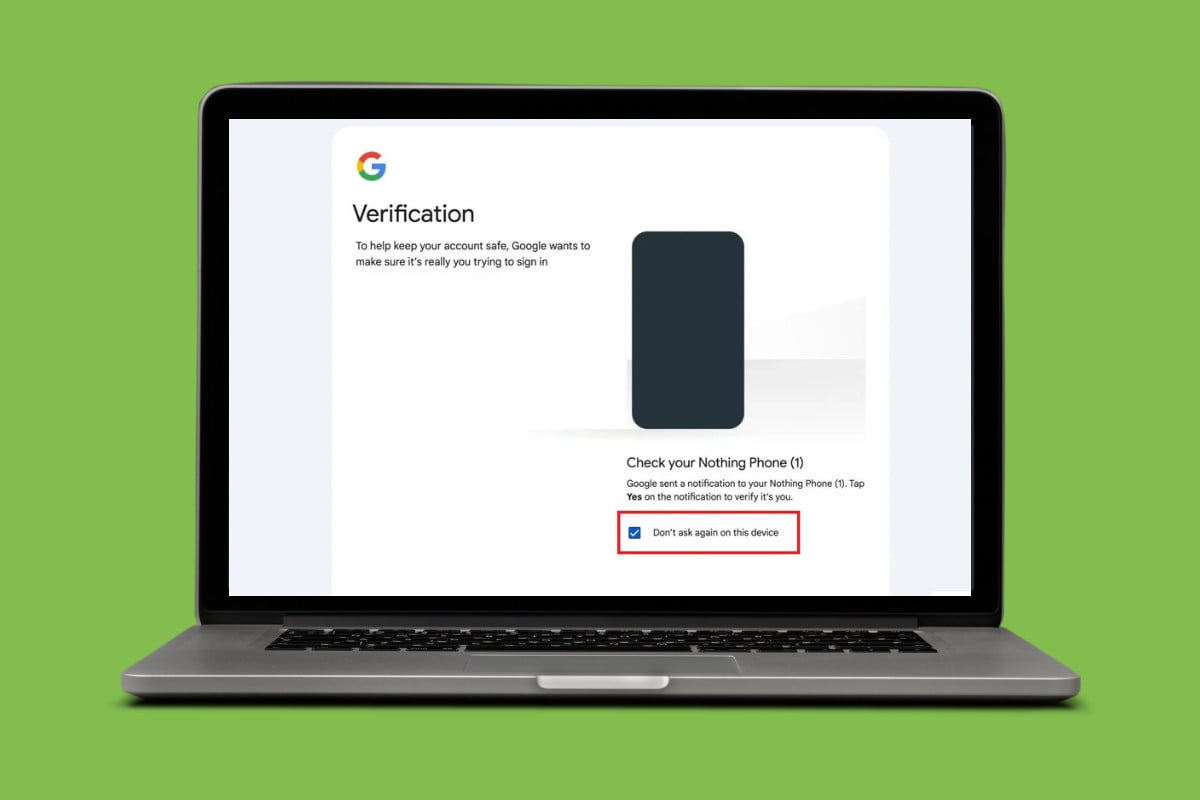
Method 2: Select Don’t Ask Again on Device Option
Gmail will send codes if you do not opt for the trusted device option.
- Open Gmail and enter your credentials.
- Now, tick on Don’t ask again for this device .
Now you won’t be asked for verification from the device.
Method 3: Remove Two-Step Verification
You will always get security codes if you have turned on the two-step verification method.
- Log in to your Google Account and click on Security from the left menu.
- Scroll down and click on 2-step Verification under How you sign in to Google.
- Enter your password .
- Now, click on Turn off 2-step Verification .
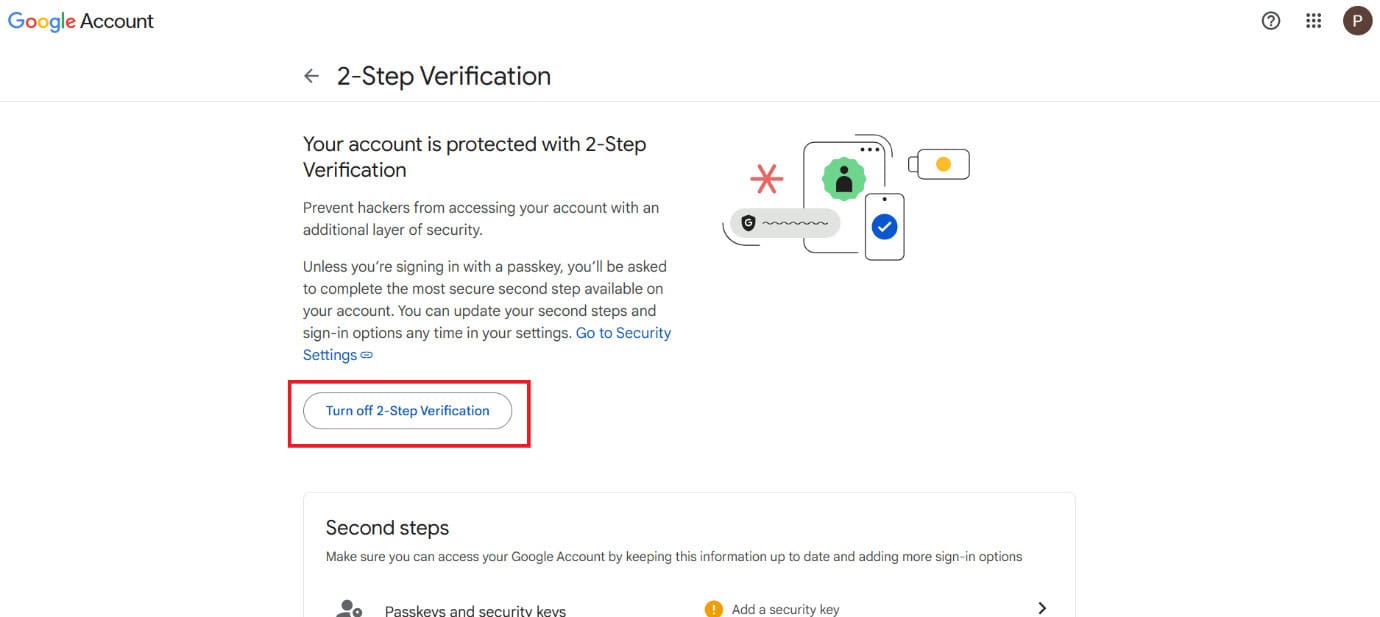
Once it is disabled, you will not get code pop-ups.
Method 4: Log Out of Gmail on All Devices
Sometimes Gmail asks for repeated verification if your account is signed in on too many devices. Log out from all devices and then sign back in only on the one you’re using. This can clear up conflicts.
Method 5: Remove Unrecognised Devices
You should also check if your account is logged into some other device.
- Log in to your Google Account > Security .
- Scroll down and click on Manage all devices under Your devices .
- Select a device of your choice and click on Sign out .
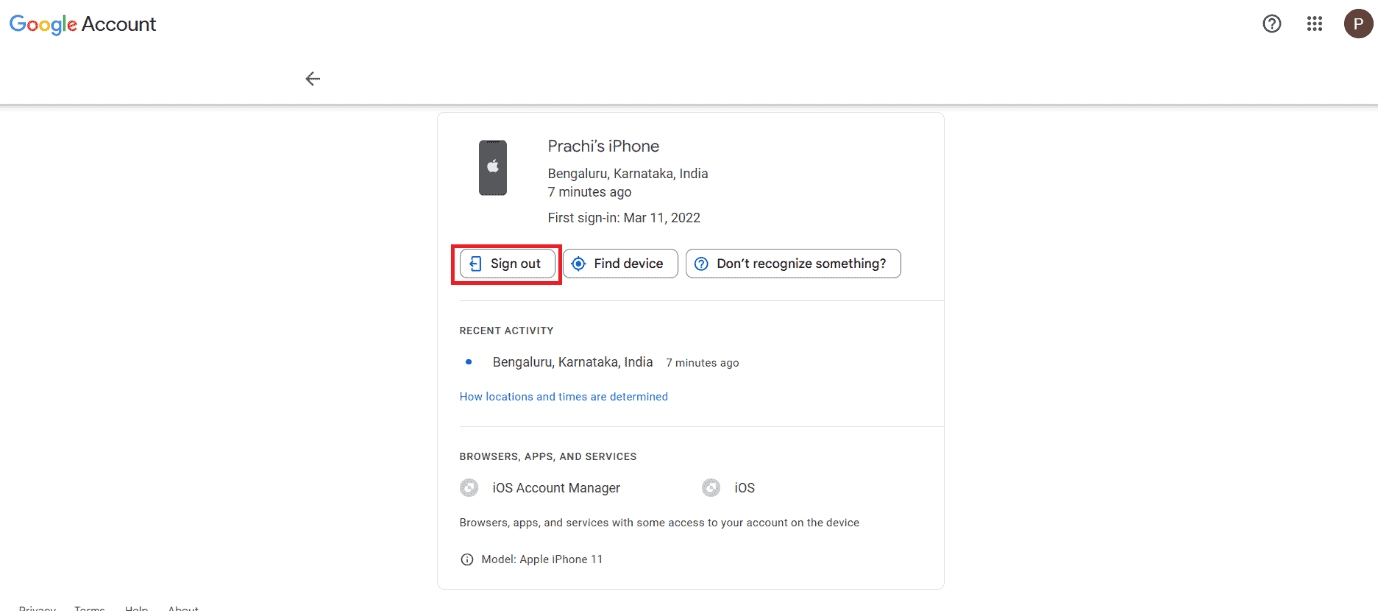
Your account will be logged out.
Method 6: Review Gmail Security Settings
You should also check on any recent activities.
- Log in to your Google Account > Security .
- Now, click on Recent security activity.
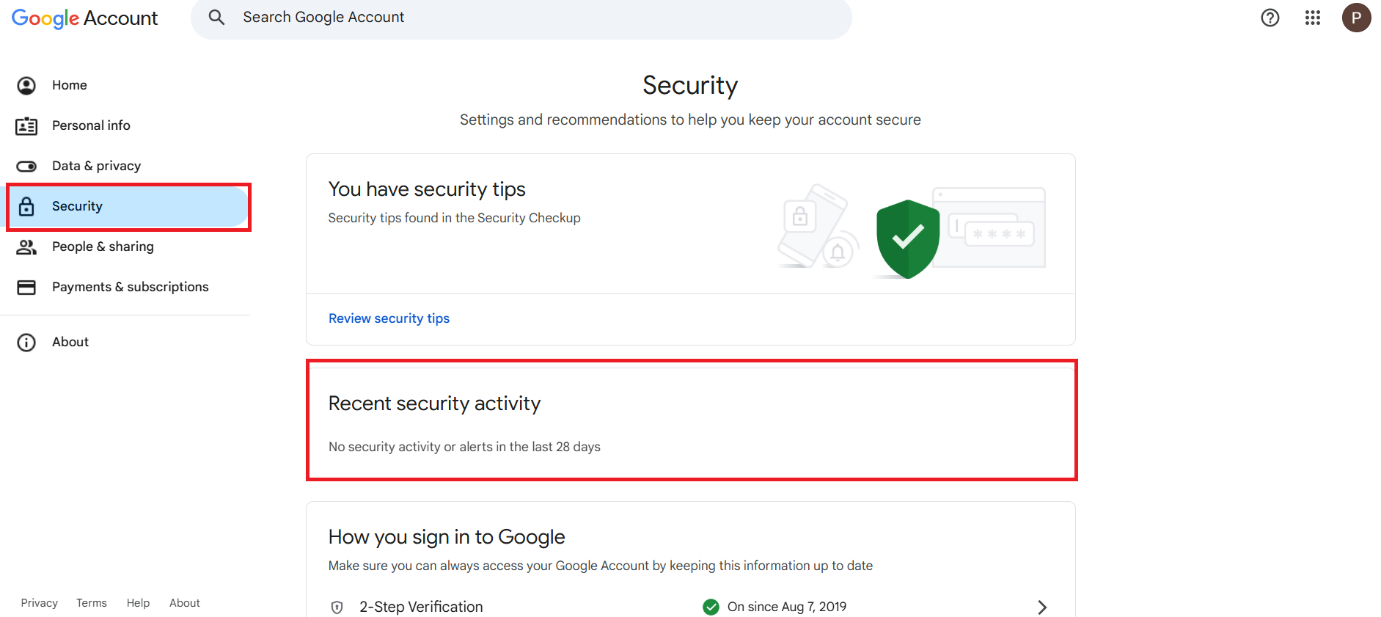
Inspect for any suspicious sign-ins or activities.
Method 7: Disable VPN or Proxy If Not Required
Using a VPN or proxy can sometimes trigger Gmail to ask for extra verification because it detects unusual login activity. If you don’t need them, turn off your VPN or proxy and try signing in again. This often helps Gmail recognize your login as normal and stops repeated verification prompts.
Method 8: Remove Malware or Viruses
Malware can interfere with your login process and trigger repeated verification prompts. Run a full system scan with Windows Security or a trusted antivirus. Removing threats often solves the issue.
Method 9: Update Operating System
An outdated operating system may not sync well with Gmail’s security features. Install any pending updates on your device. Updating ensures better compatibility and a smoother login.
Method 10: Use Google Prompt for Sign-In Instead of SMS Codes
You can also use Google prompts instead of SMS or OTPs:
- Log in to your Google Account > Security .
- Scroll down and click on 2-step Verification under How you sign in to Google.
- Enter your password .
- Scroll down and click on Google Prompt .
- Select Manage device and add the device of your choice.
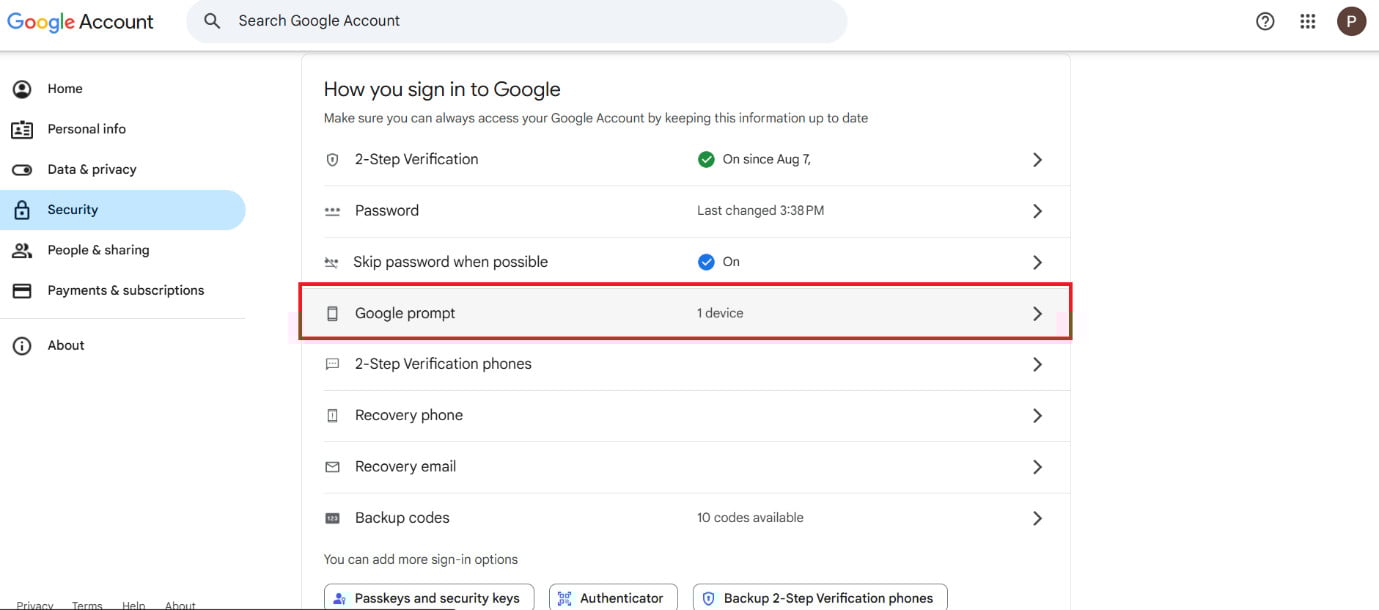
You will now get Google alerts instead of codes.
Method 11: Update Recovery Information
Outdated recovery details can cause Gmail to keep asking for verification. Keeping this information current helps Google confirm it’s really you and reduces unnecessary verification prompts.
Method 12: Clear Browser Cache and Cookies
Removing cache also goes a long way:
- Open Chrome > Settings .
- Click on Privacy and security .
- Select Delete browsing data .
- Now, tick on Cookies and other site data and Cache images and files .
- Click on Delete data .
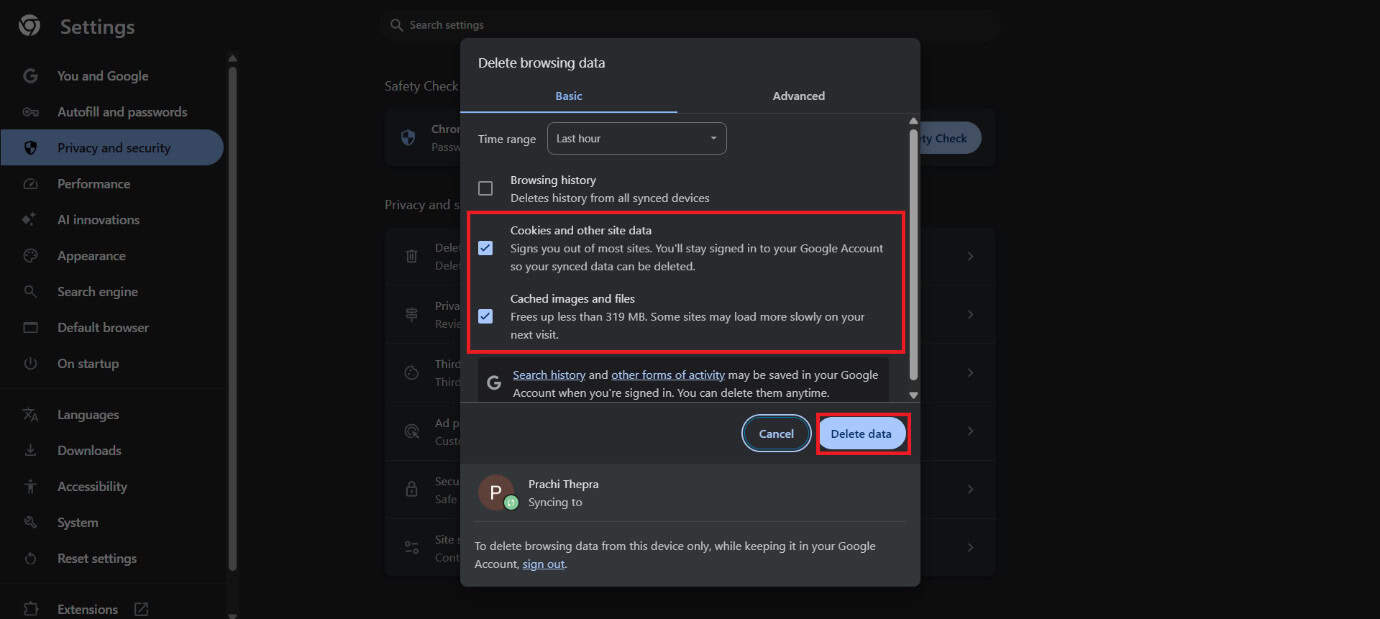
With the cache gone, the browser should be up and running.
Method 13: Use Google Account Help
If nothing else works, visit the Google Account Help page. Google provides step-by-step recovery options to fix verification issues and secure your account.
