Fix KERNEL_DATA_INPAGE_ERROR: If you are facing the Blue screen of Death (BSOD) with error KERNEL_DATA_INPAGE_ERROR and a Bug Check Code (BCCode) 0x0000007A then you can safely assume that it’s caused by a bad memory, corrupt hard disk sectors, bad block in paging file, virus or malware, faulty IDE or loose SATA cable, etc. The error itself indicates that the requested page of kernel data from the paging file could not be read into memory which can only be due to the above-mentioned reasons. You will see the BSOD screen when you try to wake your system from hibernation or after a restart.
KERNEL_DATA_INPAGE_ERROR STOP: 0x0000007A

The error itself rectifies if you restart your system but the main issue is that you will face the KERNEL_DATA_INPAGE_ERROR every single time you wake your PC from hibernation. So without wasting any time let’s see how to actually Fix KERNEL_DATA_INPAGE_ERROR Blue Screen of Death Error (STOP: 0x0000007A) with the help of below-listed troubleshooting guide.
- Fix KERNEL_DATA_INPAGE_ERROR
- Method 1: Run SFC and CHKDSK
- Method 2: Check the SATA Cable
- Method 3: Run CCleaner and Malwarebytes
- Method 4: Run MemTest86+
- Method 5: Run System Diagnostics
- Method 6: Set paging file to Automatic
Fix KERNEL_DATA_INPAGE_ERROR
Make sure to create a restore point just in case something goes wrong.
Method 1: Run SFC and CHKDSK
1.Press Windows Key + X then click on Command Prompt (Admin).

2.Now type the following in the cmd and hit enter:
Sfc /scannow

sfc /scannow /offbootdir=c:\ /offwindir=c:\windows

3.Wait for the above process to finish and once done restart your PC.
4.Next, run CHKDSK from here Fix File System Errors with Check Disk Utility(CHKDSK) .
5.Let the above process complete and again reboot your PC to save changes.
Method 2: Check the SATA Cable
In most of the cases, this error occurs because of the faulty or loose connection of hard disk and to make sure that this is not the case here you need to check your PC for any type of fault in the connection.
Important: It is not recommended to open the casing of your PC if it’s under warranty as it will void your warranty, a better approach, in this case, will be taking your PC to the service center. Also, if you don’t have any technical knowledge then don’t mess with the PC and make sure to look for an expert technician which can help you in checking for faulty or loose connection of hard disk.

Now check if the SATA cable is at fault, just use another PC cable in order to check if the cable is faulty. If this is the case then simply buying another SATA cable might fix the issue for you. Once you have checked the proper connection of hard disk is established, reboot your PC and this time you may be able to Fix KERNEL_DATA_INPAGE_ERROR BSOD as well as win32kfull.sys BSOD in Windows 10 Error.
Method 3: Run CCleaner and Malwarebytes
1.Download and install CCleaner & Malwarebytes.
- Run Malwarebytes and let it scan your system for harmful files.
3.If malware is found it will automatically remove them.
4.Now run CCleaner and in the “Cleaner” section, under the Windows tab, we suggest checking the following selections to be cleaned:
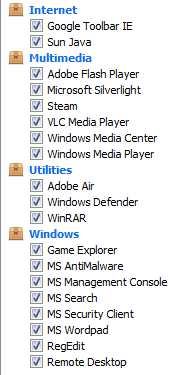
5.Once you’ve made certain the proper points are checked, simply click Run Cleaner, and let CCleaner run its course.
6.To clean your system further select the Registry tab and ensure the following are checked:
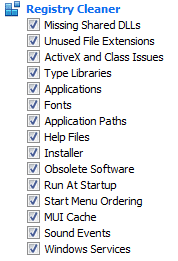
7.Select Scan for Issue and allow CCleaner to scan, then click Fix Selected Issues.
8.When CCleaner asks “ Do you want backup changes to the registry? ” select Yes.
9.Once your backup has completed, select Fix All Selected Issues.
10.Restart your PC to save changes and this would Fix KERNEL_DATA_INPAGE_ERROR BSOD Error.
Method 4: Run MemTest86+
Note: Before starting, make sure you have access to another PC as you will need to download and burn Memtest86+ to the disc or USB flash drive.
1.Connect a USB flash drive to your system.
2.Download and install Windows Memtest86 Auto-installer for USB Key .
3.Right-click on the image file which you just downloaded and select “ Extract here ” option.
4.Once extracted, open the folder and run the Memtest86+ USB Installer .
5.Choose your plugged in USB drive to burn the MemTest86 software (This will format your USB drive).

6.Once the above process is finished, insert the USB to the PC which is giving the KERNEL_DATA_INPAGE_ERROR BSOD Error.
7.Restart your PC and make sure that boot from the USB flash drive is selected.
8.Memtest86 will begin testing for memory corruption in your system.

9.If you have passed all the test then you can be sure that your memory is working correctly.
10.If some of the steps were unsuccessful then Memtest86 will find memory corruption which means that your “KERNEL_DATA_INPAGE_ERROR” is because of bad/corrupt memory.
11.In order to Fix KERNEL_DATA_INPAGE_ERROR BSOD Error , you will need to replace your RAM if bad memory sectors are found.
Method 5: Run System Diagnostics
If you are still not able to Fix KERNEL_DATA_INPAGE_ERROR BSOD Error then chances are your hard disk might be failing. In this case, you need to replace your previous HDD or SSD with a new one and install Windows again. But before running to any conclusion, you must run a Diagnostic tool to check if you really need to replace the Hard Disk or not.

To run Diagnostics restart your PC and as the computer starts (before the boot screen), press F12 key and when the Boot menu appears, highlight the Boot to Utility Partition option or the Diagnostics option and press enter to start the Diagnostics. This will automatically check all the hardware of your system and will report back if any issue is found.
Method 6: Set paging file to Automatic
1.Right-click on This PC or My Computer and select Properties.

2.Now from the left-hand menu click on Advanced System Settings.

3.Switch to the Advanced tab and then click Settings under Performance.

4.Again under Performance Options window switch to Advanced tab.

5.Click Change button under Virtual Memory.
6.Checkmark Automatically manage paging file size for all drives.

7.Click OK then click Apply followed by OK.
8.Reboot your PC to save changes.
- Fix Brightness issues after Windows 10 Creators Update
- Fix Windows could not start the Print Spooler service on local computer
- How To Fix Windows 10 Creator Update fails to install
- Fix CRITICAL_STRUCTURE_CORRUPTION Error
That’s it you have successfully Fix KERNEL_DATA_INPAGE_ERROR Blue Screen of Death error but if you still have any questions regarding this post feel free to ask them in the comment’s section.
Fix Windows could not start the Print Spooler service on local computer: If you are unable to print and receives the above error message then you are at the right place as today we are going to discuss on how to resolve this error message. The error clearly states that the Print Spooler service cannot be started, so what does this print spooler do? Well, all the printing related jobs are managed by a Windows service called Print Spooler. The print spooler helps your Windows to interact with the printer, and orders the print jobs in your queue. If the Print Spooler service fails to start you will receive the following error message:
Windows could not start the Print Spooler service on Local Computer. Error 1068: The dependency service or group failed to start.

The above error message is only displayed when you try to start Print Spooler services in services.msc window. So without wasting any time let’s see how to actually Fix Windows could not start the Print Spooler service on local computer error with the help of below-listed troubleshooting guide.
- Fix Windows could not start the Print Spooler service on local computer
- Method 1: Run Printer Troubleshooter
- Method 2: Registry Fix
- Method 3: Start Print Spooler Services
- Method 4: Run CCleaner and Malwarebytes
- Method 5: Delete all the files in PRINTERS folder
- Method 6: Run System File Checker (SFC) and Check Disk (CHKDSK)
- Method 7: Uncheck Allow service to interact with desktop
Fix Windows could not start the Print Spooler service on local computer
Make sure to create a restore point just in case something goes wrong.
Method 1: Run Printer Troubleshooter
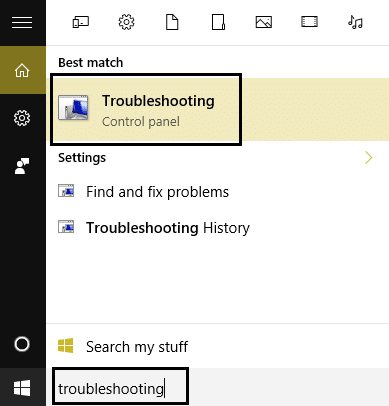
1.type “troubleshooting” in Windows Search bar and click on Troubleshooting.
6.Next, from the left window pane select View all.
7.Then from the Troubleshoot computer problems list select Printer.

8.Follow on-screen instruction and let the Printer Troubleshooter run.
9.Restart your PC and you may be able to Fix Windows could not start the Print Spooler service on local computer.
Method 2: Registry Fix
1.Press Windows Key + R then type regedit and hit Enter to open Registry Editor.

2.Navigate to the following registry key:
HKEY_LOCAL_MACHINE\SYSTEM\CurrentControlSet\Services\Spooler
3.Make sure to highlight Spooler key in the left window pane and then in the right window pane find the string called DependOnService.

4.Double click on the DependOnService string and change its value by deleting HTTP part and just leaving the RPCSS part.

5.Click OK to save changes and close Registry Editor.
6.Reboot your PC and see if the error is resolved or not.
Method 3: Start Print Spooler Services
1.Press Windows Key + R then type services.msc and hit Enter.

2.Find Print Spooler service in the list and double-click on it.
3.Make sure the Startup type is set to Automatic and the service is running, then click on Stop and then again click on start in order to restart the service.

4.Click Apply followed by OK.
5.After that, again try to add the printer and see if you’re able to Fix Windows could not start the Print Spooler service on local computer.
Method 4: Run CCleaner and Malwarebytes
1.Download and install CCleaner & Malwarebytes.
- Run Malwarebytes and let it scan your system for harmful files.
3.If malware is found it will automatically remove them.
4.Now run CCleaner and in the “Cleaner” section, under the Windows tab, we suggest checking the following selections to be cleaned:
5.Once you’ve made certain the proper points are checked, simply click Run Cleaner, and let CCleaner run its course.
6.To clean your system further select the Registry tab and ensure the following are checked:
7.Select Scan for Issue and allow CCleaner to scan, then click Fix Selected Issues.
8.When CCleaner asks “ Do you want backup changes to the registry? ” select Yes.
9.Once your backup has completed, select Fix All Selected Issues.
10.Restart your PC to save changes. This would Fix Windows could not start the Print Spooler service on local computer error but if it didn’t, then run Adwcleaner and HitmanPro.
Method 5: Delete all the files in PRINTERS folder
1.Press Windows Key + R then type services.msc and hit Enter.
2.Find Print Spooler service then right-click on it and select Stop.
3.Now in the File Explorer navigate to the following folder:
C:\Windows\system32\spool\PRINTERS
Note: It will ask to continue then click on it.
- Delete all the files in PRINTERS folder (Not the folder itself) and then close everything.
5.Again go to services.msc window and s tart Print Spooler service.

6.Reboot your PC and see if you are able to Fix Windows could not start the Print Spooler service on local computer.
Method 6:Run System File Checker (SFC) and Check Disk (CHKDSK)
1.Press Windows Key + X then click on Command Prompt(Admin).
2.Now type the following in the cmd and hit enter:
Sfc /scannow

sfc /scannow /offbootdir=c:\ /offwindir=c:\windows
3.Wait for the above process to finish and once done restart your PC.
4.Next, run CHKDSK from here Fix File System Errors with Check Disk Utility(CHKDSK) .
5.Let the above process complete and again reboot your PC to save changes.
Method 7: Uncheck Allow service to interact with desktop
1.Press Windows Key + R then type services.msc and hit Enter.
2.Find Print Spooler service in the list then right-click on it and select Properties.
3.Switch to Log On tab and uncheck “ Allow service to interact with desktop. “

4.Click Apply and then go back to the General tab and start the service.
4.Again click Apply followed by OK.
5.Reboot your PC to save changes.
- Fix Brightness issues after Windows 10 Creators Update
- Fix Windows 10 Mail Error 0x80040154 or 0x80c8043e
- How To Fix Print Spooler Error 0x800706b9
- Fix Windows 10 Creator Update fails to install
That’s it you have successfully Fix Windows could not start the Print Spooler service on local computer but if you still have any queries regarding this post feel free to ask them in the comment’s section.
