If you’re facing audio issues such as “ No audio device installed ” or no sound coming from speakers then the problem is related to the multimedia audio controller. If multimedia audio controller drivers get corrupted or outdated then you will face the sound issues on your PC. If you open the device manager then you will find a yellow exclamation mark next to Multimedia Audio Controller listed under Other devices.

To know more about the yellow exclamation mark, right-click on Multimedia Audio Controller and select Properties. In the properties window, you will see that it says “ No drivers installed for this device “. Don’t worry many Windows users have faced this issue, so you can easily resolve this issue by following the below-listed guide.
- What is the Multimedia Audio Controller?
- Fix Multimedia Audio Controller Driver Issue
- Method 1: Update Multimedia Audio Controller Driver
- Method 2: Uninstall Multimedia Audio Controller Driver
- Method 3: Check for Windows Update
- Method 4: Add a Legacy hardware
What is the Multimedia Audio Controller?
Multimedia Audio Controller drivers enable the Operating system to communicate with the Multimedia Audio Controller hardware such as your audio output devices etc. So if there is an issue with the Multimedia Audio Controller drivers, you won’t be able to use your system normally and will face various issues including the No sound issue on your PC.
As you know the main cause behind the above issue is corrupted, outdated or incompatible Multimedia Audio Controller drivers, we can easily fix the issue by either updating the drivers or completely re-installing the drivers from scratch. So without wasting any time let’s see How to Fix Multimedia Audio Controller Driver Issue with the help of the below-listed guide.
Fix Multimedia Audio Controller Driver Issue
Note: Make sure to create a restore point just in case something goes wrong.
Method 1: Update Multimedia Audio Controller Driver
1.Press Windows Key + R then type devmgmt.msc and hit Enter to open Device Manager.

2.Expand Sound, video, and game Controllers and find Multimedia Audio Controller.
3.If you’re unable to then expand Other devices and here you will find Multimedia Audio Controller.

- Right-click on Multimedia Audio Controller and select Update.

5.On the next screen click on “ Search automatically for updated driver software “.

6.Wait for the process to finish finding the latest available update for your sound drivers , if found, make sure to click on Install to complete the process.
7.Once finished, click Close and reboot your PC to save changes.
8.But if your driver is already up-to-date then you will get a message saying “ The best driver software for your device is already installed “.

9.Click on Close and you don’t need to do anything as the drivers are already up-to-date.
10.If you’re still facing the Multimedia Audio Controller Driver Issue then you need to manually update the drivers, just follow the next step.
11.Again open Device Manager then right-click on Multimedia Audio Controller & select Update driver.
12.This time click on “ Browse my computer for driver software. “

13.Next, select “ Let me pick from a list of available drivers on my computer .”

- Select the appropriate driver from the list and click Next.
15.Let the driver installation complete and then restart your PC.
Method 2: Uninstall Multimedia Audio Controller Driver
1.Press Windows Key + R then type devmgmt.msc and hit Enter to open Device Manager.
2.Expand Sound, video, and game Controllers and find Multimedia Audio Controller.
3.If you’re unable to then expand Other devices and here you will find Multimedia Audio Controller with a yellow exclamation mark.
- Right-click on Multimedia Audio Controller and select Uninstall.

5.Click on Yes to confirm the uninstallation and once finished, reboot your PC.
6.When the system restart, Windows will try to automatically install the default drivers for Multimedia Audio Controller.
7.But if the issue is still not resolved then try to visit your sound card manufacturer’s website.
8.Find the latest drivers for your sound card under the drivers and download section.
9.Download and install the latest driver on your system and this should Fix Multimedia Audio Controller Driver Issue.
Method 3: Check for Windows Update
1.Press Windows Key + I to open Settings then click on Update & Security.
2.From the left-hand side, menu click on Windows Update.
3.Now click on the “ Check for updates ” button to check for any available updates.

4.If any updates are pending then click on Download & Install updates.
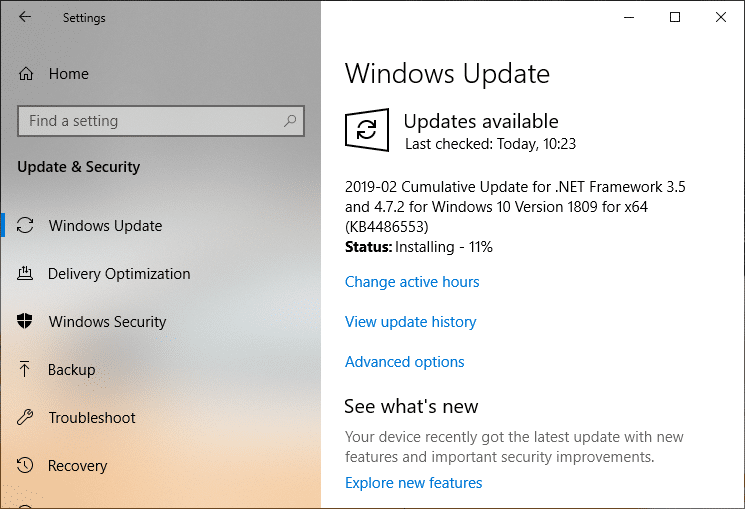
Once the updates are downloaded, install them and your Windows will become up-to-date.
Method 4: Add a Legacy hardware
1.Press Windows Key + R then type “ devmgmt.msc ” (without quotes) and hit enter to open Device Manager.
2.In Device Manager select Sound, video and game controllers and then click on Action > Add legacy hardware.

3.Click Next , select ‘ Search for and install the hardware automatically (Recommended). ‘

4.Manually install the drivers and then reboot your system to save changes.
Recommended:
- Fix Windows Media Player Server Execution Failed Error
- What Is Usoclient & How To Disable Usoclient.exe Popup
- Fix Can’t Print PDF Files from Adobe Reader
- How to Format Hard Drive on Windows 10
I hope the above steps were able to help you Fix Multimedia Audio Controller Driver Issue but if you still have any questions regarding this guide then feel free to ask them in the comment section.
If you’re facing issues in printing your PDF files on Adobe Reader then don’t worry as the problem can be easily solved by updating printer’s driver, setting your printer as the default printer, etc. But before continuing you should try to print another PDF file and if you’re able to print successfully then the PDF file you were earlier trying to print was corrupted. But if you still can’t print pdf files from adobe reader then continue with the advanced troubleshooting guide.
- Fix Can’t Print PDF Files from Adobe Reader
- Method 1: Miscellaneous Fixes
- Method 2: Update Printers driver
- Method 3: Set your Printer as the Default Printer
- Method 4: Try to print PDF as an image
- Method 5: Save another copy of the PDF file
- Method 6: Reinstall your Printer Drivers
- Method 7: Re-install Acrobat Reader
Fix Can’t Print PDF Files from Adobe Reader
Make sure to create a restore point just in case something goes wrong.
Method 1: Miscellaneous Fixes
1.Try to print the webpage you’re currently on, press Ctrl + P and print the document and see if you’re able to.

2.Instead of PDF file try to print a text or images file , if you’re are able to print then the problem is with Adobe Reader and updating it might fix the issue.

3.Power Cycle the Printer:
- Restart your PC and power off the Printer then disconnect it from the PC.
- Don’t start the Printer, just press and hold the power button of the printer for 10 seconds.
- Now connect the printer to the PC then power ON the PC and once the system starts, you can power ON your printer.
Method 2: Update Printers driver
To update the printer driver follow these steps.
1.Press Windows key + X then select Device Manager.

2.Expand Print queues then select the printer for which you want to update the drivers.
3.Right-click on the selected Printer and select Update driver.

4.Select Search automatically for updated driver software.
5.Windows will automatically install the latest drivers available for your printer.

Manually Install the Latest Printer Drivers
1.Press Windows Key + R then type “ services.msc ” and hit enter.

2.Find Print Spooler service then right-click on it and select Stop.

3.Again press Windows Key + R then type printui.exe /s /t2 and hit enter.
4.In the Printer Server Properties window search for the printer that is causing this issue, select it and then click on the Remove button.
5.Next, remove the printer and when asked for confirmation to remove the driver as well, select yes.

6.Now again go to services.msc and right-click on Print Spooler and select Start.

7.Next, navigate to your printer manufacturer’s website like HP , Dell , Canon , download and install the latest printer drivers from the website.
For example , in case you have an HP printer then you need to visit HP Software and Drivers Downloads page . Where you can easily download the latest drivers for your HP printer.
8.If you’re still not able to fix slow network printing error or can’t Print PDF Files from Adobe Reader then you can use the printer software that came with your printer. Usually, these utilities can detect the printer on the network and fix any issues that are causing the printer to appear offline.
For example, you can use HP Print and Scan Doctor to fix any issues regarding HP Printer.
Method 3: Set your Printer as the Default Printer
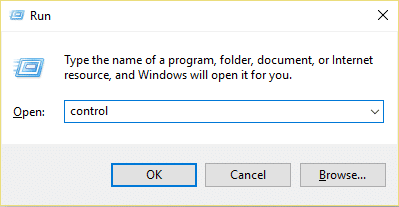
1.Press Windows Key + R then type control and hit Enter to open Control Panel.
2.From the Control Panel click on Hardware and Sound.

3.Next, click on Device and Printers.

- Right-click on your Printer and select Set as default printer.

5.Restart your PC to save changes.
Method 4: Try to print PDF as an image
1.First, open your PDF file in Acrobat Reader.

2.Now from the Adobe Reader toolbar click on the print icon or press Ctrl + P.
3.From the print window, click on the Advanced button.
4.In the Advanced Print Setup window checkmark “ Print As Image ” and click OK.
<img loading=“lazy” src=“https://techcult.com/wp-content/uploads/2019/10/From-the-print-window-click-on-the-Advanced-button.png" onerror=“this.onerror=null;this.src=‘https://blogger.googleusercontent.com/img/a/AVvXsEhe7F7TRXHtjiKvHb5vS7DmnxvpHiDyoYyYvm1nHB3Qp2_w3BnM6A2eq4v7FYxCC9bfZt3a9vIMtAYEKUiaDQbHMg-ViyGmRIj39MLp0bGFfgfYw1Dc9q_H-T0wiTm3l0Uq42dETrN9eC8aGJ9_IORZsxST1AcLR7np1koOfcc7tnHa4S8Mwz_xD9d0=s16000';" alt=“In the Advanced Print Setup window checkmark “Print As Image” and click OK - 33”>
5.Next, click the Print button and see if you’re able to print the PDF file as an image.

Method 5: Save another copy of the PDF file
1.Open the PDF file in Acrobat Reader then press Shift + Ctrl + S to open Save As dialog box.

Note: From the Acrobat Reader menu click on File and select Save As.
2.Navigate to where you want to save the file, type a new name and click Save.

3.Now try to print this newly created PDF and see if you’re able to Fix Can’t Print PDF Files from Adobe Reader.
Method 6: Reinstall your Printer Drivers
1.Press Windows Key + R then type control printers and hit Enter to open Devices and Printers.

- Right-click on your printer and select “ Remove device ” from the context menu.

3.When the confirm dialog box appears , click Yes.

4.After the device is successfully removed, download the latest drivers from your printer manufacturer website .
5.Then reboot your PC and once the system restarts, press Windows Key + R then type control printers and hit Enter.
Note: Make sure your printer is connected to the PC via USB, ethernet or wirelessly.
6.Click on the “ Add a printer ” button under Device and Printers window.

7.Windows will automatically detect the printer, select your printer and click Next.

- Set your printer as default and click Finish.

This is how you can update the driver and after this, you can try to print the documents once again.
Method 7: Re-install Acrobat Reader
1.Press Windows Key + I to open Settings then click on Apps.

2.From the left hand make sure to select Apps & features.
3.Now from the “ Search this list ” box type Acrobat in it.

4.Click on Adobe Acrobat Reader DC then click on the Uninstall button under it.

5.Now download the latest version Adobe Acrobat Reader from the official website .
6.Install the latest version of Acrobat Reader on your PC and Reboot your PC.
7.Again try to print the PDF file and this time you will be able to print it without any issues.
Recommended:
- Fix Windows Media Player Server Execution Failed Error
- 3 Ways to Delete Files Protected by TrustedInstaller
- How to Connect a Bluetooth Device on Windows 10
- How to Format Hard Drive on Windows 10
I hope the above steps were able to help you Fix Can’t Print PDF Files from Adobe Reader but if you still have any queries regarding this guide then feel free to ask them in the comment’s section.
