Microsoft frequently rolls out updates for Windows 10 to improve the operating system on various functionalities such as system efficiency, security, stability, etc. Although each bug brings a host of improvements to the operating system, it also brings new bugs that plague many users. One of these is the Windows update released in March 2021, update KB500080. This update caused many issues with the printer drivers already installed in the system. Users reported errors like Windows update for printer drivers not working. These printer installation issues were so prominent and serious that some users even reported receiving BSOD (Blue Screen of Death – the screen displayed after a system crash due to Windows failure) while printing. This made printing impossible. If you are wondering how to solve this Windows update can’t get list of devices issue, you are at the right article. Here, we discuss the possible causes and some potential solutions so we can tackle this error. Let’s get started!

- How to Fix Printer Installation Issues in Windows 10
- Method 1: Discharge Printer
- Method 2: Run Printer Troubleshooter
- Method 3: Update Device Drivers
- Method 4: Manually Install Generic Drivers
- Method 5: Restart Print Spooler Service
- Method 6: Install Drivers from Windows Update Catalog
- Method 7: Reinstall Printer
How to Fix Printer Installation Issues in Windows 10
Before getting onto the fixes, let us see some causes for this issue:
- Printer is old and has no latest software support
- Windows update bug
- Issues with printer service
- Issues with printer drivers and software
- Printer is incorrectly connected
Method 1: Discharge Printer
You can try discharging the printer of all electricity by removing it from the main switch, removing it from the computer for 2–5 minutes, and connecting it back again. Make sure to properly connect the printer to the main switch and the computer before turning it off, and check if the issue is fixed.
Method 2: Run Printer Troubleshooter
There is an in-built Windows troubleshooter for printer issues. You can access it easily by accessing settings. Running printer troubleshooter will resolve Windows update for printer drivers not working issue.
Press Windows + I keys simultaneously to launch Settings .
Click on the Update & Security tile, as shown.

Go to Troubleshoot menu in the left pane.
Select Printer troubleshooter and click on Run the troubleshooter button shown highlighted below.

- Wait for the troubleshooter to detect and fix the problem. Once the process is complete, click Apply this fix and restart your PC .
Windows will automatically search for any problems and attempt to fix them automatically. Also, you can run Hardware and Devices Troubleshooter on Windows 10 to resolve the issue.

Method 3: Update Device Drivers
As Windows users reported errors after the Windows update, there could be problems with the printer driver. Updating printer drivers could be a potential fix. Various methods to update the printer drivers are highlighted below if one of them does not work for you.
Read our guide on How to Update Device Drivers on Windows 10 and implement the different methods given in this link for printer devices.

Note : If your printer came with an installation disc, it could be a driver installation disc. Insert it into your DVD/CD driver and follow the onscreen instructions to install the driver.
Method 4: Manually Install Generic Drivers
If you have an old printer or your manufacturer has not yet released a driver for Windows 10, printer installation issues can occur. This can be an ongoing issue since the printer will be unusable without proper usable driver software. In this scenario, Windows will automatically install Generic drivers suitable for your printer. If not, then you can install them manually.
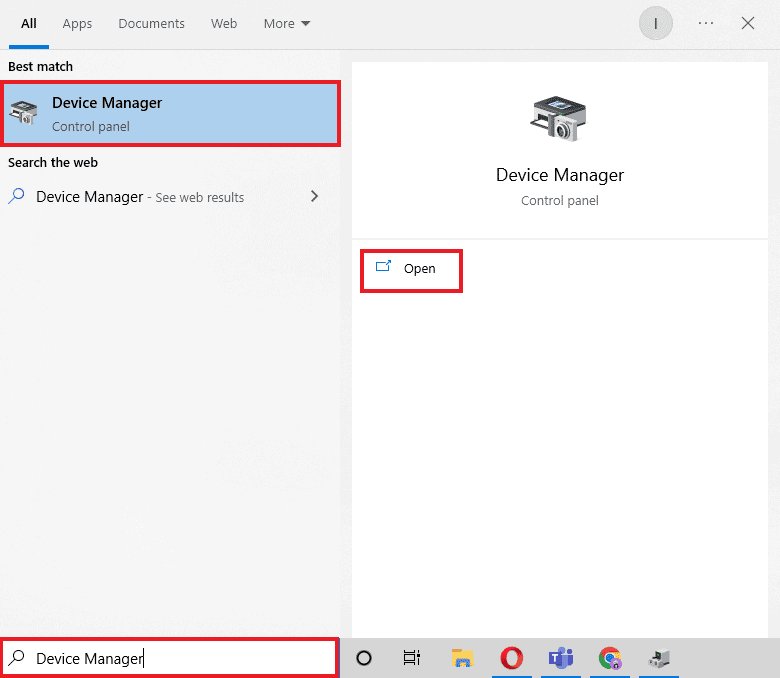
- Press the Windows key , type Device Manager , and click on Open .
- Under the Print queues section, right-click on Microsoft XPS writer and select the Update driver option.

- Click on the Browse my computer for driver software option.

- Next, click on Let me pick from a list of available drivers on my computer .

- Finally, choose Generic software device and click on Next .

This will install the required driver and fix the printer installation issue.
Method 5: Restart Print Spooler Service
When a Windows user sends print requests to the printer, the print spooler is the software that manages these requests sent by the user. Resetting it can be a potential solution. Follow the below steps:
Hit the Windows + R keys together to open the Run dialog box.
Type services.msc and click on OK to launch the Services window.

- Right-click on Print Spooler and click on Stop to stop the service.

Now, navigate to the Run dialog box again by simultaneously pressing Windows + R keys .
Enter the below command and click on OK .
%WINDIR%\system32\spool\printers

Select all the files in the folder by holding Ctrl + A keys simultaneously.
Now, press Shift + Delete to delete all the files present in that folder permanently.
Go back to the Services window and double-click on the Print Spooler service.

Make sure the Startup type drop-down is set to Automatic .
Finally, click on Start under the Service status section.

- Click on Apply > OK to confirm.
Check if Windows Update can’t get list of devices issue gets resolved or not.
Method 6: Install Drivers from Windows Update Catalog
Sometimes, using a generic driver does not help and might still throw up printer installation issues. If you face issues with the printer and you have an old printer, then you can try an official Microsoft Windows Update Catalog. Here, the updates are archived so year-old drivers can easily download and use them. Let us see how to use it.
Go to the Microsoft Catalog website in a browser.
Type the model of your printer (e.g. HP LaserJet 4000 ) and click on Search to search drivers for your hardware.
If you find the driver for your hardware, click on Download .

- Here, click on the cab link to download the driver.

Right-click on the downloaded file and choose Extract .
Update your printer driver manually by locating the folder where you extracted the drivers.
Method 7: Reinstall Printer
You can reinstall the printer completely from the start to see if that works. This involves removing the printer and device driver with all powers and connecting them back.
- Hit the Windows key , type Control Panel , then click on Open .

- Set View by > Category , then click on View devices and printers .

Under the Printers section, right-click on your printer .
Choose the Remove device option.

Click on Yes in the UAC prompt to remove the device.
Now, reboot the PC and reconnect your printer.
Go to Devices and Printers and right click on the printer and select Set as default printer .

This will solve printer installation issues.
Recommended:
- Fix Daemon Tools Unable to Access Image File MDF
- Fix Epson Scanner Cannot Communicate in Windows 10
- Fix Error Printing in Windows 10
- Where is the WPS Button on Canon Printer?
We hope that this article was helpful, and you were able to resolve printer installation issues in Windows 10. If you have any doubts or suggestions, comment below. Also, let us know what you want to learn next.
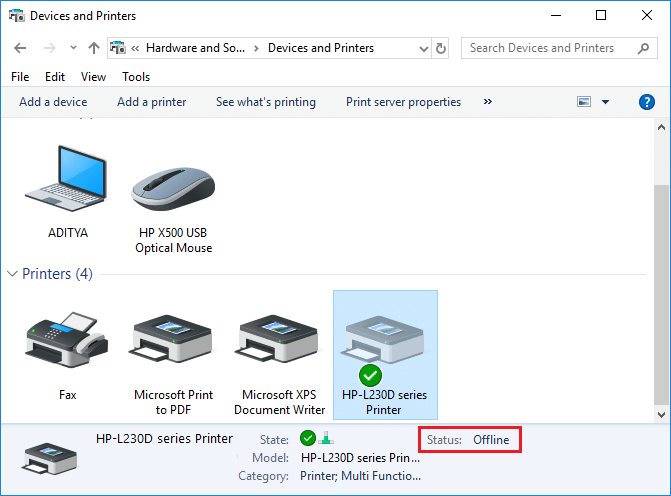
How to Get Your Printer Back Online: There may be situations where you need to print any file for an urgent meeting and you need to submit those files in 30 minutes. So what you usually do is open the file and go to print option to print the document. But suddenly you noticed that in the bottom right corner of your system the status of your printer is showing as offline. This is a usual problem for users because even when your Printer is clearly ON and ready to print, the status is showing offline.
This is caused by the communication error viz The Active Directory Domain Services is Currently Unavailable error of the printer with your system. There is no particular cause for this error but the issue could be caused because of outdated or incompatible drivers, conflict of printer spooler services, a problem with physical or hardware connection of the printer to PC, etc. So without wasting any time let’s see How to Get Your Printer Back Online in Windows 10 with the help of the below-listed tutorial.
- How to Get Your Printer Back Online in Windows 10
- Method 1: Check Your Printer Connection
- Method 2: Update Printer Driver
- Method 3: Change the Printer Status
- Method 4: Restart Print Spooler Service
- Method 5: Use a Second Printer
- Method 6: Reinstall your Printer Drivers
How to Get Your Printer Back Online in Windows 10
Make sure to create a restore point just in case something goes wrong.
Method 1: Check Your Printer Connection
When there is an error showing your status of the printer as offline, the system wants to tell users that there is something wrong with the communication established between the printer and the system through the USB cable or network connection. To solve this issue the steps are:
- To restart your printer, off the power supply of the printer & then switch it ON again.
- Now again check the connection of your printer.
- If the connection of your system with the printer is made using a USB cable, make sure your cable is working properly and the connections to the ports are fitted tight. You could also switch the USB port to see if this resolves the problem.
- If the connection of your system with the printer is made through wired networks, check whether the connection to your cable is properly done or not. Also, you can check whether the signal to your printer is flashing or not.
- If the connection of your system with the printer is made through a wireless network, make sure your printer is connected to your computer network & the wireless icon will lit-up to show that you are connected.
If nothing works then you should try to run Printer Troubleshooter:
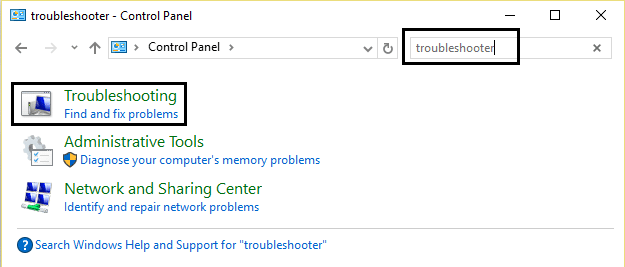
1.Type “troubleshooting” in Control Panel then click on Troubleshooting from the search result.
2.Next, from the left window pane select View all.
3.Then from the Troubleshoot computer problems list select Printer.

4.Follow on-screen instruction and let the Printer Troubleshooter run.
5.Restart your PC and you may be able to Get Your Printer Back Online in Windows 10, if not then continue with the next method.
Method 2: Update Printer Driver
1.Press Windows Key + R then type “ services.msc ” and hit enter.

2.Find Print Spooler service then right click on it and select Stop.

3.Again press Windows Key + R then type printui.exe /s /t2 and hit enter.
4.In the Printer Server Properties window search for the printer which is causing this issue.
5.Next, remove the printer and when asked for confirmation to remove the driver as well, select yes.

6.Now again go to services.msc and right-click on Print Spooler and select Start.

7.Next, navigate to your printers manufacturer website, download and install the latest printer drivers from the website.
For example , in case you have an HP printer then you need to visit HP Software and Drivers Downloads page . Where you can easily download the latest drivers for your HP printer.
8.If you’re still not able to fix Printer Offline Status then you can use the printer software that came with your printer. Usually, these utilities can detect the printer on the network and fix any issues that are causing the printer to appear offline.
For example, you can use HP Print and Scan Doctor to fix any issues regarding HP Printer.
Method 3: Change the Printer Status
1.Turn off your Printer and then again turn it back ON.
2.Now press the key combination Windows Key + I to open Settings.
3.Now click on “ Devices ” then from the left-hand side menu select “ Bluetooth & other devices ” option.

4.Under Related settings click on “ Devices and printers “.

5.Then, you have to right-click on the printer icon with a green check-mark and choose “ See what’s printing ”.

Note: If there is no default printer set, then right-click on your printer and select “ Set as default printer “.

6.You will see the printer queue, see if there are any unfinished tasks and make sure to remove them from the list.

7.Now from the printer queue window, select your Printer and uncheck the “Use Printer Offline” & “ Pause Printer ” option.

Method 4: Restart Print Spooler Service
1.Use the shortcut key combination Windows Key + R to open the Run application.
2.Now type in there “ services.msc ” and hit Enter or click OK.
3.Scroll down to look for “ Print Spooler ” from the service utility window an check whether the status is running or not.
4.If you cannot see the status, you can right-click on Print Spooler and choose “ Start ”.
5.Or else, double-click on Print Spooler service & make sure the Startup type is set to Automatic and the service is running, then click on Stop and then again click on start in order to restart the service.

6.Click Apply followed by OK.
7.After that, again try to add the printer and see if you’re able to Get Your Printer Back Online in Windows 10.
Method 5: Use a Second Printer
This approach of solving the issue will work only when the printer is connected via a network to the PC (instead of the USB cable). Otherwise, you can manually set your IP address for your printer.
1.Press Windows Key + I to open Settings then click on Devices.
2.From the left-hand menu click on “ Bluetooth & other devices “.
3.Now from the right window pane click on “ Devices and printers “.
4.Right-click on your printer and select Printer properties from the context menu.

5.Switch to Ports tab then click on the “ Add Port… ” button.

6.Choose “ Standard TCP/IP Port ” under Available port types and then click on the New Port button.

7.On the Add Standard TCP/IP Printer Port Wizard click on Next .

8.Now type in the Printers IP Address and Port name then click Next.

Note: You could easily find the IP address of your printer on the device itself. Or you could find these details on the manual that came with the printer.
9.Once you successfully added the Standard TCP/IP Printer, click Finish.

See if you’re able to Get Your Printer Back Online in Windows 10 , if not then you need to reinstall your printer drivers.
Method 6: Reinstall your Printer Drivers
1.Press Windows Key + R then type control printers and hit Enter to open Devices and Printers.

- Right-click on your printer and select “ Remove device ” from the context menu.

3.When the confirm dialog box appears , click Yes.

4.After the device is successfully removed, download the latest drivers from your printer manufacturer website .
5.Then reboot your PC and once the system restarts, press Windows Key + R then type control printers and hit Enter.
Note: Make sure your printer is connected to the PC via USB, ethernet or wirelessly.
6.Click on the “ Add a printer ” button under Device and Printers window.

7.Windows will automatically detect the printer, select your printer and click Next.

- Set your printer as default and click Finish.

Recommended:
- How to Change Default System Font in Windows 10
- What is an MKV file and how to open it?
- Fix Destination Path Too Long Error
- How to Find My Router’s IP Address?
I hope this article was helpful and now you can easily Get Your Printer Back Online in Windows 10 , but if you still have any questions regarding this guide then feel free to ask them in the comment’s section.
Fix Printer Driver is unavailable on Windows 10: If you’re not able to use your Printer and you face the error message that says “Driver is unavailable” then this means that the driver installed for your Printer is not compatible, outdated or corrupted. In any case, until you resolve this error you won’t be able to access your Printer. To view this message you need to head over to Devices and Printers then select your Printer and under Status, you will see “Driver is unavailable”.

This error message can be annoying, especially is you need to use the printer urgently. But don’t worry there are few easy fixes which can resolve this error and in no time you will be able to use your printer. So without wasting any time let’s see How to Fix Printer Driver is unavailable on Windows 10 with the help of the below-listed troubleshooting guide.
- Fix Printer Driver is unavailable on Windows 10
- Method 1: Uninstall the Printer Drivers
- Method 2: Make sure Windows is up to date
- Method 3: Verify the Admin Account
- Method 4: Install the Printer Drivers in Compatibility mode
- Method 5: Reinstall your Printer Drivers
- Method 6: Reset your PC
Fix Printer Driver is unavailable on Windows 10
Make sure to create a restore point just in case something goes wrong.
Method 1: Uninstall the Printer Drivers
1.Type control in Windows Search then click on the search result which says Control Panel.

2.From the Control Panel click on Hardware and Sound.

3.Next, click on Device and Printers.

4.Right-click on the printer device which shows the error “ Driver is unavailable ” and select Remove device.
5.Press Windows Key + R then type devmgmt.msc and hit Enter to open Device Manager.

6.Expand Print queues then right-click on your Printer device and select Uninstall.

Note: If you don’t have your device listed then don’t worry as it may already be removed when you remove the printer device from Devices and Printers.
7.Again click on Uninstall to confirm your actions and this will successfully remove the printer drivers from your PC.
8.Now press Windows Key + R then type appwiz.cpl and hit Enter.

9.From the Programs and Features window, uninstall any application related to your printer.

10.Disconnect your Printer from the PC, shut down your PC and router, power off your printer.
11.Wait for a few minutes then plug everything the back as it was earlier, make sure to connect your Printer to the PC using a USB cable and see if you’re able to Fix Printer Driver is unavailable on Windows 10.
Method 2: Make sure Windows is up to date
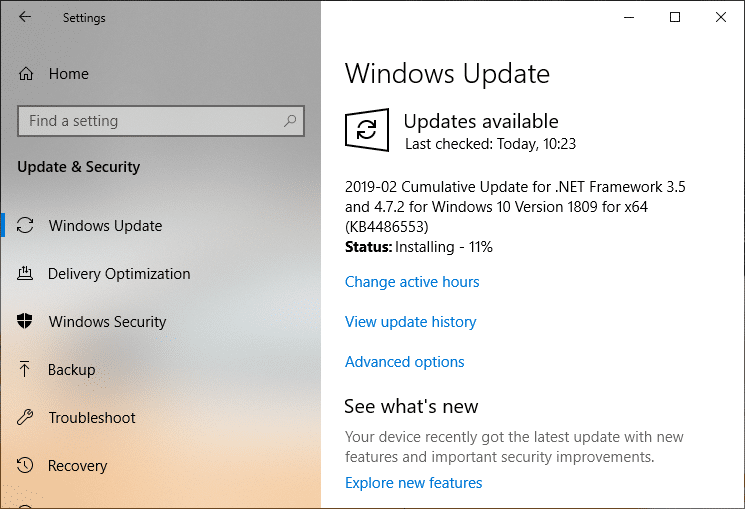
1.Press Windows Key + I to open Settings then click on Update & Security.
2.From the left-hand side, menu click on Windows Update.
3.Now click on the “ Check for updates ” button to check for any available updates.

4.If any updates are pending then click on Download & Install updates.
Once the updates are downloaded, install them and your Windows will become up-to-date.
Method 3: Verify the Admin Account
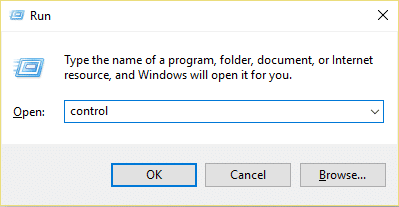
1.Press Windows Key + R then type control and hit Enter to open Control Panel.
2.Click on User Accounts then again click on User Accounts.

3.Now click on the “ Make changes to my account in PC settings ” link.

4.Click on the verify link and follow the on-screen instructions to verify your admin account.

5.Once finished, reboot your PC and again install the printer without any issues.
Method 4: Install the Printer Drivers in Compatibility mode
1.Press Windows Key + R then type devmgmt.msc and hit Enter to open Device Manager.
2.Expand Print queues then right-click on your Printer device and select Uninstall.
3.If you’re prompted to confirm then again click on the Uninstall button.
4.Now go to your printers manufacturer’s website and download the latest drivers for your printer.
5.Right-click on the setup file and select Properties.

Note: If the drivers are in a zip file make sure to unzip it then right-click on the .exe file.
6.Switch to the Compatibility Tab and checkmark “ Run this program in Compatibility mode “.
7.From the drop-down select Windows 7 or 8 and then checkmark “ Run this program as an administrator “.

8.Finally, double-click on the setup file and let the drivers install.
9.Once finished, reboot your PC and see if you’re able to fix the issue.
Method 5: Reinstall your Printer Drivers
1.Press Windows Key + R then type control printers and hit Enter to open Devices and Printers.
- Right-click on your printer and select “ Remove device ” from the context menu.
3.When the confirm dialog box appears , click Yes.
4.After the device is successfully removed, download the latest drivers from your printer manufacturer website .
5.Then reboot your PC and once the system restarts, press Windows Key + R then type control printers and hit Enter.
Note: Make sure your printer is connected to the PC via USB, Ethernet or wirelessly.
6.Click on the “ Add a printer ” button under Device and Printers window.
7.Windows will automatically detect the printer, select your printer and click Next.
- Set your printer as default and click Finish.
Method 6: Reset your PC
Recommended:
- Mouse Lags or Freezes on Windows 10? 10 Effective ways to fix it!
- 4 Ways to Clear Clipboard History in Windows 10
- How to Fix Computer Shuts Down Randomly
- Fix Logitech Wireless Mouse Not Working
That’s if you have successfully Fix Printer Driver is unavailable on Windows 10 but if you still have any questions regarding this article then please feel free to ask them in the comment section.
Fix Windows Cannot Connect to the Printer: If you are connected to a local network which shares a printer, it may be possible you may receive the error message “ Windows cannot connect to the printer. Operation failed with error 0x000000XX ” while trying to add the shared printer to your computer using Add Printer feature. This issue occurs because, after the printer is installed, Windows 10 or Windows 7 incorrectly looks for the Mscms.dll file in a subfolder different than the windows\system32 subfolder.

Now there is alreadya Microsoft hotfix for this issue but it doesn’t seem to work for many users. So without wasting any time let’s see how to actually Fix Windows Cannot Connect to the Printer on Windows 10 with the below-listed troubleshooting guide.
Note: You could try the Microsoft hotfix first, just in case if this work for you then you will save a lot of time.
- Windows Cannot Connect to the Printer [SOLVED]
- Method 1: Copy the mscms.dll
- Method 2: Create A New Local Port
- Method 3: Restart Print Spooler Service
- Method 4: Delete Incompatible Printer Drivers
- Method 5: Registry Fix
Windows Cannot Connect to the Printer [SOLVED]
Make sure to create a restore point just in case something goes wrong.
Method 1: Copy the mscms.dll
1.Navigate to the following folder: C:\Windows\system32\
2.Find the mscms.dll in the above directory and right-click then select copy.

3.Now paste the above file in the following location according to your PC architecture:
C:\windows\system32\spool\drivers\x64\3\ (For 64-bit) C:\windows\system32\spool\drivers\w32x86\3\ (For 32-bit)
4.Reboot your PC to save changes and again try to connect to the remote printer again.
This should help you Fix Windows Cannot Connect to the Printer issue, if not then continue.
Method 2: Create A New Local Port
1.Press Windows Key + X then select Control Panel.

2.Now click Hardware and Sound then click on Devices and Printers.
3.Click Add a printer from the top menu.

4.If you don’t see you printer listed click the link which says “ The printer that I want isn’t listed. “

5.From the next screen select “ Add a local printer or network printer with manual settings ” and click Next.

6.Select Create a new port and then from type of port drop-down select Local Port and then click Next.

7.Type the printer’s address in Printers port name field in the following format:
\IP address or the Computer Name\Printers Name
For example \192.168.1.120\HP LaserJet Pro M1136

8.Now click OK and then click Next.
9.Follow on-screen instructions to finish the process.
Method 3: Restart Print Spooler Service
1.Press Windows Key + R then type services.msc and hit Enter.
2.Find Print Spooler service in the list and double-click on it.
3.Make sure the Startup type is set to Automatic and the service is running, then click on Stop and then again click on start in order to restart the service.
4.Click Apply followed by OK.
5.After that, again try to add the printer and see if the you’re able to Fix Windows Cannot Connect to the Printer issue.
Method 4: Delete Incompatible Printer Drivers
1.Press Windows key + R then type printmanagement.msc and hit Enter.
2.From the left pane, click All Drivers.

3.Now in the right window pane, right-click on the printer driver and click Delete.
4.If you see more than one printer driver names, repeat the above steps.
- Again try to add the printer and install its drivers. See if you are able to Fix Windows Cannot Connect to the Printer issue, if not then continue with the next method.
Method 5: Registry Fix
1.First, you need to stop Printer Spooler service (Refer to method 3).
2.Press Windows Key + R then type regedit and hit Enter to open Registry Editor.

3.Navigate to the following registry key:
HKEY_LOCAL_MACHINE\SOFTWARE\Microsoft\Windows NT\CurrentVersion\Print\Providers\Client Side Rendering Print Provider
4.Now right-click on Client Side Rendering Print Provider and select Delete.

5.Now again start Printer Spooler service and reboot your PC to save changes.
- Fix Windows 10 Update Error 0x8007042c
- Fix Windows Update Error 0x80010108
- How To Fix Error 0X80010108 In Windows 10
- Fix Windows Update Error 0x800706d9
That’s it you have successfully Fix Windows Cannot Connect to the Printer issue but if you still have any questions regarding this article then feel free to ask them in comment’s section.

- How to Fix Error Printing in Windows 10
- What Causes Error Printing Message?
- What Causes Printer Status Error Printing on Windows 10?
- Method 1: Troubleshoot Hardware Issues
- Method 2: Troubleshoot Printer Connection
- Method 3: Run Printer Troubleshooter
- Method 4: Verify Printer Port Settings
- Method 5: Disable Print Spooler Service
- Method 6: Change Print Spooler Service Recovery Options
- Method 7: Update Printer Drivers
- Method 8: Roll Back Printer Driver Updates
- Method 9: Reinstall Printer Drivers
- Method 10: Reinstall Printer Drivers in Compatibility mode
- Method 11: Update Windows
- Method 12: Reconnect Printer
How to Fix Error Printing in Windows 10
The Error Printing message is generally caused by a loose connection or outdated printer drivers. When this dialogue box appears on your screen, it could be accompanied by an error code for reference or no code. Make sure to not confuse this issue with the Missing or Damaged ink cartridge errors. These are the different steps that you can use on your Windows 10 computer to solve the Error Printing message errors.
What Causes Error Printing Message?
We have listed the possible reasons that may cause the said error message in your PC.
- Windows 10 network printer error
- Windows cannot connect to the printer
- Status error printing
- Printer in error state
- Error printing wireless printer
- Printer error 0x00000709 in Windows 10
- Error printing HP/Brother/Canon/Epson
- Error printing Windows 10/11/7
- Printing issues with Windows 10 update
- Error printing PDF Windows 10
- Error printing restarting Windows 10
What Causes Printer Status Error Printing on Windows 10?
Here are some indispensable reasons that cause error printing message on your Windows 10 PC. Read them carefully to find which one troubles you.
- Printer is not turned on
- Printer is not connected to your computer
- The Wi-Fi or USB connection is not set properly
- A loose connection or outdated USB drivers also causes trouble
- Few essential services are not running on your PC
Here are some amazing hacks that will help you fix error printing message. But, before following the below-mentioned methods, reboot your Windows 10 PC to resolve any temporary glitches associated with the device. If you did not attain any fix for the issue after rebooting your computer, follow the below-mentioned methods.
Method 1: Troubleshoot Hardware Issues
Paper and ink are two essential components in the printing process. You have to place the paper on the tray and this will be pulled out of the device. Once the paper is printed, it will be again pulled out of the device. If any of these factors do not meet, then you will face the discussed problem.
If there is any damage to the paper tray, the device will fail to pull the paper, and result in an error printing Windows 10 message. Check if the paper tray is empty and broken. Replace the paper tray if broken.
If you find the tray is knocked out of its position, you can fix this easily by placing the paper tray in proper position . On the other hand, if the tray is broken, seek professional help to repair it.

Method 2: Troubleshoot Printer Connection
When you face printer status error printing error, the device wants to tell users that there is something wrong with the communication established between the printer and the system through the USB cable or network connection. To solve printer status error Windows 10 issue ensure whether the following steps are satisfied or not.
To restart your printer , switch off the power supply of the printer & then switch it ON again.
Now again check the connection of your printer .
If you have connected your printer using a USB cable, make sure your cable is working properly and the connections to the ports are fitted tight . You could also switch the USB port to see if this resolves the problem.
If you have connected your printer through wired networks, check whether the connection to your cable is properly done or not . Also, you can check whether the signal to your printer is flashing or not.
If the connection of your system with the printer is made through a wireless network, make sure your printer is connected to your computer network & the wireless icon will lit-up to show that you are connected.

Method 3: Run Printer Troubleshooter
The easiest and quickest way to solve any problem with a device or a feature is to run the troubleshooter associated with it. Windows 10 includes a troubleshooter tool for a wide variety of issues, and printer problems are also one of them. The printer troubleshooter automatically performs several actions like restarting the print spooler service, clearing corrupt spooler files, checking whether the existing printer drivers are outdated or corrupt, etc.
Press Windows + I keys to open Settings .
Now, click on Update & Security .

Switch to the Troubleshoot settings page by clicking on the same from the left-hand panel.
Select Printer under the Get up and running menu and follow the on-screen instructions to run the printer troubleshooter.
Check if you have fixed error printing Windows 10 issue.
Method 4: Verify Printer Port Settings
Few users have suggested that printer status error Windows 10 can be resolved by tweaking some printer port settings as instructed below.
- Hit the Windows key and type Control panel . Then, click on Open .

- Set View by > Category , then click on the View devices and printers option.

- Now, right-click on your printer and select Properties .

Switch to the Ports tab and find the port to which your device is connected.
Then, click the checkbox that hosts the USB pin of the printer.
Save the changes by clicking Apply and OK .
Note: It is also quite possible that your printer is working just fine, but you have been sending the print request to the wrong printer. This might be the case if there are multiple printers installed on your computers. Set the one you are trying to use as the default printer to resolve the issue. Hence, right-click on your printer and select Set as default printer .

Method 5: Disable Print Spooler Service
A print spooler is a mediating file/tool that coordinates between your computer and the printer. The spooler manages all the print jobs you send to the printer and lets you delete a print job that is still being processed. Problems might be encountered if the Print Spooler service is corrupted or if the temporary files of the spooler become corrupt. Restarting the service and deleting these temporary files should help in fixing error printing Windows 10 problems on your computer.
- Before we delete the print spooler files, we will need to halt the Print Spooler service that constantly runs in the background. To do so, hit the Windows key and type Services . Then, click on Open .

- Scan the list of Local Services to find the Print Spooler service. Once found, right-click on the Print Spooler service and select Properties from the context menu (or double-click on a service to access its Properties)

- Click on the Stop button to stop the service.
Note: Minimize the Services window instead of closing as we will need to restart the service after deleting the temporary files.

- Now, open up the Windows File Explorer by hitting the Windows + E keys together and navigate to the following path .
C:\WINDOWS\system32\spool\printers
Note: You can also launch the run command box, type %WINDIR%\system32\spool\printers command and hit Enter key to reach the required destination directly.

Press Ctrl + A keys simultaneously to select all the files in the printers folder and hit the delete key on your keyboard to delete them.
Maximize/switch back to the Services application window and click on the Start button to restart the Print Spooler service.

You should now be able to fix printer status error printing message and be able to print your documents without any issues.
Method 6: Change Print Spooler Service Recovery Options
Any incorrect recovery settings configuration of the print spooler service may also cause printer status error printing with your device. Therefore, you need to make sure that recovery settings are correct otherwise Printer spooler will not start automatically.
Open the Services window as you did in the previous method.
Locate Print Spooler then right-click on it and select Properties.

- Switch to the Recovery tab and ensure that three failure tabs are set to Restart the Service.

- Click Apply followed by OK to save the settings. Now see if you’re able to fix printer status error Windows 10.
Method 7: Update Printer Drivers
Every computer peripheral has a set of software files associated with it to communicate with your computer and the OS effectively. These files are known as device drivers. These drivers are unique for each device and manufacturer. Also, it is important to have the correct set of drivers installed to use an external device without facing any issues. Drivers are also constantly updated to stay compatible with the new Windows versions. If your drivers are not updated to their latest versions, update them by following our guide How to Update Device Drivers on Windows 10 .

Method 8: Roll Back Printer Driver Updates
Sometimes, the current version of printer drivers may cause any conflicts and in this case, you have to restore previous versions of installed drivers. This process is called rollback of drivers and you can easily roll back your computer drivers to their previous state by following our guide How to Rollback Drivers on Windows 10 .

Wait until the previous versions of drivers are installed on your Windows 10 PC. Once done, check if you have fixed error printing Windows 10 issue.
Method 9: Reinstall Printer Drivers
Incompatible drivers must be reinstalled to resolve error printing message problems. You are advised to reinstall device drivers only if you cannot attain any fix by updating them. Steps to reinstall drivers are very easy and you can do so by using a third-party application or by implementing the steps manually as instructed in our guide How to Uninstall and Reinstall Drivers on Windows 10

After reinstalling printer drivers, check if you can hear audio from Logitech speakers.
Method 10: Reinstall Printer Drivers in Compatibility mode
Few users have suggested that re-installing printer drivers in compatibility mode have helped them fix printer status error printing issue. Here are a few instructions regarding the same.
- Click on the Windows key and type Device manager . Then, click on Open .

- Expand Print queues then right-click on your Printer device and select Uninstall device .

If you’re prompted to confirm then again click on the Uninstall button.
Now go to your printer driver download webpage (e.g. HP ) and download the latest drivers for your printer.
Right-click on the setup file and select Properties.

Note: If the drivers are in a zip file make sure to extract all the files and then right-click on the .exe file.
Switch to the Compatibility Tab and click on Run this program in Compatibility mode .
From the drop-down select Windows 7 or 8 and then click on Run this program as an administrator .

Finally, double-click on the setup file and wait for the drivers to be installed on your device.
Once finished, reboot the PC and see if you can fix printer status error Windows 10 issue.
Method 11: Update Windows
Also, if there are any bugs in your PC, they can only be fixed after a Windows update . Microsoft releases regular updates to fix all these bugs thereby fixing error printing Windows 10 issue. Hence, ensure if you have updated your Windows Operating System and if any updates are pending in action, use our guide How to Download and Install Windows 10 Latest Update

After updating your Windows Operating System, check whether printer status error Windows 10 issue is resolved.
Method 12: Reconnect Printer
If all these steps do not work to fix printer status error Windows 10, you might need to completely uninstall the existing drivers and the printer and then reinstall them. The process of doing the same is simple but rather lengthy but this seems to fix error printing message on your Windows PC. Anyway, below are the steps to remove and add your printer back.
- Open the Settings application by pressing the Windows + I keys together and select Devices as shown.

Move to the Printers & scanners settings in the left pane.
Find the problematic printer in the right-side panel and single click on it to access its options. Select Remove Device , let the process complete, and then close Settings.

- Type Print Management in the Windows search bar and click Open to launch the application.

- Double-click on All Printers (in the left panel or right panel, both are fine) and press Ctrl + A to select all connected printers.

- Right-click over any printer and select Delete .

Now, it is time to add the printer back, but first, unplug the printer cable from your computer and perform a restart. Once the computer boots back on, properly reconnect the printer.
Follow the above steps 1 and 2 to open the Printer & Scanner settings.
Click on the Add a printer & scanner button at the top of the window.

- Windows will now automatically start looking for any connected printers. If Windows successfully detects the connected printer, click on its entry in the search list and select Add device to add it back otherwise, click on The printer that I want isn’t listed hyperlink.

- In the following window, select the appropriate option by clicking on its radio button (For example, select My printer is a little older. Help me find it if your printer doesn’t use USB for connection or select Add a Bluetooth, wireless, or network discoverable printer to add a wireless printer) and click on Next .

- Follow the on-screen instructions to reinstall your printer .

Now that you have successfully reinstalled your printer, try printing a test page to ensure everything is right back on track.
Open up Windows Settings and click on Devices .
On the Printers and Scanners page, click on the printer you just added back and would like to test, followed by a click on the Manage button.

- Finally, click on the Print a test page option. Muffle your ears & listen carefully for the sound of your printer printing a page and rejoice.

Recommended:
- Fix Unable to Install GarageBand on iOS
- Fix Error Code 0x80d0000a in Windows 10
- Fix Photoshop Dynamiclink Not Available in Windows 10
- Where is the WPS Button on Canon Printer?
The Wi-Fi Protected Setup (WPS) button allows you to easily connect your Canon printer to a wireless network. However, locating this button can sometimes be confusing, as its placement varies across Canon printer models. This article will explain what the WPS button is, why it is useful for connecting your printer wirelessly, and guide you to finding its location on some common Canon printer models like the PIXMA, MAXIFY, and imageCLASS series. With step-by-step instructions and images highlighting button locations, you’ll learn where to access WPS on your specific Canon printer.

- Where is the WPS Button on Canon Printer?
- How to Set Up the Canon Printer to the WLAN using the WPS button
- Method 1: Through WPS Button
- Method 2: Through WPS Settings Menu
Where is the WPS Button on Canon Printer?
The Canon Printer comes with a WPS button that enables you to connect the Printer to a Local Area Network. The WPS method, also known as the Push button method is a method of connecting the Canon Printer to an access point Wireless Router or a Gateway. The WPS button will let you connect the Canon Printer to the Wireless Local Area Network (WLAN) on the building. The WPS button is available on the panel and is indicated by a Wireless icon on the button. This button is extremely useful if you have connected all the devices on a particular office building to a common network, and you can use any of the PCs to print the file using the same Printer.
How to Set Up the Canon Printer to the WLAN using the WPS button
Understanding the function and accessibility of this connection feature will make establishing wireless printing much simpler. So if you’ve been wondering, “Where is the WPS button on my Canon printer?”, read on for clear explanations tailored to your machine.
There are two methods to set up the Canon Printer to the Wireless Local Area Network on your building:
Method 1: Through WPS Button
The first method is using the WPS button on the Canon Printer and the setup process is very simple. All you need to do is to enable the buttons on the devices to let the devices automatically get connected to the network.
- Find the location of the WPS button on the Canon Printer panel .
Note: If the WPS button is activated on your Canon Printer, you can see the Wi-Fi lamp flash on rhythmically on the Canon Printer.
- Press the WPS button on the Wireless Router within 2 minutes and you should see the devices getting connected.
Note 1: If you haven’t activated the WPS button on the Wireless router within 2 minutes, the devices may not get connected.
Note 2: Turn off the Wi-Fi connection on all the unpaired devices while you are setting up the Canon Printer to the WLAN router for quick connectivity.

Method 2: Through WPS Settings Menu
If your Canon Printer has no WPS button on the panel, then, you can follow the options in this method to connect your Canon Printer to the WLAN network. You will be able to access the WPS settings using the options discussed below and you can easily connect the Printer to the Network.
Option I: Using HOME Button
The first option is to use the HOME button on the Canon Printer panel. If you are perplexed with the question of where is the WPS button on Canon Printer, you can use this option to access the WPS settings on the Canon Printer using the HOME button.
- Enter the Printer’s setup menu using the MENU button on the Canon Printer’s panel.

- Use the arrow keys to move to the WLAN icon on the screen and press the left function key beneath the arrow keys to select it.
- Navigate to the Wireless LAN Setup in the Settings screen using the arrow keys on the Canon Printer panel and then press the OK button.
Note 1: The Wireless LAN Setup may be also available as the Wireless Setup or the Network Setup on the screen.
Note 2: The Wi-Fi lamp on the bottom-left part of the Printer’s panel would flash on when the wireless connection of the Canon Printer is enabled.
- In the Wireless LAN setup screen, move to the WPS (Push button method) tab and press the OK button to select the option.

Press the OK button on the next screen to confirm the selection.
Press the WPS button on the Wireless Router for 2 minutes for the connection to take place.
Press the OK button on the Canon Printer within 2minutes to connect the Printer to the Wireless LAN network.
Option II: Using Setup Button
The second option to connect the Canon Printer to the WLAN is using the Setup button on the Canon Printer panel. If you cannot find the answer to the question of where is the WPS button on Canon Printer but can easily access the WLAN settings that will allow you to connect to the Wireless router.
Press the Setup button indicated by the Tools icon on the Canon Printer’s panel.
Move to the Wireless LAN setup tab on the screen and press the OK button on the Setup Menu.
Press the Stop/ Reset button on the Printer’s panel, select the Wireless LAN Setup Standard Setup option displayed on the screen, and press the OK button on the panel.

- Navigate to the specific network in the list of available networks on the screen and press the OK button twice.
Note: If the network is not displayed, use the arrow keys to select the Search again option on the screen and press the OK button.
- Enter the security Passphrase on the next screen using the numeric keys on the Printer panel and press the OK button.
Note: Press the * key to toggle between the Uppercase and lowercase characters in the numeric pad.
- Press the OK button to complete the setup of the Wi-Fi network to your Canon Printer.
Recommended:
- Fix Login Failed Your Account Cannot Play on this Platform Fortnite
- Which is Better Between 21:9 vs 16:9 Monitors?
- 13 Best Cheap Android TV Box
- Fix WD My Passport Ultra Not Detected on Windows 10
Microsoft frequently rolls out updates for Windows 10 to improve the operating system on various functionalities such as system efficiency, security, stability, etc. Although each bug brings a host of improvements to the operating system, it also brings new bugs that plague many users. One of these is the Windows update released in March 2021, update KB500080. This update caused many issues with the printer drivers already installed in the system. Users reported errors like Windows update for printer drivers not working. These printer installation issues were so prominent and serious that some users even reported receiving BSOD (Blue Screen of Death – the screen displayed after a system crash due to Windows failure) while printing. This made printing impossible. If you are wondering how to solve this Windows update can’t get list of devices issue, you are at the right article. Here, we discuss the possible causes and some potential solutions so we can tackle this error. Let’s get started!
- How to Fix Printer Installation Issues in Windows 10
- Method 1: Discharge Printer
- Method 2: Run Printer Troubleshooter
- Method 3: Update Device Drivers
- Method 4: Manually Install Generic Drivers
- Method 5: Restart Print Spooler Service
- Method 6: Install Drivers from Windows Update Catalog
- Method 7: Reinstall Printer
How to Fix Printer Installation Issues in Windows 10
Before getting onto the fixes, let us see some causes for this issue:
- Printer is old and has no latest software support
- Windows update bug
- Issues with printer service
- Issues with printer drivers and software
- Printer is incorrectly connected
Method 1: Discharge Printer
You can try discharging the printer of all electricity by removing it from the main switch, removing it from the computer for 2–5 minutes, and connecting it back again. Make sure to properly connect the printer to the main switch and the computer before turning it off, and check if the issue is fixed.
Method 2: Run Printer Troubleshooter
There is an in-built Windows troubleshooter for printer issues. You can access it easily by accessing settings. Running printer troubleshooter will resolve Windows update for printer drivers not working issue.
Press Windows + I keys simultaneously to launch Settings .
Click on the Update & Security tile, as shown.
Go to Troubleshoot menu in the left pane.
Select Printer troubleshooter and click on Run the troubleshooter button shown highlighted below.
- Wait for the troubleshooter to detect and fix the problem. Once the process is complete, click Apply this fix and restart your PC .
Windows will automatically search for any problems and attempt to fix them automatically. Also, you can run Hardware and Devices Troubleshooter on Windows 10 to resolve the issue.
Method 3: Update Device Drivers
As Windows users reported errors after the Windows update, there could be problems with the printer driver. Updating printer drivers could be a potential fix. Various methods to update the printer drivers are highlighted below if one of them does not work for you.
Read our guide on How to Update Device Drivers on Windows 10 and implement the different methods given in this link for printer devices.
Note : If your printer came with an installation disc, it could be a driver installation disc. Insert it into your DVD/CD driver and follow the onscreen instructions to install the driver.
Method 4: Manually Install Generic Drivers
If you have an old printer or your manufacturer has not yet released a driver for Windows 10, printer installation issues can occur. This can be an ongoing issue since the printer will be unusable without proper usable driver software. In this scenario, Windows will automatically install Generic drivers suitable for your printer. If not, then you can install them manually.
- Press the Windows key , type Device Manager , and click on Open .
- Under the Print queues section, right-click on Microsoft XPS writer and select the Update driver option.
- Click on the Browse my computer for driver software option.
- Next, click on Let me pick from a list of available drivers on my computer .
- Finally, choose Generic software device and click on Next .
This will install the required driver and fix the printer installation issue.
Method 5: Restart Print Spooler Service
When a Windows user sends print requests to the printer, the print spooler is the software that manages these requests sent by the user. Resetting it can be a potential solution. Follow the below steps:
Hit the Windows + R keys together to open the Run dialog box.
Type services.msc and click on OK to launch the Services window.
- Right-click on Print Spooler and click on Stop to stop the service.
Now, navigate to the Run dialog box again by simultaneously pressing Windows + R keys .
Enter the below command and click on OK .
%WINDIR%\system32\spool\printers
Select all the files in the folder by holding Ctrl + A keys simultaneously.
Now, press Shift + Delete to delete all the files present in that folder permanently.
Go back to the Services window and double-click on the Print Spooler service.
Make sure the Startup type drop-down is set to Automatic .
Finally, click on Start under the Service status section.
- Click on Apply > OK to confirm.
Check if Windows Update can’t get list of devices issue gets resolved or not.
Method 6: Install Drivers from Windows Update Catalog
Sometimes, using a generic driver does not help and might still throw up printer installation issues. If you face issues with the printer and you have an old printer, then you can try an official Microsoft Windows Update Catalog. Here, the updates are archived so year-old drivers can easily download and use them. Let us see how to use it.
Go to the Microsoft Catalog website in a browser.
Type the model of your printer (e.g. HP LaserJet 4000 ) and click on Search to search drivers for your hardware.
If you find the driver for your hardware, click on Download .
- Here, click on the cab link to download the driver.
Right-click on the downloaded file and choose Extract .
Update your printer driver manually by locating the folder where you extracted the drivers.
Method 7: Reinstall Printer
You can reinstall the printer completely from the start to see if that works. This involves removing the printer and device driver with all powers and connecting them back.
- Hit the Windows key , type Control Panel , then click on Open .
- Set View by > Category , then click on View devices and printers .
Under the Printers section, right-click on your printer .
Choose the Remove device option.
Click on Yes in the UAC prompt to remove the device.
Now, reboot the PC and reconnect your printer.
Go to Devices and Printers and right click on the printer and select Set as default printer .
This will solve printer installation issues.
Recommended:
- Fix Daemon Tools Unable to Access Image File MDF
- Fix Epson Scanner Cannot Communicate in Windows 10
- Fix Error Printing in Windows 10
- Where is the WPS Button on Canon Printer?
We hope that this article was helpful, and you were able to resolve printer installation issues in Windows 10. If you have any doubts or suggestions, comment below. Also, let us know what you want to learn next.
