If you’re facing any issues with your USB Composite device such as they can’t work properly with USB 3.0 then don’t worry as this guide will help you resolve this problem. It is really a happy moment that you bought a new laptop with the latest configuration. You might have heard that for faster file transfer through USB ports, USB 3.0 is the most sought after port. Therefore, most of the devices are coming with this configuration only. However, you may forget that what if you have an old printer that cannot work on the latest USB 3.0 ports.

“USB device is an older USB device and might not work USB 3.0”
Most of the old devices work on USB 2.0 ports. It means you are going to experience some problems while connecting older devices with the latest USB 3.0 port. One of the most common errors that you experience is “USB Composite Device can’t work properly with USB 3.0”. However, in some cases, users experience no problem while connecting the old printer in the USB 3.0 port. No worries, you do not need to panic or throw out your old printer out because we are going to explain some methods to fix USB Composite Device can’t work properly with USB 3.0 issue.
- Fix USB Composite Device can’t work properly with USB 3.0
- Method 1 – Update USB Driver
- Method 2 – Re-install USB controllers
- Method 3 – Enable USB legacy support in BIOS
- Method 4 – Prevent Windows from turning off the devices
- Method 5 – USB 2.0 Expansion Card
- Method 6 – Run Hardware and Devices Troubleshooter
- Method 7 – Windows USB Troubleshooter
Fix USB Composite Device can’t work properly with USB 3.0
Make sure to create a restore point just in case something goes wrong.
Method 1 – Update USB Driver
Sometimes it is all about the driver. If it is corrupted, updated or missing, you may face the above issue.
1.Press Windows key + R then type devmgmt.msc and Enter to open Device Manager.

2.Expand Universal Serial Bus controllers.
3.Right-click on Generic USB Hub and select “Update Driver.”

4.Now select Browse my computer for driver software.

5.Click on Let me pick from a list of drivers on my computer.

6.Select Generic USB Hub from the list of drivers and click Next.

7.Wait for Windows to finish the installation then click Close.
8.Make sure to follow the steps 4 to 8 for all the “ Generis USB Hub ” present under Universal Serial Bus controllers.
9.If the problem is still not resolved then follow the above steps for all the devices listed under Universal Serial Bus controllers.

This method may be able to Fix USB Composite Device can’t work properly with USB 3.0 , if not then continue.
Method 2 – Re-install USB controllers
Another method is that you can rely on is disabling and re-enabling your USB controllers. It could be possible that the problem is with the USB controller. You do not need to worry while following the steps to conduct this process because it is completely harmless for your system.
1.Open Device Manager. Press Windows +R and type “ devmgmt.ms c”.
2.Here you need to click on Universal Serial Bus controllers and expand this option.

3.Here you need to right-click on each USB controller and choose the Uninstall option.

4.You need to repeat the same procedure with all available USB controllers listed under Universal Serial Bus controllers.
5.Finally, once you are done with the uninstallation process, you need to restart your system.
6.Upon rebooting your system Windows automatically will scan your system of hardware changes and install all missing drivers.
Method 3 – Enable USB legacy support in BIOS
If you are still struggling with this problem you can opt for this method. You just need to access your BIOS settings to check whether USB legacy support is enabled or not. If it is not enabled you have to enable it. Hopefully, you will get our problem solved.
1.Turn off your laptop, then turn it on and simultaneously press F2, DEL or F12 (depending on your manufacturer) to enter into BIOS setup.

2.Navigate to Advanced using the arrow keys.
3.Go to USB Configuration and then Enable USB legacy support.

4.Exit saving changes and check if you’re able to Fix USB device is an older USB device and might not work USB 3.0 issue.
Method 4 – Prevent Windows from turning off the devices
Have you ever noticed that for a moment your printer gets connected and then disconnected? Yes, there could be a Windows glitch which automatically turns off the device to save power. Usually, it occurs to just to save power in most of the devices, particularly in laptops.
1.Press Windows +R and type “ devmgmt.msc ” and hit Enter to open Device Manager.
2.You need to navigate to USB Serial Device Controllers.
3.You need to locate USB Root Hub then right-click on each USB Root Hub and navigate to Properties and choose the Power Management Tab.

4.Here you need to uncheck the box “ Allow the computer to turn off this device to save power “. Finally, save your settings.

5.Reboot your system and try connecting your printer back.
Method 5 – USB 2.0 Expansion Card
Unfortunately, if none of the above-mentioned methods worked well for you to fix USB Composite Device can’t work properly with USB 3.0, you can buy USB 2.0 Expansion card to connect your old printer with your new laptop.
Method 6–Run Hardware and Devices Troubleshooter
1.Press Windows Key + I to open Settings then click on Update & Security icon.
2.From the left-hand menu make sure to select Troubleshoot.
3.Now under “Find and fix other problems” section, click on “ Hardware and Devices “.
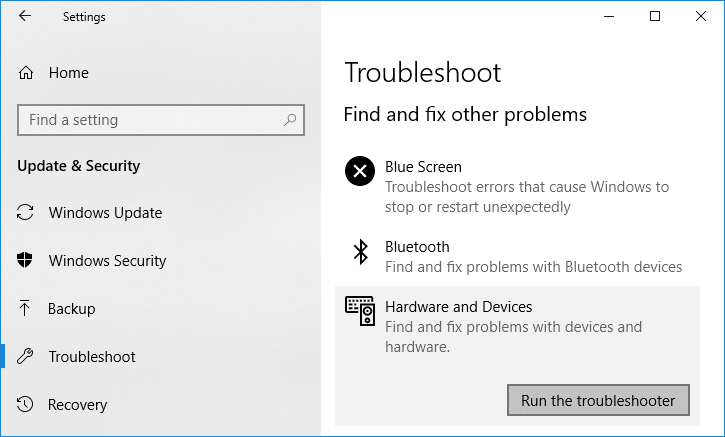
4.Next, click on Run the troubleshooter and follow on-screen instructions to Fix USB Composite Device can’t work properly with USB 3.0.

Method 7 – Windows USB Troubleshooter
Windows has its own troubleshooting section to help all Windows users. You can easily take help directly from Microsoft to solve your problem. This web-based diagnostic and repair tool of Windows will automatically detect the problem and repair it or gives ideas to solve this problem.

Hopefully, these solutions will help you to solve your problem. There could be other possible solutions as well, but we have included the most effective solutions for fixing USB Composite Device can’t work properly issue. All you need to make sure that you follow the steps systematically so that you can expect the result properly.
Recommended:
- Why is Windows 10 Updates Extremely Slow?
- How to Check Your CPU Temperature in Windows 10
- Print Screen Not Working? 7 Ways to Fix it!
- Disable OneDrive on Windows 10 PC
I hope this article was helpful and you can now easily Fix USB Composite Device can’t work properly with USB 3.0 , but if you still have any questions regarding this tutorial then feel free to ask them in the comment’s section.

- What is Print Screen and its uses?
- 7 Ways to Fix Print Screen Not Working in Windows 10
- What To Do If Your Print Screen Key Does Not Work?
- Method 1: Update your keyboard driver
- Method 2: Disable the F Lock or F Mode
- Method 3: Make sure Windows is up to date
- Method 4: Stop Background programs
- Method 5: Perform a Clean Boot
- Method 6: Configure Alternate Hotkeys for the Print Screen key
- Method 7: Use the Snipping Tool
What is Print Screen and its uses?
Basically, Print Screen saves a bitmap image of the current screen or screenshot to the Windows clipboard , while pressing the Alt key in combination with Print Screen (Prt Sc) will capture the currently selected window. This image then can be saved by using the paint or any other editing application. Another use of the Prt Sc key is that when pressing in combination with both the left Alt and left Shift key will turn on a high contrast mode .
With the introduction of Windows 8 (also in Windows 10), you can press Windows Key in combination with the Prt Sc key will capture the screenshot and saved this image to the disk (the default picture location). Print screen is often abbreviated as:
Print Scrn

Prnt Scrn

Prt Scrn

Prt Scn

Prt Scr

Prt Sc

Pr Sc
7 Ways to Fix Print Screen Not Working in Windows 10
Before making any changes to your system, make sure to create a restore point . Just in case something goes wrong, you will be able to restore your system to an earlier configuration when everything was working correctly.
What To Do If Your Print Screen Key Does Not Work?
So if you’re not able to take screenshots in Windows 10 or the Print Screen key is not working then don’t worry as today we are going to see how to fix this issue. If the print screen doesn’t work then try Windows Key + PrtSc key and if this also doesn’t worry then don’t panic. So without wasting any time let’s see the resolve Print Screen not working issue with the help of the below-listed troubleshooting guide.
Note: First, try to use the print screen key again, simply press the Print Screen key (PrtSc) then open Paint and press Ctrl + V to paste the captures screenshot, does it work? If it didn’t then sometimes you need to use the function key in addition to the print screen key, so press Fn + PrtSc and see if this works. If it didn’t then continue with the below fixes.
Method 1: Update your keyboard driver
- Press Windows Key + R then type “ devmgmt.msc ” and hit Enter to open Device Manager.
- Expand Keyboard then right-click on Standard PS/2 Keyboard and select Update Driver.

- First, select Search automatically for updated driver software and wait for Windows to automatically install the latest driver.

Reboot your PC and see if you’re able to fix the issue, if not then continue.
Again go back to Device Manager and right-click on Standard PS/2 Keyboard and select Update Driver.
This time select “ Browse my computer for driver software. ”

- On the next screen click on “ Let me pick from a list of available drivers on my computer. ”

Select the latest drivers from the list and click Next.
Reboot your PC to save changes and see if you’re able to fix the Print Screen not working in Windows 10 issue, if not then continue with the next method.
Method 2: Disable the F Lock or F Mode
See if you have an F Mode key or an F Lock key on your keyboard. Because such keys will prevent you from taking screenshots, thus disabling the print screen key. So press the F Mode or F Lock key and again try to use the Print Screen Key.
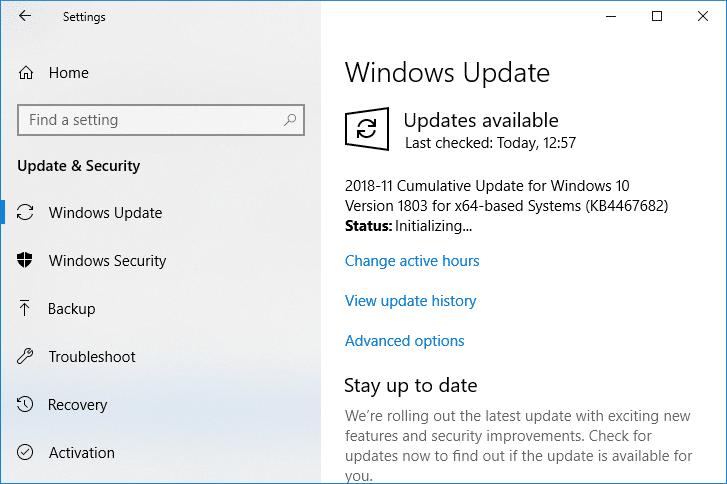
Method 3: Make sure Windows is up to date
- Press Windows Key + I to open Settings then click on the Update & Security icon.
- Then under Update status click on “ Check for updates. ”

- If an update is found for your PC, install the update and reboot your PC.
Method 4: Stop Background programs
Press Ctrl + Shift + Esc key together to open Task Manager.
Find the following programs then right-click on each of them and select “ End Task “:
OneDrive Dropbox Snippet tool

- Once finished close Task Manager and check if you’re able to fix Print Screen not working issue.
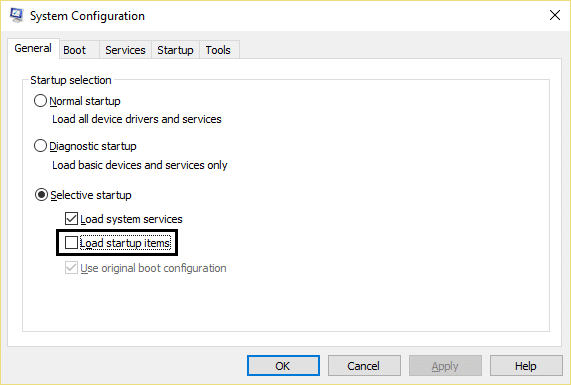
Method 5: Perform a Clean Boot
Sometimes 3rd party software can conflict with the keyboard and can cause the print screen key to not work correctly. In order to fix the issue , you need to perform a clean boot on your PC then try to use the Print Screen key to take a screenshot.
Method 6: Configure Alternate Hotkeys for the Print Screen key
Navigate to this website and download the ScreenPrint Platinum.
Install the program then open the ScreenPrint Platinum program.

- Now click on Setup from the ScreenPrint Platinum menu and select ScreenPrint.

- Click on the Hotkeys button at the bottom of the Configuration window.

- Next, checkmark “ Enable Hotkeys ” then under Global Capture Hotkey, select any character from the dropdown such as P.

Similarly, under Global Capture Hotkey checkmark Ctrl and Alt.
Finally, click the Save button and this will assign the Ctrl + Alt + P keys to substitute for the Print Screen key.
Press Ctrl + Alt + P keys together to capture the screenshot then paste it inside Paint.

Although it didn’t actually fix Print Screen not working issue, it’s a great alternative till you finally found a proper fix for it. But if you don’t want to use a third-party app then you could also use the Windows in-built Snipping Tool.
Method 7: Use the Snipping Tool
If you still failed to take a screenshot by pressing the Print Screen key then you should try to use Snipping Tool in Windows 10. In the Windows Search type snipping and click on the “ Snipping Tool ” from the search result.

This in-built tool in Windows provides a great way to take a screenshot of the portion of the currently active window or the whole screen.

Recommended:
- What is the Difference Between CC and BCC in an Email?
- Fix Cursor Jumps or moves randomly in Windows 10
- Set up Yahoo email account in Windows 10 Mail App
- How to Check Your CPU Temperature in Windows 10
That’s it you have successfully Fix Print Screen Not Working in Windows 10 Issue but if you still have any queries regarding this post then feel free to ask them in the comment section.
