Fix Windows Time service doesn’t start automatically: Windows Time service (W32Time) is clock synchronization service provided by Microsoft for Windows which automatically synchronize the correct time for your system. The Time synchronization is done through an NTP (Network Time Protocol) Server such as time.windows.com. Every PC running Windows Time service uses the service to maintain accurate time in their system.

But sometimes it’s possible that this Windows time service doesn’t start automatically and you might get the error “The Windows Time Service is not started.” This means the Windows Time service failed to start and your Date & Time will not be synchronized. So without wasting any time let’s see how to actually Fix Windows Time service doesn’t start automatically issue with the below-listed troubleshooting steps.

- Fix Windows Time service doesn’t start automatically
- Method 1: Unregister and then again Register Time Service
- Method 2: Delete the trigger event that is registered as the default setting
- Method 3: Enable Time Synchronization in Task Scheduler
- Method 4: Manually Start the Windows Time Service
Fix Windows Time service doesn’t start automatically
Make sure to create a restore point just in case something goes wrong.
Method 1: Unregister and then again Register Time Service
1.Press Windows Keys + X then select Command Prompt (Admin).

2.Type the following command one by one and hit Enter:
pushd %SystemRoot%\system32 .\net stop w32time .\w32tm /unregister .\w32tm /register .\sc config w32time type= own .\net start w32time .\w32tm /config /update /manualpeerlist:”0.pool.ntp.org,1.pool.ntp.org,2.pool.ntp.org,3.pool.ntp.org”,0x8 /syncfromflags:MANUAL /reliable:yes .\w32tm /resync popd

3.If the above commands don’t work then try these:
w32tm /debug /disable w32tm /unregister w32tm /register net start w32time
4.After the last command, you should get a message saying “ The Windows Time Service is starting. The windows time service was started successfully. “
5.This means that your Internet Time synchronization is working again.
Method 2: Delete the trigger event that is registered as the default setting
1.Press Windows Key + X then select Command Prompt (Admin).
2.Type the following command in cmd and hit Enter:
sc triggerinfo w32time delete
3.Now run the following command to define a trigger event that suits your environment:
sc triggerinfo w32time start/networkon stop/networkoff

4.Close command prompt and again check if you’re able to Fix Windows Time service doesn’t start automatically issue.
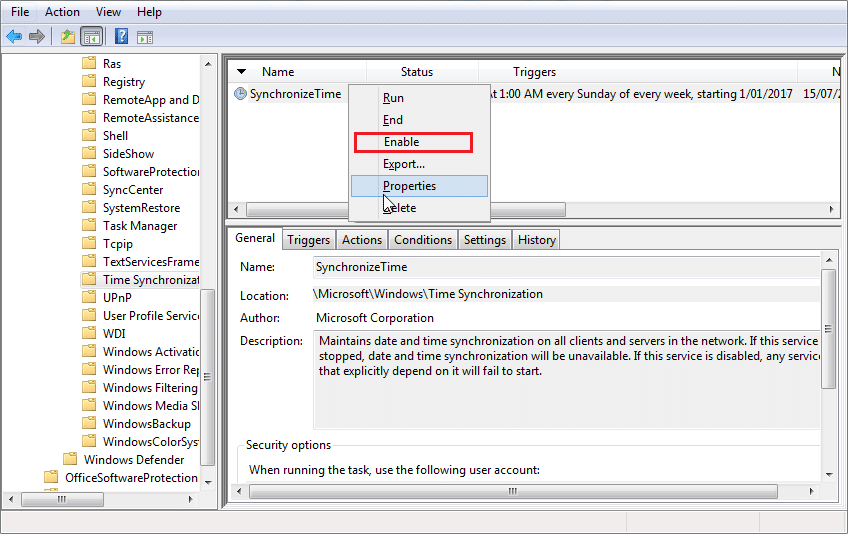
Method 3: Enable Time Synchronization in Task Scheduler
1.Press Windows Key + X then select Control Panel.

2.Click System and Security and then click Administrative Tools.

3.Double click on Task Scheduler and navigate to the following path:
Task Scheduler Library / Microsoft / Windows / Time Synchronization
4.Under Time Synchronization, right-click on Synchronize Time and select Enable.
5.Reboot your PC to save changes.
Method 4: Manually Start the Windows Time Service
1.Press Windows Key + R then type services.msc and hit Enter.

2.Find Windows Time Service in the list then right-click and select Properties.

3.Make sure the Startup type is set to Automatic (Delayed Start) and the service is running, if not then click on start.

4.Click Apply followed by OK.
5.Now Time Synchronization in Task Scheduler may start Windows Time service before the Service Control Manager and in order to avoid this situation, we need to disable Time Synchronization in Task Scheduler.
6.Open Task Scheduler and navigate to the following path:
Task Scheduler Library / Microsoft / Windows / Time Synchronization
7.Right click on Synchronize Time and select Disable.

8.Reboot your PC to save changes.
- Fix Task Scheduler Error One or more of the specified arguments are not valid
- How to Fix Default Printer Keeps Changing Issue
- Fix Webcam not working in Windows 10
- Fix Superfetch has stopped working
That’s it you have successfully Fix Windows Time service doesn’t start automatically but if you still have any questions regarding this post then feel free to ask them in the comment’s section.
Fix Default Printer Keeps Changing Issue: In Microsoft latest operating system which is Windows 10, they have removed the Network Location aware feature for Printers and because of this, you can’t set the default printer of your choice. Now the default printer is set automatically by Windows 10 and is generally the last printer you selected. If you want to change the default printer and don’t want it to automatically change then follow the below-listed troubleshooting guide.

- Default Printer Keeps Changing [SOLVED]
- Method 1: Disable Windows 10 to Automatically Manage your Printer
- Method 2: Manually Set the Default Printer
- Method 3: Registry Fix
Default Printer Keeps Changing [SOLVED]
Make sure to create a restore point just in case something goes wrong.
Method 1: Disable Windows 10 to Automatically Manage your Printer
1.Press Windows Key + I to open Settings then click Devices.

2.Now from the left-hand menu select Printers & scanners.
- Disable the toggle under “ Let Windows manage my default printer. “

4.Close everything and reboot your PC.
Method 2: Manually Set the Default Printer
1.Press Windows Key + X then select Control Panel.
2.Click Hardware and Sound and then select Devices and Printers.

3.Right-click on your printer and select Set as a default printer.

4.Restart your PC to save changes.
Method 3: Registry Fix
1.Press Windows Key + R then type regedit and hit Enter to open Registry Editor.

2.Navigate to the following registry key:
HKEY_CURRENT_USER\SOFTWARE\Microsoft\Windows NT\CurrentVersion\Windows
3.Double click on LegacyDefaultPrinterMode and change its value to 1.

Note: If the value is not present then you have to manually create this key, right-click in an empty area in the right-hand side window in the registry then select New > DWORD (32-bit) Value and name this key as LegacyDefaultPrinterMode.
4.Click OK and close registry editor. Again set your default Printer by following the above method.
5.Reboot your PC to save changes.
6.If this doesn’t fix the issue then again open Registry Editor and navigate to the following path:
HKEY_USERS\USERS_SID\Printers\Connections HKEY_USERS\USERS_SID\Printers\Settings

7.Delete all the entries present inside these keys and then navigate to:
HKEY_USERS\USERS_SID\Printers\Defaults
8.Delete the DWORD DisableDefault in the right-hand side window and again set your default Printer.
9.Reboot your PC to save the above settings.
- Fix Task Scheduler Error One or more of the specified arguments are not valid
- Fix You can’t sign in to your PC right now error
- Your Device Is Offline. Please Sign In With The Last Password Used On This Device
- Fix Superfetch has stopped working
That’s it you have successfully Fix Default Printer Keeps Changing [SOLVED] but if you still have any questions regarding this guide then feel free to ask them in the comment’s section.
