Fix Working on updates 100% complete Don’t turn off your computer: Windows updates are a crucial part of System which ensures smooth system performance. Windows 10 automatically download & install important updates from Microsoft Server but sometimes while working on updates on Shutdown or Startup, the update installation get stuck or freezes. In short, you will be stuck on the Windows update Screen and you will see one of the following messages persist for a long time:

Working on updates

100% complete

Don't turn off your computer


Preparing to configure Windows.

Do not turn off your computer.


Please do not power off or unplug your machine.

Installing update 2 of 5...


Configuring Windows updates

100% complete

Do not turn off your computer.


Getting Windows ready

Don't turn off your computer


Keep your PC on until this is done

Installing update 3 of 5...
If you are stuck on anyone of the screen then the only option you have is restarting your PC. There are several reasons as to why Windows updates get stuck or freezes but most of the times it’s related to software or drivers conflict. So without wasting any more time let’s see how to actually Fix Working on updates 100% complete Don’t turn off your computer with the below-listed troubleshooting guide.
- Fix Working on updates 100% complete Don’t turn off your computer
- If you can access the Windows after a restart:
- Method 1: Run the Windows Update Troubleshooter
- Method 2: Rename SoftwareDistribution Folder
- Method 3: Reset Windows Update components
- Method 4: Perform a Clean Boot
- Method 5: Run System Restore
- Method 6: Uninstall the particular update causing the issue
- If you can’t access the Windows:
- Method 1: Remove any USB peripherals
- Method 2: Boot into Safe Mode and uninstall that particular update
- Method 3: Run Automatic/Startup Repair
- Method 4: Run MemTest86+
- Method 5: Run System Restore
- Method 6: Reset Windows Update components in Safe Mode
- Method 7: Run DISM
Fix Working on updates 100% complete Don’t turn off your computer
It’s possible that the Windows update might be taking time and it’s not actually stuck, so it’s advice to wait for few hours before trying the below guide.
If you can access the Windows after a restart:
Method 1: Run the Windows Update Troubleshooter
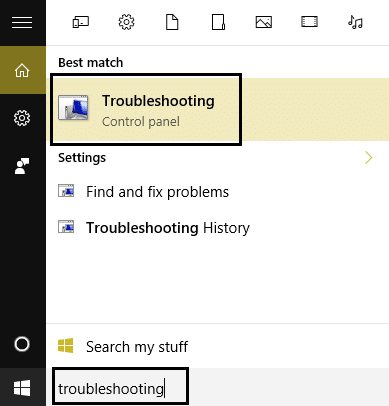
1.Type “troubleshooting” in Windows Search bar and click on Troubleshooting.
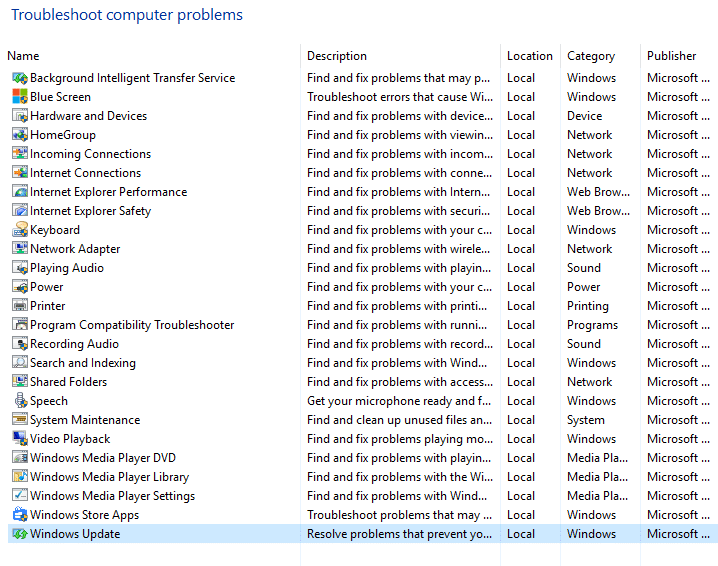
2.Next, from the left window pane select View all.
3.Then from the Troubleshoot computer problems list select Windows Update.
4.Follow on-screen instruction and let the Windows Update Troubleshoot run.
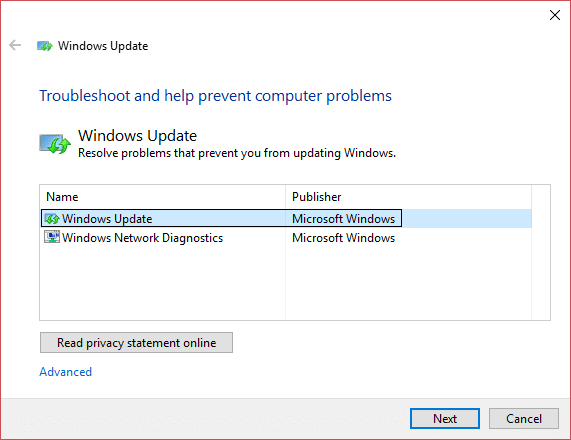
5.Restart your PC to save changes.
This should help you to Fix Working on updates 100% complete Don’t turn off your computer but if not then continue with the next method.
Method 2: Rename SoftwareDistribution Folder
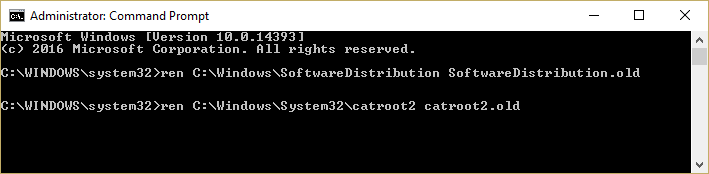
1.Press Windows Key + X then select Command Prompt (Admin).
2.Now type the following commands to stop Windows Update Services and then hit Enter after each one:
net stop wuauserv net stop cryptSvc net stop bits net stop msiserver

3.Next, type the following command to rename SoftwareDistribution Folder and then hit Enter:
ren C:\Windows\SoftwareDistribution SoftwareDistribution.old ren C:\Windows\System32\catroot2 catroot2.old
4.Finally, type the folowing command to start Windows Update Services and hit Enter after each one:
net start wuauserv net start cryptSvc net start bits net start msiserver

5.Reboot your PC to save changes and this should Fix Working on updates 100% complete Don’t turn off your computer issue.
Method 3: Reset Windows Update components
1.Press Windows Key + X then select Command Prompt (Admin).

2.Type the following command into cmd and hit Enter after each one:
net stop bits net stop wuauserv net stop appidsvc net stop cryptsvc
3.Delete the qmgr*.dat files, to do this again open cmd and type:
Del “%ALLUSERSPROFILE%\Application Data\Microsoft\Network\Downloader\qmgr*.dat”
4.Type the following into cmd and hit Enter:
cd /d %windir%\system32

- Reregister the BITS files and the Windows Update files . Type each of the following commands individually in cmd and hit Enter after each one:
regsvr32.exe atl.dll

regsvr32.exe urlmon.dll

regsvr32.exe mshtml.dll

regsvr32.exe shdocvw.dll

regsvr32.exe browseui.dll

regsvr32.exe jscript.dll

regsvr32.exe vbscript.dll

regsvr32.exe scrrun.dll

regsvr32.exe msxml.dll

regsvr32.exe msxml3.dll

regsvr32.exe msxml6.dll

regsvr32.exe actxprxy.dll

regsvr32.exe softpub.dll

regsvr32.exe wintrust.dll

regsvr32.exe dssenh.dll

regsvr32.exe rsaenh.dll

regsvr32.exe gpkcsp.dll

regsvr32.exe sccbase.dll

regsvr32.exe slbcsp.dll

regsvr32.exe cryptdlg.dll

regsvr32.exe oleaut32.dll

regsvr32.exe ole32.dll

regsvr32.exe shell32.dll

regsvr32.exe initpki.dll

regsvr32.exe wuapi.dll

regsvr32.exe wuaueng.dll

regsvr32.exe wuaueng1.dll

regsvr32.exe wucltui.dll

regsvr32.exe wups.dll

regsvr32.exe wups2.dll

regsvr32.exe wuweb.dll

regsvr32.exe qmgr.dll

regsvr32.exe qmgrprxy.dll

regsvr32.exe wucltux.dll

regsvr32.exe muweb.dll

regsvr32.exe wuwebv.dll
6.To reset Winsock:
netsh winsock reset

7.Reset the BITS service and the Windows Update service to the default security descriptor:
sc.exe sdset bits D:(A;;CCLCSWRPWPDTLOCRRC;;;SY)(A;;CCDCLCSWRPWPDTLOCRSDRCWDWO;;;BA)(A;;CCLCSWLOCRRC;;;AU)(A;;CCLCSWRPWPDTLOCRRC;;;PU)
sc.exe sdset wuauserv D:(A;;CCLCSWRPWPDTLOCRRC;;;SY)(A;;CCDCLCSWRPWPDTLOCRSDRCWDWO;;;BA)(A;;CCLCSWLOCRRC;;;AU)(A;;CCLCSWRPWPDTLOCRRC;;;PU)
8.Again start the Windows update services:
net start bits net start wuauserv net start appidsvc net start cryptsvc
9.Install the latest Windows Update Agent.
10.Reboot your PC and see if you’re able to Fix Working on updates 100% complete Don’t turn off your computer issue , if not then continue.
Method 4: Perform a Clean Boot
1.Press Windows Key + R then type msconfig and hit enter to System Configuration.
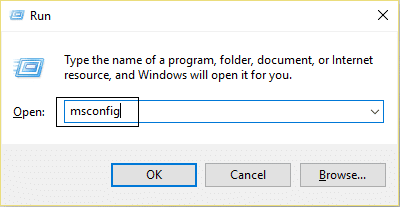
2.On General tab, choose Selective Startup and under it make sure the option “ load startup items ” is unchecked.

3.Navigate to the Services tab and checkmark the box that says “ Hide all Microsoft services. “

4.Next, click Disable all which would disable all the other remaining services.
5.Restart your PC check if the problem persists or not.
6.If the issue is resolved then it’s definitely caused by a third party software. In order to zero in on the particular software, you should enable a group of services (refer the previous steps) at a time then reboot your PC. Keep doing this until you figure out a group of services which are causing this error then check the services under this group one by one until you find which one is causing the problem.
6.After you had finish troubleshooting make sure to undo the above steps (select Normal startup in step 2) in order to start your PC normally.
Method 5: Run System Restore
1.Press Windows Key + R and type” sysdm.cpl ” then hit enter.
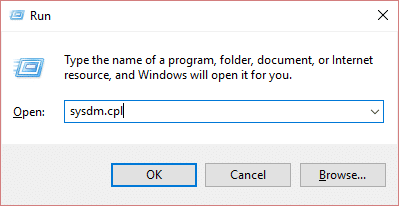
2.Select System Protection tab and choose System Restore.

3.Click Next and choose the desired System Restore point .

4.Follow on-screen instruction to complete system restore.
5.After reboot, you may be able to Fix Working on updates 100% complete Don’t turn off your computer.
Method 6: Uninstall the particular update causing the issue
1.Press Windows Key + X then select Control Panel.

2.Under Programs click Uninstall a program.
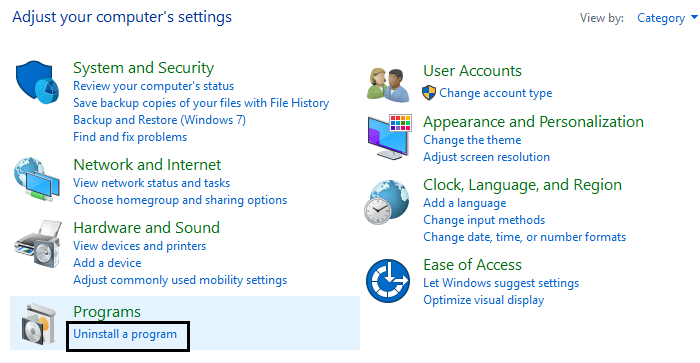
3.From the left-hand menu click on View installed updates.

4.Now from the list right-click on the particular update which is causing this problem and select Uninstall.

If you can’t access the Windows:
First, enable legacy Advanced boot option
Method 1: Remove any USB peripherals
If you’re stuck with “Working on updates 100% complete Don’t turn off your computer” then you might want to try to remove any external device connected to PC and make sure you also disconnect any device connected via USB such as pen drives, mouse or keyboard, portable hard disk, etc. Once you have successfully disconnected any such device then again try to update the Windows.
Method 2: Boot into Safe Mode and uninstall that particular update
- Restart your Windows 10.
2.As the system restarts enter into BIOS setup and configure your PC to boot from CD/DVD.
3.Insert the Windows 10 bootable installation DVD and restart your PC.
4.When prompted to Press any key to boot from CD or DVD, press any key to continue.
5.Select your language preferences, and click Next. Click Repair your computer in the bottom-left.

6.On choose an option screen, click Troubleshoot .

7.On Troubleshoot screen, click Advanced option .

8.On Advanced options screen, click Command Prompt .

9.When the Command Prompt(CMD) open type C: and hit enter.
10.Now type the following command:
BCDEDIT /SET {DEFAULT} BOOTMENUPOLICY LEGACY
11.And hit enter to Enable Legacy Advanced Boot Menu.

12.Close Command Prompt and back on the Choose an option screen, click continue to restart Windows 10.
13.Finally, don’t forget to eject your Windows 10 installation DVD, in order to get Boot options.
14.On Boot Option screen choose “ Safe Mode. “

15.Once you are in Safe Mode follow the method 6 to uninstall the update causing the trouble.
Method 3: Run Automatic/Startup Repair
1.Insert the Windows 10 bootable installation DVD and restart your PC.
2.When prompted to Press any key to boot from CD or DVD, press any key to continue.

3.Select your language preferences, and click Next. Click Repair your computer in the bottom-left.
4.On choose an option screen, click Troubleshoot .
5.On Troubleshoot screen, click Advanced option .

6.On the Advanced options screen, click Automatic Repair or Startup Repair .

7.Wait til the Windows Automatic/Startup Repairs complete.
8.Restart and you have successfully Fix Working on updates 100% complete Don’t turn off your computer issue.
Also, read How to fix Automatic Repair couldn’t repair your PC .
Method 4: Run MemTest86+
Note: Before starting, make sure you have access to another PC as you will need to download and burn Memtest86+ to the disc or USB flash drive.
1.Connect a USB flash drive to your system.
2.Download and install Windows Memtest86 Auto-installer for USB Key .
3.Right-click on the image file which you just downloaded and select “ Extract here ” option.
4.Once extracted, open the folder and run the Memtest86+ USB Installer .
5.Choose your plugged in USB drive to burn the MemTest86 software (This will format your USB drive).

6.Once the above process is finished, insert the USB to the PC which is giving the A disk read error occurred message.
7.Restart your PC and make sure that boot from the USB flash drive is selected.
8.Memtest86 will begin testing for memory corruption in your system.

9.If you have passed all the test then you can be sure that your memory is working correctly.
10.If some of the steps were unsuccessful then Memtest86 will find memory corruption which means that your “A disk read error occurred” is because of bad/corrupt memory.
11.In order to Fix Working on updates 100% complete Don’t turn off your computer issue , you will need to replace your RAM if bad memory sectors are found.
Method 5: Run System Restore
1.Put in the Windows installation media or Recovery Drive/System Repair Disc and select your l anguage preferences , and click Next
2.Click Repair your computer at the bottom.
3.Now choose Troubleshoot and then Advanced Options.
4..Finally, click on “ System Restore ” and follow onscreen instructions to complete the restore.

5.Restart your PC to save changes.
Method 6: Reset Windows Update components in Safe Mode
Again boot into Safe Mode and follow the method 3 in order to reset Windows Update components which would Fix Working on updates 100% complete Don’t turn off your computer.
Method 7: Run DISM
1.Again open the Command Prompt from the above-specified method.
2.Type the following command in cmd and hit enter after each one:
a) Dism /Online /Cleanup-Image /CheckHealth

b) Dism /Online /Cleanup-Image /ScanHealth

c) Dism /Online /Cleanup-Image /RestoreHealth

3.Let the DISM command run and wait for it to finish.
- If the above command doesn’t work then try on the below:
Dism /Image:C:\offline /Cleanup-Image /RestoreHealth /Source:c:\test\mount\windows

Dism /Online /Cleanup-Image /RestoreHealth /Source:c:\test\mount\windows /LimitAccess
Note: Replace the C:\RepairSource\Windows with the location of your repair source (Windows Installation or Recovery Disc).
5.Reboot your PC to save changes and this should Fix Working on updates 100% complete Don’t turn off your computer.
- 0xc000000f: An Error occurred while attempting to read the boot configuration data
- Fix Error 2502 and 2503 while installing or uninstalling
- Error code: 0x80070035 The network path was not found
- How to Fix Chrome Won’t Open or Launch
That’s it you have successfully Fix Working on updates 100% complete Don’t turn off your computer issue but if you still have any questions regarding this post then feel free to ask them in the comment’s section.
