Fix Youtube Not Working Issue on Chrome: If you are facing issues when using YouTube in Chrome or when streaming YouTube videos then don’t worry as in this article you see how to fix this issue. You may encounter that YouTube not working or opening issue in Chrome such as there is no sound available for YouTube videos, instead of the video you only see a black screen etc then don’t worry as the main cause of this issue seems to be outdated chrome browser or Cache or cookies problem of chrome. So without wasting any time let’s see How to Fix Youtube Not Working Issue on Chrome with the help of the below-listed guide.
![Fix Youtube Not Working Issue on Chrome [SOLVED] - 1](https://techcult.com/wp-content/uploads/2019/01/Fix-Youtube-Not-Working-Issue-on-Chrome-SOLVED.png)
- Fix Youtube Not Working Issue on Chrome [SOLVED]
- Method 1: Make sure Chrome is up to date
- Method 2: Clear Cache & Cookies in Chrome
- Method 3: Disable Hardware Acceleration in Chrome
- Method 4: Disable all third party extensions
- Method 5: Reset Chrome to default
- Method 6: Use Chrome Cleanup Tool
- Method 7: Reinstall Google Chrome Browser
Fix Youtube Not Working Issue on Chrome [SOLVED]
Make sure to create a restore point just in case something goes wrong.
Method 1: Make sure Chrome is up to date
1.In order to update Google Chrome, click Three dots on the upper right-hand corner in Chrome then select help and then click on About Google Chrome.

2.Now make sure Google Chrome is updated if not then you will see an Update button , click on it.

This will update Google Chrome to its latest build which could help you Fix Youtube Not Working Issue on Chrome.
Method 2: Clear Cache & Cookies in Chrome
When the browsing data is not cleared from a long time then this can also cause the Youtube picture-in-picture not working issue on Chrome.
1.Open Google Chrome and press Ctrl + H to open history.
2.Next, click Clear browsing data from the left panel.

3.Make sure the “ beginning of time ” is selected under Obliterate the following items from.
4.Also, checkmark the following:
Browsing history Download history Cookies and other sire and plugin data Cached images and files Autofill form data Passwords

5.Now click Clear browsing data button and wait for it to finish.
6.Close your browser and restart your PC to save changes
Method 3: Disable Hardware Acceleration in Chrome
1.Open Google Chrome then click the three dots in the upper right corner and select Settings.

2.Now scroll down till you find Advanced (which would be probably located at the bottom) then click on it.

3.Now scroll down till you find System settings and make sure to disable the toggle or turn off the option “ Use hardware acceleration when available. “

4.Restart Chrome and this should help you in fixing Youtube Not Working Issue on Chrome.
Method 4: Disable all third party extensions
Extensions are a very useful feature in chrome to extend its functionality but you should know that these extensions take up system resources while they run in the background. In short, even though the particular extension is not in use, it will still use your system resources. So it’s a good idea to remove all the unwanted/junk Chrome extensions which you might have installed earlier.
1.Open Google Chrome then type chrome://extensions in the address and hit Enter.
2.Now first disable all the unwanted extensions and then delete them by clicking on the delete icon.

3.Restart Chrome and see if you’re able to Fix Youtube Not Working Issue on Chrome.
4.If you’re still facing the issues with YouTube videos then disable all the extension.
Method 5: Reset Chrome to default
1.Open Google Chrome then click the three dots on the upper right corner and click on Settings.
2.Now in the settings window scroll down and click on Advanced at the bottom.
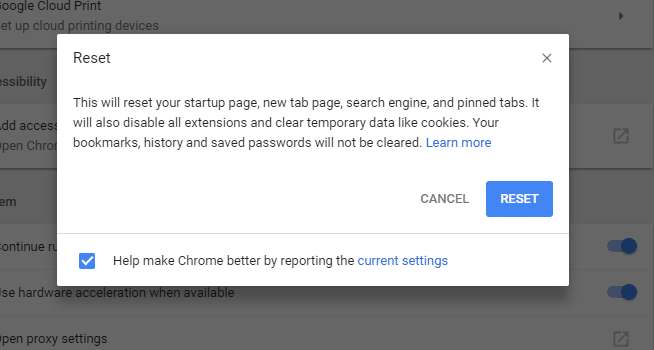
3.Again scroll down to bottom and click on Reset column.

4.This would open a pop window again asking if you want to Reset, so click on Reset to continue.
Method 6: Use Chrome Cleanup Tool
The official Google Chrome Cleanup Tool helps in scanning and removing software’s that may cause the problem with chrome such as crashes, unusual startup pages or toolbars, unexpected ads you can’t get rid of, or otherwise changing your browsing experience.

Method 7: Reinstall Google Chrome Browser
Well, if you have tried everything and still not able to fix the error then you need to reinstall Chrome again. But first, make sure to uninstall Google Chrome completely from your system then again download it from here . Also, make sure to delete the user data folder and then install it again from the above source.
1.Press Windows Key + R then type the following and hit Enter:
%LOCALAPPDATA%\Google\Chrome\User Data\
2.Right-click on the default folder and select Rename or you can delete if you are comfortable losing all your preferences in Chrome.

3.Rename the folder to default.old and hit Enter.
Note: If you are not able to rename the folder make sure you close all instances of chrome.exe from Task Manager.
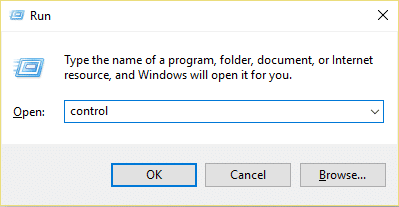
4.Now press Windows Key + R then type control and hit Enter to open Control Panel.
5.Click Uninstall a program and then find Google Chrome.

6.Right-click on Chome and select Uninstall.
7.Now reboot your PC to save changes and again download & install Chrome .
Recommended:
- How to Fix Printer Offline Status in Windows 10
- SOLVED: Encrypt Contents To Secure Data Grayed Out In Windows 10
- Fix Windows Hello isn’t available on this device on Windows 10
- How to Reinstall Realtek HD Audio Manager [GUIDE]
That’s it you have successfully Fix Youtube Not Working Issue on Chrome but if you still have any questions regarding this tutorial feel free to ask them in the comment’s section.
Fix Printer Offline Status in Windows 10: If you are facing some issues with your printer then generally restarting the printer can pretty much fix most of these issues. But if your printer is offline even after being fully connected to the PC then this issue can’t be fixed by a simple restart. Users are complaining that they can’t use the printer because their printer is offline even though their printer in ON, connect to the PC and fully operational.

If your printer is not working, or the print command doesn’t seem to respond then you can check if your device status if offline or not. To verify this, press Windows Key + R then type control printers and hit Enter. Or you could navigate to the Devices and Printers in Control Panel then select the desired printer and under the ribbon, at the bottom, you will see something like this “Status: Offline”. If this is the case then your printer is offline and until you resolve this issue the printer won’t work.
- Why does your Printer Go offline?
- Fix Printer Offline Status in Windows 10
- Method 1: Check Printer Connection
- Method 2: Change the Printer Status
- Method 3: Update Printer Driver
- Method 4: Run Printer Troubleshooter
- Method 5: Restart Print Spooler Service
- Method 6: Add a Second Printer
- Method 7: Reinstall your Printer Drivers
Why does your Printer Go offline?
There is no particular cause for this error but the issue could be caused because of outdated or incompatible drivers, conflict of printer spooler services, a problem with physical or hardware connection of the printer to PC or, The Active Directory Domain Services is Currently Unavailable error .. So without wasting any time let’s see How to Fix Printer Offline Status in Windows 10 with the help of the below-listed tutorial.
Fix Printer Offline Status in Windows 10
Make sure to create a restore point just in case something goes wrong.
Method 1: Check Printer Connection
Before doing anything, first, you should check if the communication between the printer & PC is properly set up. There can be something wrong with the USB cable or USB port, or network connection if connected wirelessly.
1.Shutdown your PC and power off your printer. Remove all the cables connected to the printer (even the power cable) and then press & hold the power button of the printer for 30 seconds.
2.Again connect all the cables and then make sure the USB cable from the printer is properly connected to the USB port of the PC. You could also switch the USB port to see if this resolves the problem.
3.If your PC is connected via Ethernet port then make sure the Ethernet port is working and the connection to your printer & PC is proper.
4.If the printer is connected to PC via a wireless network then make sure the printer is connected to your PC network. Check if this Fixes Printer Offline Status in Windows 10, if not then continue.
Method 2: Change the Printer Status
1.Press Windows Key + R then type control printers and hit Enter to open Devices and Printers.

Note: You could also open Devices and Printers in control panel by navigating to Control Panel > Hardware and Sound > Devices and Printers.
2.Right-click on your printer and select “ Set as default printer ” from the context menu.

3.Then again right-click on your printer and select “ See what’s printing “.

4.You will see the printer queue, see if there are any unfinished tasks and make sure to remove them from the list.

5.Now from the printer queue window, select your Printer and uncheck the “Use Printer Offline” option.
![Fix Youtube Not Working Issue on Chrome [SOLVED] - 23](https://techcult.com/wp-content/uploads/2019/01/Click-on-Printer-then-uncheck-the-Use-Printer-Offline-option.png)
6.Similarly, uncheck the “ Pause Printing ” option, just to make sure everything works fine.
Method 3: Update Printer Driver
1.Press Windows Key + R then type “ services.msc ” and hit enter.

2.Find Print Spooler service then right click on it and select Stop.

3.Again press Windows Key + R then type printui.exe /s /t2 and hit enter.
4.In the Printer Server Properties window search for the printer which is causing this issue.
5.Next, remove the printer and when asked for confirmation to remove the driver as well, select yes.

6.Now again go to services.msc and right-click on Print Spooler and select Start.
7.Next, navigate to your printers manufacturer website, download and install the latest printer drivers from the website.
For example , in case you have an HP printer then you need to visit HP Software and Drivers Downloads page . Where you can easily download the latest drivers for your HP printer.
8.If you’re still not able to fix Printer Offline Status then you can use the printer software that came with your printer. Usually, these utilities can detect the printer on the network and fix any issues that are causing the printer to appear offline.
For example, you can use HP Print and Scan Doctor to fix any issues regarding HP Printer.
Method 4: Run Printer Troubleshooter
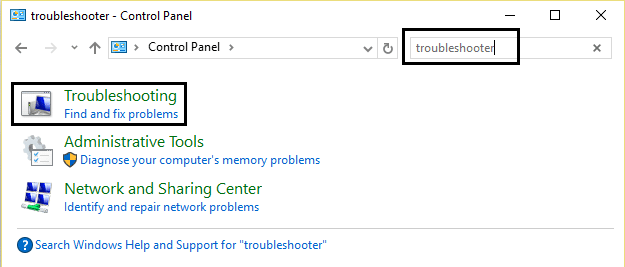
1.Type “troubleshooting” in Control Panel then click on Troubleshooting from the search result.
2.Next, from the left window pane select View all.
3.Then from the Troubleshoot computer problems list select Printer.

4.Follow on-screen instruction and let the Printer Troubleshooter run.
5.Restart your PC and you may be able to Fix Printer Offline Status in Windows 10.
Method 5: Restart Print Spooler Service
1.Press Windows Key + R then type services.msc and hit Enter.
2.Find Print Spooler service in the list and double-click on it.
3.Make sure the Startup type is set to Automatic and the service is running, then click on Stop and then again click on start in order to restart the service.

4.Click Apply followed by OK.
5.After that, again try to add the printer and see if you’re able to Fix Printer Offline Status in Windows 10.
Method 6: Add a Second Printer
NOTE: This method will only work if your printer is connected via a network to the PC (instead of the USB cable).
1.Press Windows Key + I to open Settings then click on Devices.

2.From the left-hand menu click on “ Bluetooth & other devices “.
3.Now from the right window pane click on “ Devices and printers “.

4.Right-click on your printer and select Printer properties from the context menu.

5.Switch to Ports tab then click on the “ Add Port… ” button.

6.Select “ Standard TCP/IP Port ” under Available port types and then click New Port button.

7.On the Add Standard TCP/IP Printer Port Wizard click on Next .

8.Now type in the Printers IP Address and Port name then click Next.

Note: You could easily find the IP address of your printer on the device itself. Or you could find these details on the manual that came with the printer.
9.Once you successfully added the Standard TCP/IP Printer, click Finish.

See if you’re able to Fix Printer Offline Status in Windows 10 Issue , if not then you need to reinstall your printer drivers.
Method 7: Reinstall your Printer Drivers
1.Press Windows Key + R then type control printers and hit Enter to open Devices and Printers.
- Right-click on your printer and select “ Remove device ” from the context menu.

3.When the confirm dialog box appears , click Yes.

4.After the device is successfully removed, download the latest drivers from your printer manufacturer website .
5.Then reboot your PC and once the system restarts, press Windows Key + R then type control printers and hit Enter.
Note: Make sure your printer is connected to the PC via USB, ethernet or wirelessly.
6.Click on the “ Add a printer ” button under Device and Printers window.

7.Windows will automatically detect the printer, select your printer and click Next.

- Set your printer as default and click Finish.

If nothing above helps then follow this guide: Fix Printer Installation Error 0x00000057
Recommended:
- SOLVED: Encrypt Contents To Secure Data Grayed Out In Windows 10
- How to Fix USB Tethering Not Working in Windows 10
- Fix The program can’t start because api-ms-win-crt-runtime-l1-1-0.dll is missing
- Fix Microsoft Visual C++ 2015 Redistributable Setup Fails Error 0x80240017
That’s it you have successfully Fix Printer Offline Status in Windows 10 but if you still have any questions regarding this tutorial then feel free to ask them in the comment’s section.
