If you are facing the error This webpage is not available with error code ERR_QUIC_PROTOCOL_ERROR then you are at the right place as today we are going to see how to fix this issue. This error will stop you from visiting the above webpage and other websites also don’t seem to load. Unfortunately, the actual cause of this error is still not known but there are few fixes which you could try to resolve this error. Anyway without wasting any time let’s see how to actually fix this error.

- [FIXED] ERR_QUIC_PROTOCOL_ERROR in Chrome
- Method 1: Disable Experimental QUIC protocol
- Method 2: Disable Unwanted Chrome Extensions
- Method 3: Uncheck Proxy
- Method 4: Temporarily Disable Firewall
[FIXED] ERR_QUIC_PROTOCOL_ERROR in Chrome
Make sure to create a restore point just in case something goes wrong.
Method 1: Disable Experimental QUIC protocol
Open Google Chrome and type chrome://flags and hit enter to open settings.
Scroll down and find Experimental QUIC protocol.
![Disable Experimental QUIC protocol | [FIXED] ERR_QUIC_PROTOCOL_ERROR in Chrome - 2](https://techcult.com/wp-content/uploads/2017/05/Disable-Experimental-QUIC-protocol.png)
Next, make sure it’s set to disable.
Restart your browser and you may be able to Fix ERR_QUIC_PROTOCOL_ERROR in Chrome.
Method 2: Disable Unwanted Chrome Extensions
Extensions are a very useful feature in chrome to extend its functionality but you should know that these extensions take up system resources while they run in the background. In short, even though the particular extension is not in use, it will still use your system resources. So it’s a good idea to remove all the unwanted/junk extensions which you might have installed earlier.
Open Google Chrome then type chrome://extensions in the address and hit Enter.
Now first disable all the unwanted extensions and then delete them by clicking on the delete icon.

- Restart Chrome and see if you’re able to Fix ERR_QUIC_PROTOCOL_ERROR in Chrome.
Method 3: Uncheck Proxy
- Press Windows Key + R then type inetcpl.cpl and hit enter to open Internet Properties.

- Next, Go to Connections tab and select LAN settings.
![Switch to the Connections tab and click on the LAN Settings button | [FIXED] ERR_QUIC_PROTOCOL_ERROR in Chrome - 5](https://techcult.com/wp-content/uploads/2020/10/Switch-to-the-Connections-tab-and-click-on-the-LAN-Settings-button.png)
- Uncheck Use a Proxy Server for your LAN and make sure “Automatically detect settings” is checked.

- Click Ok then Apply and reboot your PC.
Method 4: Temporarily Disable Firewall
Sometimes the Antivirus program can cause error and in order to verify this is not the case here, you need to disable your antivirus for a limited time so that you can check if the error still appears when the antivirus is off.
- Right-click on the Antivirus Program icon from the system tray and select Disable.

- Next, select the time frame for which the Antivirus will remain disabled.

Note: Choose the smallest amount of time possible for example 15 minutes or 30 minutes.
Once done, again try to connect to open Google Chrome and check if the error resolves or not.
Search for the control panel from the Start Menu search bar and click on it to open the Control Panel.
![Type Control Panel in the search bar and press enter | [FIXED] ERR_QUIC_PROTOCOL_ERROR in Chrome - 9](https://techcult.com/wp-content/uploads/2020/08/Type-Control-Panel-in-the-search-bar-and-press-enter.png)
- Next, click on System and Security then click on Windows Firewall.

- Now from the left window pane click on Turn Windows Firewall on or off.

- Select Turn off Windows Firewall and restart your PC.

Again try to open Google Chrome and visit the web page which was earlier showing the error. If the above method doesn’t work make sure to follow the exact same steps to turn on your Firewall again.
Recommended:
- Fix Printer Installation Error 0x000003eb
- Fix The Installation Failed In The First Boot Phase Error
- How To Fix Windows Settings won’t open
- Fix Windows Update Error 8024402F
That’s it you have successfully Fix ERR_QUIC_PROTOCOL_ERROR in Chrome but if you still have any queries regarding this guide then feel free to ask them in the comment’s section.
Fix Printer Installation Error 0x000003eb: If you are trying to install a printer but can’t do so because of the error code 0x000003eb then you are at the right place as today we are going to discuss on how to fix this issue. The error message doesn’t give you much information as it just says unable to install the printer and gives you the error code 0x000003eb.
Unable to install printer. Operation could not be completed (error 0x000003eb)

But if you troubleshoot the issue you must have come to a conclusion that this must be a problem with printer drivers being incompatible or corrupt. And you are right, the printer connectivity or installation error 0x000003eb occurs because the drivers are somehow got corrupted or incompatible. So without wasting any time let’s see how to actually Fix Printer Installation Error 0x000003eb.
- Fix Printer Installation Error 0x000003eb
- Method 1: Make sure Windows Installer Service is Running
- Method 2: Perform Clean Boot
- Method 3: Registry Fix
Fix Printer Installation Error 0x000003eb
Make sure to create a restore point just in case something goes wrong.
Method 1: Make sure Windows Installer Service is Running
1.Press Windows Key + R then type services.msc and hit Enter.

2.Find Windows Installer service in the list and double click on it.
3.Make sure the Startup type is set to Automatic and click Start , if the service is not already running.

4.Click Apply followed by OK.
5.Again try to install the printer.
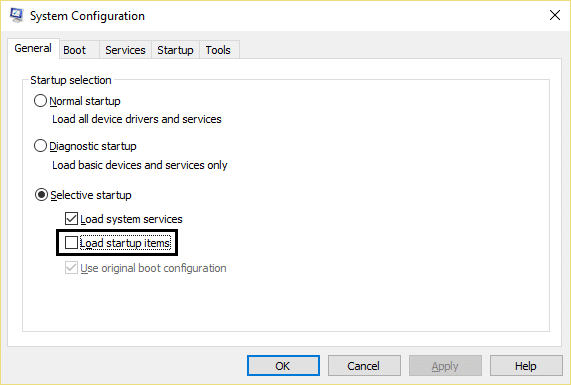
Method 2: Perform Clean Boot
Note: Make sure to unplug any external devices from your PC and then try to install the printer.
Sometimes 3rd party software can conflict with Windows and therefore cause Error 0x000003eb In Windows 10. In order Fix this issue , you need to perform a clean boot in your PC and diagnose the issue step by step.
Once you have performed the clean boot, make sure to install Printer and see if you are able to Fix Printer Installation Error 0x000003eb.
Method 3: Registry Fix
Note: Backup your Registry before performing the below-listed steps.
1.Press Windows Key + R then type service.msc and hit Enter.
2.Double click on Print Spooler service and click on Stop , in order to stop Print Spooler service.

3.Click Apply followed by OK.
4.Now press Windows Key + R then type regedit and hit Enter to open Registry Editor.

5.Navigate to the following registry key according to your system architecture:
For 32-bit system: HKEY_LOCAL_MACHINE\SYSTEM\CurrentControlSet\Control\Print\Environments\Windows NT x86\Drivers\Version-3
For 64-bit system: HKEY_LOCAL_MACHINE\SYSTEM\CurrentControlSet\Control\Print\Environments\Windows x64\Drivers\Version-3

6.Delete all the keys listed under version-3 , by right-clicking on them and select Delete.
7.Press Windows Key + R then type the following and hit Enter:
C:\Windows\System32\spool\drivers\W32X86
8.Rename the folder name 3 to 3.old.

9.Again Start the Print Spooler service and try to install your printers.
If you are still not able to install your printer then make sure to first uninstall your printer completely and then again install it with new drivers. Make sure to use the CD wizard which came with the printer rather than the Add Printer option in Windows.
- Fix Background Intelligent Transfer Service Missing from services
- How To Fix NETWORK_FAILED in Chrome
- Fix Google Chrome error He’s Dead, Jim!
- Fix ERR_NETWORK_ACCESS_DENIED in Chrome
That’s it you have successfully Fix Printer Installation Error 0x000003eb but if you still have any queries regarding this guide then feel free to ask them in the comment’s section.
