If you frequently use WhatsApp, this blog is for you because the most recent update to the WhatsApp camera settings allows you to add filters or special effects to images or videos, such as sepia or black and white. In the end, adjusting the camera settings on WhatsApp can improve users’ photographs and videos while also allowing them to customize the app to their preferences. This article will make you understand how to change WhatsApp camera settings on Windows 10, Android, and iPhone.

- How to Change WhatsApp Camera Settings
- How to Change WhatsApp Camera Settings on Android?
- How to Change WhatsApp Camera Settings Windows 10?
- How to Change WhatsApp Camera Settings iPhone?
- How Can I Improve My WhatsApp Camera Quality?
How to Change WhatsApp Camera Settings
Read this article till the end to learn the steps demonstrating how to change Whatsapp camera settings in a detailed manner using the pictures for better understanding.
How to Change WhatsApp Camera Settings on Android?
You may also use the WhatsApp camera settings to save storage space. It includes options to control the resolution of photos and videos, which can help save storage space on your device.
Let us see the steps to change WhatsApp camera settings on Android phone:
Note : Since Android smartphones do not have the same Settings options, they vary from manufacturer to manufacturer. Hence, ensure the correct settings before changing any on your device.
- Open the Settings menu on your Android.

- Tap on Apps & notifications .

- Tap on WhatsApp .

- Tap on Permissions .

- Turn on the toggles for the Camera and Microphone options to access the WhatsApp Android camera.

Also Read : WhatsApp Introduces New Camera Mode Update
How to Change WhatsApp Camera Settings Windows 10?
To change the camera settings on WhatsApp for Windows 10, you will need to follow these steps:
Open WhatsApp on your Windows 10 device.
Start a video call with someone and click on the three-dotted icon from the options menu panel.

- Now, make the desired camera settings changes on the WhatsApp camera.

How to Change WhatsApp Camera Settings iPhone?
You can change the WhatsApp camera settings iPhone by following these steps:
- Open Settings on your iPhone.

- Swipe down and tap on Privacy & Security .

- Tap on Photos .

- Tap on the WhatsApp app.

- Then, choose the desired photo access choice for WhatsApp.

Read from the start to learn how to change Whatsapp camera settings on Android and Windows.
Also Read : 17 Best App for WhatsApp Hacking
How Can I Improve My WhatsApp Camera Quality?
To improve the quality of your WhatsApp camera, you should make sure you have a strong internet connection, that your phone’s camera is in good condition and is not covered up, and that you are in a well-lit area. Additionally, you can try to keep your phone as still as possible during the call and change the photo quality setting in the app.
Here are some tips you can utilize to improve the quality of your camera while video calling either way:
- Switch to a Wi-Fi connection : In order to improve your WhatsApp camera quality, make sure that your device is connected to a strong Wi-Fi network. If your router supports dual-band Wi-Fi, it is recommended that you connect your device to the 5GHz band for the best results.
- Pause all downloads : To improve the quality of your camera it is recommended to pause any downloads that are currently running in the background. This will free up bandwidth, which can be used to improve the quality of the video call. Additionally, it is also recommended to close any apps running in the background to further free up resources.
- Clean camera lens : Before starting a video call, clean the lens with a dry cloth. This will ensure that the image is clear and free of dust or other dirt particles that can affect image quality. Also, if you are in a low-light environment, try adjusting the brightness settings of your phone to get the best quality image.
- Use headphones : Using headphones while making a video/audio call on WhatsApp can help to improve the quality of the call. The headphones can help to eliminate external noises, which can interfere with sound quality . Additionally, the headphones can help to improve the clarity of the conversation, allowing for a clearer call.
- Use a lit place : Natural lighting is the best option for taking photos with your smartphone. If the lighting is too dark, the photos will appear grainy and lack detail. Additionally, make sure to move away from the live camera and choose a virtual background that will help focus the viewer’s attention on your subject. Another tip is to use the RAW format and process the images correctly.
Along with the previously mentioned Whatsapp camera settings, you can change these camera modifications on your phone to improve quality.
Q1. What camera settings should you change for iPhone?
Ans . To improve the quality of the video you are recording with your iPhone Camera , you should switch to 4K resolution, shoot at 24 frames per second, turn off HDR Video, turn on Grid, turn off View Outside Frame, and turn on Macro Control.
Q2. Why is WhatsApp DP blurry on iPhone?
Ans . A blurry profile picture is the result of poor optimization, a side effect of WhatsApp most likely stretching the original image you uploaded. Different issues like uploading poorly optimized photos or large images may result in blurry or low-quality WhatsApp pics. Also, a weak internet connection can cause the photo to be blurry.
Q3. What are the best settings for WhatsApp?
Ans . To ensure the best privacy settings on WhatsApp, you can adjust the privacy settings to make sure only the contacts you want can see your activity and profile.
Q4. Why WhatsApp photo quality is low?
Ans . WhatsApp tends to lower the quality of photos when they are shared in chats. This is done to save data as well as for speed. WhatsApp is known to use aggressive compression algorithms to reduce the size of shared media (photos, video) to save bandwidth. The outcome may not impact the viewing experience, but it does reduce the quality of the photo.
Recommended :
- How to Cancel Grammarly Subscription
- 16 Settings You Should Change to Protect Your Privacy in Windows 11
- How to Unblur an Image on iPhone
- How to Enable Camera Access on Instagram
A0 size papers are the largest size papers available to us as per ISO 216 paper size divisions. But how to print out a high-resolution image of this size? Especially when our systems can only print the largest sizes up to A3. Well, that points to a multi-page printout with combining a couple of pages will help you get the desired image. So this article will help you with how to print large images on multiple pages with understanding how to print image on multiple pages altogether on Windows 10 & 11.

- How to Print Large Image on Multiple Pages in Windows 10/11
- Method 1: With Microsoft Paint
- Method 2: Using Excel Spreadsheet
- Method 3: Via Microsoft Word
- Method 4: Through PDF Format
How to Print Large Image on Multiple Pages in Windows 10/11
Printing large images isn’t directly possible for large poster-sized images. Universally available sizes printable from Windows 10 and 11 are:
- US letter sizes and the US envelop sizes.
- A series (from A3 to A5), B4 to B6 print sizes, C size sheet, D size sheet, E size sheet.
- Envelop sizes, PRC envelops sizes, Japanese Envelop sizes, PRC sizes, Postcard sizes, and many more.
However, A3 is the largest direct printable size for the systems we are using now. And considering allowed print sizes in India, the Bureau of Indian Standards allows the ISO -A series size for drawing and other engineering works. This is why the largest size available in the country is A3x4 paper . After this brief but vital info about paper sizes, let’s move towards learning how to print large images on multiple pages.
Note: The methods and steps represented below are performed on Windows 11. The pictures, interface, and terminologies used are from Windows 11 which closely match Windows 10 too. Do verify before making any changes.
Method 1: With Microsoft Paint
Splitting a large image into numerous ones and printing it onto multiple pages can be easily done through Microsoft Paint. It is one of the ways to know how to print large image on multiple pages in Windows 10 and 11. To do so, follow these steps:
Locate your desired image in the File Explorer .
Right-click on it, and from the context menu, click the Open with > Paint app as depicted below.

- As the image opens in Paint, click on the File menu option from the top left corner.

- From the given list, select the Print option and then click on Page setup as shown.

- In the Page Setup window, choose your desired paper size from the Size: drop-down menu option.

6A. Adjust and verify the Orientation and Centring sections as per your output image preference.
6B. Type the number of pages required for the image to be split in the Fit to option box under the Scaling section. As shown below, if the image is required to be split into 16 separate images, type 4 by 4 page(s) in the boxes.

- After customization, click on the OK button.

- Next, click File > Print > Print as illustrated below.

Click on the printer you want to print with under the Select Printer section.
Then, click on Print . The copies will start to print according to the selection made.
Note: For demo purposes, we have selected the Microsoft Print to PDF option under the Select Printer section. Please select the printer available on your system to print your desired images.

Method 2: Using Excel Spreadsheet
Another way to learn how to print large image on multiple pages is by doing it on an Excel spreadsheet. You can print split images of a large one swiftly with Microsoft Excel as follows:
- Type Excel in the Windows search menu and click on Run as administrator .

- In the Excel window, go to Home and click on the Blank workbook option as shown.

- In the new blank workbook, click on the Insert tab.

- Click on the Pictures drop-down option and select This device to browse and pick your required image.

- A File explorer pop-up window will appear. Now, locate your picture and click on Insert .

- After the picture loads on the spreadsheet, click on the picture and hover on any of the corners when you see the cursor turn into an expanding arrow .

- Click and drag the image corners to increase its size.

- After you stretch the image to the desired size depicted in the Size section of the Picture Format ribbon, click on the File option.

9A. Click on the Print option and configure the Settings section as per your output image preferences.
9B. Verify the number of Pages your image will split in as per the size stretched and the Settings made.

Note: You can repeat steps 7, 8, and 9 to adjust the number of print copies you require of the image from the Settings until the desired preview is reached.
- Click on the Printer drop-down menu option to find and select the printer connected with your system.

- After completing these settings, select the number of copies from the Copies drop-down box. Then, click on the Print option to start the print.

Method 3: Via Microsoft Word
Microsoft Word is another alternative for you to know how to print large image on multiple pages. Follow the upcoming steps to do so:
- Type Word in the Windows search bar and click the Open option as shown below.

- Click on the View tab in the blank workbook.

- In the Page Movement section, select the Side to Side option shown highlighted.

- Click on the Insert tab and click the Pictures > This Device option as depicted below.

- Select and insert the desired image from the pop-up window into this Word file.

Right-click on the image and click the Wrap Text option.
To wrap and move the image freely in the Word file, select either Behind Text or In Front of Tex option.

- Then, stretch the image to desired width and height on the first page as shown.

- Similarly, add the same image on the second page and wrap the image as earlier.

- Stretch the second image to a degree where it will connect the first image as shown below.
Note: You can check the desired width and height in the Size section from the top right corner under Picture Format tab.

- Now, follow steps 8-11 from Method 2 for setting the image for printing and then start printing the image on multiple pages.
Method 4: Through PDF Format
PDF is another way with which you can split your larger resolution image into multiple images for printing. To get the answer to how to print large image on multiple pages questions, follow these steps:
Note: The following steps are performed on Adobe Acrobat DC . Make sure to have this software installed in your system before performing the upcoming steps.
Locate your desired image in the File Explorer .
Right-click on it, and from the context menu, click the Open with > Choose another app option as depicted below.
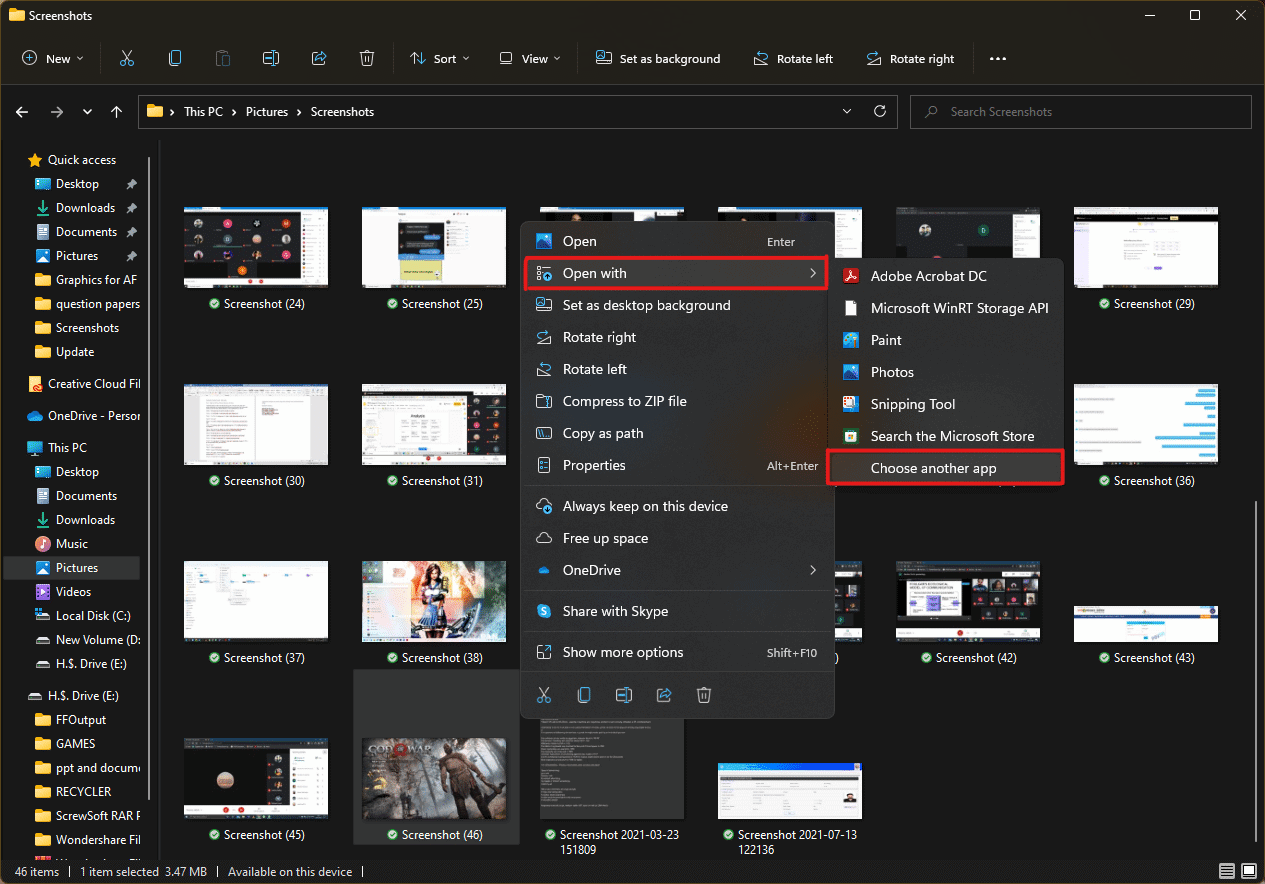
- How do you want to open this file? pop-up will appear with a list of installed apps in the system. Find and select Adobe Acrobat DC and click on OK .
Note: You can click on More apps to further expand the list of apps if you didn’t find Adobe Acrobat earlier.

- After the image opens in Adobe Acrobat, press the key combination Ctrl + P to open the Print window.

- Click on the Poster tab to split images.

- Click on the Page setup… button to configure the page sizes of the split images.

- Configure the Orientation settings and Paper size settings through the drop-down menu and click on OK .

- Select the printer a ttached to your system from the Printer drop-down menu option from the top left corner and click the Print option to start the printing process.

Recommended:
- How to Create a Hanging Indent in Word and Google Docs
- How to Reset Windows 11
- Fix Local Print Spooler Service Is Not Running
- How to Create PDF File in Windows 11
We hope you understood how to print large images on multiple pages in Windows 10/11 . Share your experiences in the comment section below with your queries and suggestions. Also, let us know which topic you want us to explore next.
