Printheads are an important part of printers as they host ink cartridges and keep them operating for high-quality prints. Your printer will frequently require a clean printhead which you can do yourself. However, it’s important to be gentle and careful while cleaning the printhead, as these components are delicate. In this guide, we will discuss various methods to clean HP printhead.

- How to Clean HP Printhead
- How to Clean HP Printhead with HP Expert
- How to Clean Printhead from Computer
- How to Clean Printhead Manually
- When Should I Clean Printhead
- Why Perform Nozzle Check before Cleaning?
How to Clean HP Printhead
A printhead on your printer can be cleaned by two methods, the first method involves steps using computer software, and the other method involves manually cleaning printer HP which can help with HP printer clogged ink nozzle.
Note: When manually cleaning your printer head, it is important to avoid damaging the printhead or ink cartridges, as this can lead to costly repairs at a service center. To prevent damage, make sure the printer is off and unplugged .
How to Clean HP Printhead with HP Expert
If your HP printer clogged ink nozzle and requires cleaning, you can use HP experts to clean it. Follow these simple steps to clean your HP printhead with HP experts:
On your computer, run Clean Printhead program.
If the Clean Printhead program does not work, manually open the cover of your printer and unplug the printer from the electric outlet.
Carefully remove all the ink cartridges from the printer and clean the contacts with a clean cloth.
Now, carefully clean the printhead contacts.
Carefully reinsert the cartridges back into the printer.
Now, plug the printer back into the electric outlet.
Now, let the printer boot up.
Now, perform a test print with an empty sheet to see if the printhead has been cleaned.
To clean the printhead properly, you may have to perform this procedure many times.
Note: If you continue to receive bad prints even after following the above-mentioned steps for HP ink tank printer head cleaning, the issue can be caused by other problems with the printer that cannot be helped with cleaning printer HP. You should consider taking your printer to a repair center to diagnose and resolve the issue.
How to Clean Printhead from Computer
You can also clean your computer’s HP printhead. Follow these simple steps to clean HP printhead on your computer.
Click on Start on your computer.
Search for and open the Control Panel.

- Here, click on View devices and printers
Note : Here, you will find a list of any printers you have connected to previously as well as the ones you currently use).

- Click on the printer icon and select Properties.
Note : If you see an indication that your ink cartridges are all full but your print jobs are fuzzy or smudged, then, this is a clear sign that you need to clean the printhead to resolve the HP printer clogged ink nozzle issue.
Click on Printing Preferences , and then navigate to the Service tab.
Click on Printer Services in the next window.
Locate and click on Clean Printheads , to start the process of cleaning the printhead without manually removing it.
How to Clean Printhead Manually
You can also manually perform HP ink tank printer head cleaning. Follow these simple steps to clean your printhead manually.
- Turn on the printer, and then open the access door.
Note: Opening the access door varies by printer model.
The printer carriage will move to the center, and you can access the printhead and cartridges .
Before you unplug your device from the outlet, wait until the cartridges have stopped moving.
Remove the cartridges by lifting them or pushing on the tab that holds them.
Place the cartridges on a piece of clean paper. To properly clean printer HP, ensure the nozzle is pointing away from the surface.
Clean the contacts located on the bottom of ink cartridges with a clean cloth ( preferably lint-free). Make sure you don’t touch or damage the cartridge.
Note: The contacts should be pointing away from any surface to avoid damage. The nozzle should not be pointing down to prevent the rest of the ink in the chamber from draining out.
- You can also use a cotton or foam rubber swab moistened with bottled water to gently clean it off.
Note: Do not use alcohol or any other cleaning fluid to clean the printer contact points or printheads to avoid an HP printer clogged ink nozzle issue with the printer.
Dry the contact points for 10 minutes before replacing the ink cartridge in the printer. You can also use cotton swabs to dry the contacts.
Now, inside your printer, locate any contact points and print carriages that need HP ink tank printer head cleaning, then clean them with a cloth or a swab.
Wait for around five minutes for the print carriage to dry, and then reinsert the ink cartridges into the printer.
Carefully snap the cartridges into place, and make sure they’re secure before you plug in the power cord.
Close the printhead cover and wait for the initialization process to finish the cleaning printer HP.
When Should I Clean Printhead
When you have not used your printer for a long time, your printer’s printhead may get dirty. Users generally should print a few pages with their printer at least once a month to avoid dirty printhead issues and maintain print quality. However, even if you use your printer regularly, you may encounter a dirty printhead issue and need to clean the HP printhead.
It is easy to diagnose this problem, you can determine if the issue is caused by the printhead by just looking at your printer. You can keep the following points in mind to know when to clean the printhead.
- If the LED screen or the PC is telling you that the ink is full in the cartridges but none is passing through the paper during printing, this is because the printhead on your HP printer clogged ink nozzle and needs cleaning.
- If you can print but the print quality is poor , such as blurry images and missing words on paper, this could be a sign of a clogged printhead on your HP printer.
Why Perform Nozzle Check before Cleaning?
However, before you start the HP ink tank printer head cleaning, you will have to perform a nozzle check to make sure the issue is indeed caused by the printhead. A nozzle check not only helps you understand the cause of the problem , but you will also be able to keep your printer, printhead, ink, and cartridges safe.
Q. Why can’t I print from an HP printer?
Ans. If your printhead is clogged, you may not be able to print documents properly.
Q. Can I clean the printhead on my computer?
Ans. Yes , you can clean the printheads on your computer by navigating to the Control Panel .
Q. Can ink cartridges cause printheads to malfunction?
Ans. Yes , if there is an ink spill or other printer malfunctions, the printhead may get affected and require cleaning and maintenance.
Recommended : How to Print When You Don’t Have a Printer
We hope this guide was helpful to you and you were able to find methods on how to clean HP printhead. Let us know which method worked best for you. If you have any suggestions or queries for us, please let us know in the comment section.
Microsoft frequently rolls out updates for Windows 10 to improve the operating system on various functionalities such as system efficiency, security, stability, etc. Although each bug brings a host of improvements to the operating system, it also brings new bugs that plague many users. One of these is the Windows update released in March 2021, update KB500080. This update caused many issues with the printer drivers already installed in the system. Users reported errors like Windows update for printer drivers not working. These printer installation issues were so prominent and serious that some users even reported receiving BSOD (Blue Screen of Death – the screen displayed after a system crash due to Windows failure) while printing. This made printing impossible. If you are wondering how to solve this Windows update can’t get list of devices issue, you are at the right article. Here, we discuss the possible causes and some potential solutions so we can tackle this error. Let’s get started!

- How to Fix Printer Installation Issues in Windows 10
- Method 1: Discharge Printer
- Method 2: Run Printer Troubleshooter
- Method 3: Update Device Drivers
- Method 4: Manually Install Generic Drivers
- Method 5: Restart Print Spooler Service
- Method 6: Install Drivers from Windows Update Catalog
- Method 7: Reinstall Printer
How to Fix Printer Installation Issues in Windows 10
Before getting onto the fixes, let us see some causes for this issue:
- Printer is old and has no latest software support
- Windows update bug
- Issues with printer service
- Issues with printer drivers and software
- Printer is incorrectly connected
Method 1: Discharge Printer
You can try discharging the printer of all electricity by removing it from the main switch, removing it from the computer for 2–5 minutes, and connecting it back again. Make sure to properly connect the printer to the main switch and the computer before turning it off, and check if the issue is fixed.
Method 2: Run Printer Troubleshooter
There is an in-built Windows troubleshooter for printer issues. You can access it easily by accessing settings. Running printer troubleshooter will resolve Windows update for printer drivers not working issue.
Press Windows + I keys simultaneously to launch Settings .
Click on the Update & Security tile, as shown.

Go to Troubleshoot menu in the left pane.
Select Printer troubleshooter and click on Run the troubleshooter button shown highlighted below.

- Wait for the troubleshooter to detect and fix the problem. Once the process is complete, click Apply this fix and restart your PC .
Windows will automatically search for any problems and attempt to fix them automatically. Also, you can run Hardware and Devices Troubleshooter on Windows 10 to resolve the issue.

Method 3: Update Device Drivers
As Windows users reported errors after the Windows update, there could be problems with the printer driver. Updating printer drivers could be a potential fix. Various methods to update the printer drivers are highlighted below if one of them does not work for you.
Read our guide on How to Update Device Drivers on Windows 10 and implement the different methods given in this link for printer devices.

Note : If your printer came with an installation disc, it could be a driver installation disc. Insert it into your DVD/CD driver and follow the onscreen instructions to install the driver.
Method 4: Manually Install Generic Drivers
If you have an old printer or your manufacturer has not yet released a driver for Windows 10, printer installation issues can occur. This can be an ongoing issue since the printer will be unusable without proper usable driver software. In this scenario, Windows will automatically install Generic drivers suitable for your printer. If not, then you can install them manually.
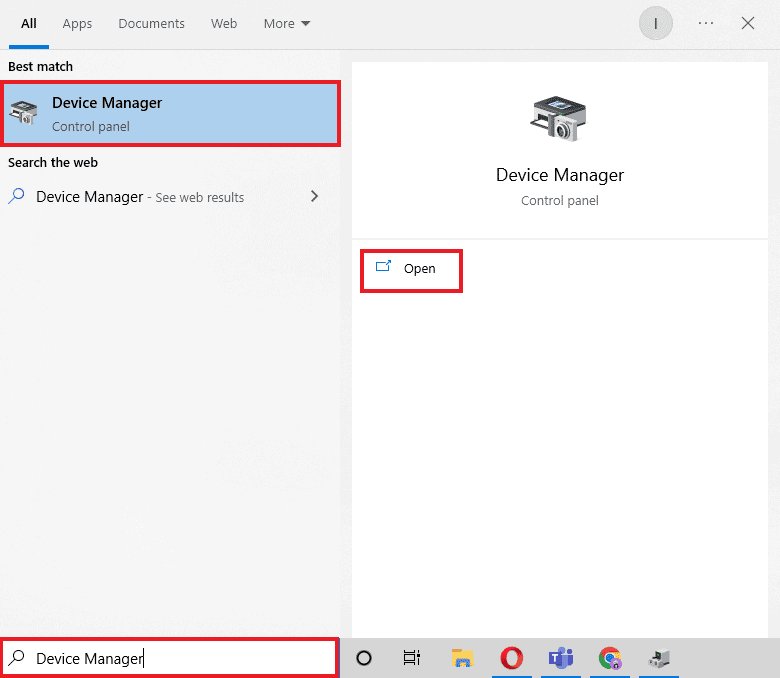
- Press the Windows key , type Device Manager , and click on Open .
- Under the Print queues section, right-click on Microsoft XPS writer and select the Update driver option.

- Click on the Browse my computer for driver software option.

- Next, click on Let me pick from a list of available drivers on my computer .

- Finally, choose Generic software device and click on Next .

This will install the required driver and fix the printer installation issue.
Method 5: Restart Print Spooler Service
When a Windows user sends print requests to the printer, the print spooler is the software that manages these requests sent by the user. Resetting it can be a potential solution. Follow the below steps:
Hit the Windows + R keys together to open the Run dialog box.
Type services.msc and click on OK to launch the Services window.

- Right-click on Print Spooler and click on Stop to stop the service.

Now, navigate to the Run dialog box again by simultaneously pressing Windows + R keys .
Enter the below command and click on OK .
%WINDIR%\system32\spool\printers

Select all the files in the folder by holding Ctrl + A keys simultaneously.
Now, press Shift + Delete to delete all the files present in that folder permanently.
Go back to the Services window and double-click on the Print Spooler service.

Make sure the Startup type drop-down is set to Automatic .
Finally, click on Start under the Service status section.

- Click on Apply > OK to confirm.
Check if Windows Update can’t get list of devices issue gets resolved or not.
Method 6: Install Drivers from Windows Update Catalog
Sometimes, using a generic driver does not help and might still throw up printer installation issues. If you face issues with the printer and you have an old printer, then you can try an official Microsoft Windows Update Catalog. Here, the updates are archived so year-old drivers can easily download and use them. Let us see how to use it.
Go to the Microsoft Catalog website in a browser.
Type the model of your printer (e.g. HP LaserJet 4000 ) and click on Search to search drivers for your hardware.
If you find the driver for your hardware, click on Download .

- Here, click on the cab link to download the driver.

Right-click on the downloaded file and choose Extract .
Update your printer driver manually by locating the folder where you extracted the drivers.
Method 7: Reinstall Printer
You can reinstall the printer completely from the start to see if that works. This involves removing the printer and device driver with all powers and connecting them back.
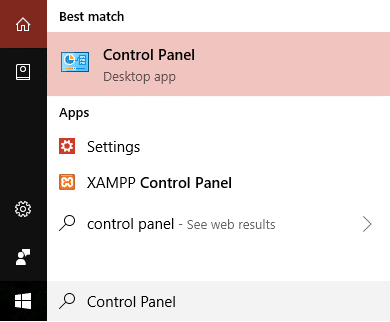
- Hit the Windows key , type Control Panel , then click on Open .

- Set View by > Category , then click on View devices and printers .

Under the Printers section, right-click on your printer .
Choose the Remove device option.

Click on Yes in the UAC prompt to remove the device.
Now, reboot the PC and reconnect your printer.
Go to Devices and Printers and right click on the printer and select Set as default printer .

This will solve printer installation issues.
Recommended:
- Fix Daemon Tools Unable to Access Image File MDF
- Fix Epson Scanner Cannot Communicate in Windows 10
- Fix Error Printing in Windows 10
- Where is the WPS Button on Canon Printer?
We hope that this article was helpful, and you were able to resolve printer installation issues in Windows 10. If you have any doubts or suggestions, comment below. Also, let us know what you want to learn next.
Cancel or Delete a Stuck Print Job in Windows 10: Printing job in windows 10 can be really demanding. Printers can turn out to be really frustrating as sometimes the printing queue gets stuck in between and there is no way either to cancel or delete the print job from the queue. To get the printing queue working and start printing your documents again the methods explained below can be really helpful in Windows 10.

- 6 Ways to Delete a Stuck Print Job in Windows 10
- Method 1: Manually Clear Print Queue
- Method 2: Cancel the stuck print job using the Command prompt (CMD)
- Method 3: Delete the stuck print job using services.msc
- Method 4: Delete the Stuck Print job using Devices & Printers
- Method 5: Remove the stuck print job by updating the Printer’s driver
- Method 6: Reinstall your Printer Drivers
6 Ways to Delete a Stuck Print Job in Windows 10
Make sure to create a restore point just in case something goes wrong.
Method 1:Manually Clear Print Queue
Command prompt can be used to stop and start the print spooler which can remove the stuck print job. To perform the process following steps should be followed:
1.Click the Start button or press the Windows key.
2.Type Command Prompt in the Search.
3.Right-click on Command Prompt and select Run as Administrator .

4.A new window of Command Prompt will open, type net stop spooler and then press Enter on the keyboard.

5.Open File Explorer on your system from the start menu, desktop or toolbar, alternatively you can press Windows key + E .
6.Locate the address bar in the file explorer window, and type C:\Windows\System32\Spool\Printers and press enter on the keyboard.

7.A new folder will open, select all the files in that folder by pressing Ctrl and A then pressing the delete key on the keyboard.

8.Close the folder and return to Command Prompt then type net start spooler and press Enter on the keyboard.

9.This is how you can make the stuck print job to work properly.
Method 2: Cancel the stuck print job using the Command prompt (CMD)
Command prompt can be used to delete the content of the Printers folder which can remove the stuck print job. This is one of the quickest ways to remove the stuck print job. To perform the process following steps should be followed.
1.Press Windows Key + X then select Command Prompt (Admin).

2.Type the following command into cmd and hit Enter:
net stop spooler

del %systemroot%\System32\spool\printers\* /Q /F /S

net start spooler

3.This will successfully Cancel or Delete a Stuck Print Job in Windows 10.
Method 3: Delete the stuck print job using services.msc
1.Press Windows Key + R to open Run dialog box then type services.msc and hit Enter.

2.In the services window, right-click on Print Spooler service and select “ Stop ”. In order to perform this, you have to be logged in as Administrator-mode.

3.Open File Explorer on your system from the start menu, desktop or toolbar, you can also press Windows key + E .
4.Locate the address bar in the file explorer window, and type C:\Windows\System32\Spool\Printers and press enter on the keyboard.
5.A new folder will open, select all the files in that folder by pressing Ctrl and A then pressing the delete key on the keyboard.
6.Close the folder return to the services window and again select the Print Spooler service, right click on it and select Start .

This method will successfully Cancel or Delete a Stuck Print Job in Windows 10 , but if you still stuck then follow the next method.
Method 4: Delete the Stuck Print job using Devices & Printers
If clearing the spooler and restarting it again is not working and you are still stuck with your print job then you can identify the document which is stuck and get it clear. Sometimes, a single document creates the whole problem. One document which is not able to be print will block the whole queue. Also, sometimes you might need to cancel all the printing documents and then forward them to printing again. To cancel or restart the printing process of a document you can follow these steps.
1.Press Windows Key to bring up search then type Control an click on Control Panel.
2.Click on Hardware and Sound then click on Devices and Printers .

3.In the new window, you can see all the printers which are connected to your computer.
4.Right click on the printer which is stuck and select See what’s printing .

5.In the new window, a list of all documents which are present in the queue will be present.
6.Select the first document in the list then right-click on it and select Restart from the list.

7.If the printer makes noise and starts to work then you are done here.
8.If the printer is still stuck then again right-click on the document and select Cancel.
9.If the problem still persists then in the printer window click on Printer and select Cancel All Documents .

After this, all documents in the print queue should disappear and you can give a command to the printer again and it should work fine.
Method 5: Remove the stuck print job by updating the Printer’s driver
If clearing the spooler and canceling or restarting the document from the printing queue does not works then you can try to update the printer’s driver to delete a stuck Print job in Windows 10. To update the driver follow these steps.
1.Press Windows key + X then select Device Manager.

2.Expand Print queues then select the printer for which you want to update the drivers.
3.Right-click on the selected Printer and select Update driver.

4.Select Search automatically for updated driver software.

5.Windows will automatically install the latest drivers available for your printer.

Manually Install the Latest Printer Drivers
1.Press Windows Key + R then type “ services.msc ” and hit enter.
2.Find Print Spooler service then right click on it and select Stop.
3.Again press Windows Key + R then type printui.exe /s /t2 and hit enter.
4.In the Printer Server Properties window search for the printer which is causing this issue.
5.Next, remove the printer and when asked for confirmation to remove the driver as well, select yes.

6.Now again go to services.msc and right-click on Print Spooler and select Start.

7.Next, navigate to your printers manufacturer website, download and install the latest printer drivers from the website.
For example , in case you have an HP printer then you need to visit HP Software and Drivers Downloads page . Where you can easily download the latest drivers for your HP printer.
8.If you’re still not able to cancel or remove a stuck print job in Windows 10 then you can use the printer software that came with your printer. Usually, these utilities can detect the printer on the network and fix any issues that are causing the printer to appear offline.
For example, you can use HP Print and Scan Doctor to fix any issues regarding HP Printer.
Method 6: Reinstall your Printer Drivers
1.Press Windows Key + R then type control printers and hit Enter to open Devices and Printers.

- Right-click on your printer and select “ Remove device ” from the context menu.

3.When the confirm dialog box appears , click Yes.

4.After the device is successfully removed, download the latest drivers from your printer manufacturer website .
5.Then reboot your PC and once the system restarts, press Windows Key + R then type control printers and hit Enter.
Note: Make sure your printer is connected to the PC via USB, ethernet or wirelessly.
6.Click on the “ Add a printer ” button under Device and Printers window.

7.Windows will automatically detect the printer, select your printer and click Next.

- Set your printer as default and click Finish.

This is how you can update the driver and after this, you can try to print the documents once again.
Recommended:
- How to Remove Malware from your PC in Windows 10
- Set Daily Bing Image As Wallpaper On Windows 10
- Restore Old Desktop Icons in Windows 10
- Fix Spacebar Not Working on Windows 10
I hope this article was helpful and you can now easily Cancel or Delete a Stuck Print Job in Windows 10 , but if you still have any questions regarding this guide then feel free to ask them in the comment’s section.
Does your printer fail to respond when you give the print command? If yes, there is no need to panic as you are not alone. Numerous people have encountered this problem while attempting to print documents from Windows 10 computer. A corrupt, obsolete, or damaged printer driver is the primary cause of this vexing Printer not responding error . The good news is that you can quickly resolve this issue by implementing the step-by-step methods listed in this guide.
Why is my device showing Printer driver is unavailable?
There are several reasons for the printer to become unresponsive and you can begin by testing the following:
- Check if the printer cables are properly attached to the computer
- Check if the printer is connected to Wi-Fi
- Make sure that the ink cartridges are not empty
- Check your system for alert lights or error messages
- If you just upgraded your computer from Windows 7 or 8 to Windows 10 and started facing printer issues, the update may have corrupted the printer driver
- It is possible that the original printer driver is incompatible with the latest version of Windows OS
Microsoft had stated that when Windows 10 was released, there would be no built-in backward compatibility with some apps and applications. However, numerous printer manufacturers were unable to update their drivers in time, which complicated the situation further.

What is the use of a printer driver?
Prior to understanding how to resolve the Printer not responding issue , it is imperative to learn about the printer drivers. It is a simple application that is mounted on the Windows 10 computer that allows interaction between the PC and the printer.
It performs two critical roles:
- The first function is to act as a link between the printer and your device. It allows your computer to recognize the printer hardware, its features, and specifics.
- Secondly, the driver is accountable for converting the print job data to signals which can be understood & implemented by the printer.
Each printer comes with its own special driver that is tailored to different operating system profiles such as Windows 7, Windows 8, or Windows 10. If your printer is not programmed correctly or mounts the wrong system driver, the computer would be unable to find it & process a print job.
Certain printers, on the other hand, can utilize generic drivers offered by Windows 10. This enables you to print without the need to install external vendor drivers.
- Fix Printer Not Responding Error in Windows 10
- Method 1: Run Windows Update
- Method 2: Update Your Printer Drivers
- Method 3: Reinstall Printer Driver
- Special Mention: Only for Plug–and–Play Printers
Fix Printer Not Responding Error in Windows 10
If you’re unable to print any internal document or a file that you downloaded from the internet then you may be facing the Printer driver is unavailable error. To resolve the printer not responding error, you can follow the below-listed troubleshooting steps.
Method 1: Run Windows Update
One possible reason for your Windows 10 computer to display the ‘Printer Driver is Unavailable’ error is because you are running an out-of-date operating system. To update your Windows OS, follow the below steps:
- Click the Start button and navigate to the Settings icon.
- Select Update & Security .

- Windows will check for updates and, if found, will automatically download and install them.

- Now, Restart your computer once the update process is complete.
You can now check if you’re able to fix printer is not responding error.
Method 2: Update Your Printer Drivers
To update your printer drivers, you can download the latest drivers from the manufacturer’s website. Drivers can also be downloaded from the manufacturer’s support site. To install the printer drivers downloaded from the manufacturer’s website, follow these steps:
- Search for Control Panel in the Windows search bar then click on the Control Panel from the search results.

- Make sure to select ‘ Large Icons ‘ from the ‘ View by: ‘ dropdown. Now look for Device Manager and click on it.

- Under the Device Manager window, locate the printer for which you want to install drivers for.

- Right-click the name of the printer and select Update Driver Software from the accompanying pop-up menu.

A new window will appear. If you’ve already downloaded drivers from the manufacturer’s website, choose the Browse my computer for driver software option.
Next, click on the Browse button and navigate to the place where you have downloaded the printer drivers from the manufacturer’s website.

Follow the on-screen instructions to install the drivers manually.
If you don’t have the downloaded drivers then select the option labeled Search automatically for updated driver software.
- Follow on-screen instructions to install the latest printer drivers.
Restart your PC and see if you’re able to fix the printer not responding issue.
Method 3: Reinstall Printer Driver
If you cannot print your document because of the error message ‘printer driver is unavailable,’ the best course of action would be to reinstall the printer driver. Follow these steps to fix printer is not responding error:
- Press Windows Key +R then type devmgmt.msc and click on OK.

- The Device Manager window will open. Expand Print queues and find your printer device.

Right-click on your printer device (with which you are facing the issue) and select Uninstall device option.
Remove the device from printer queues and restart your PC to finish the uninstallation.
After restarting your device, re-open Device Manager and click on Action .

- From the Action menu select Scan for hardware changes .

Windows will now reinstall the appropriate printer driver on your computer. Finally, restart the device and see if your printer is responding and you’re able to print your documents.
Special Mention: Only for Plug–and–Play Printers
After you reinstall the printer drivers, Windows will automatically detect your Printer. If it recognizes the printer, proceed with the on-screen instructions .
Unplug the printer from your computer. Also, remove any cords and wires that are connected between them.
Reconnect all and follow the Setup Wizard process.
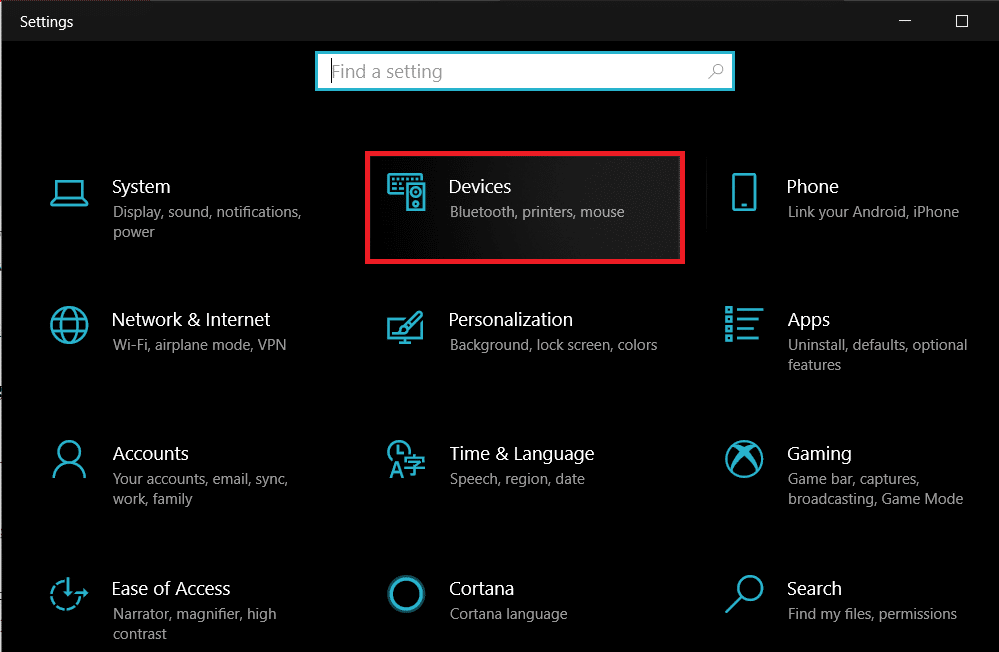
If the Wizard is unavailable, navigate to Start > Settings > Devices > Printers & Scanners > Add a Printer or Scanner.

Q1. What should I do if my Printer Driver is not Installing?
If nothing happens when you double-click the installation file, try the following:
Click on Start , then navigate to Settings > Devices > Printers & scanners.
Select Print Server Properties under Related Settings.
Verify that your printer is specified under the Drivers tab.
If your printer is not visible, click Add under the Welcome to the Add Printer Driver Wizard then click on Next.
Pick the Device Architecture in the Processor Selection dialogue box. Once done, click Next.
Pick your Printer Manufacturer from the left pane. Then choose your Printer Driver from the right pane.
Finally, click on Finish and follow the on-screen instructions to add your driver.
Q2. How do I download the driver from the manufacture’s website?
Consult the service website for your printer manufacturer. To do so, conduct an internet search for the manufacturer of your printer followed by the term support, e.g., HP support .
Driver updates are available and accessible from a printer manufacturer’s website under the Drivers category. Certain support websites enable you to check specifically as per printer model code. Find and download the most recent driver for your printer and install it according to manufacturer installation directions.
A vast majority of drivers are executable files that you can simply install by double-clicking on them. After you have downloaded the file, begin the installation. Then, proceed with these steps to re-install the printer drivers:
Click on Start, then navigate to Settings > Devices > Printers & scanners.
Locate the printer under Printers & scanners. Select it, and then click on Remove device.
After deleting your printer, reinstall it using the Add a printer or scanner option.
Q3. What is the meaning of Printer Driver Unavailable?
The error printer driver is unavailable indicates that the driver mounted on your computer is incompatible with your printer or is outdated. If the machine is unable to identify the drivers, you will be unable to activate or print from your printer .
Recommended:
- How to Get Your Printer Back Online in Windows 10
- How to Print When You Don’t Have a Printer
- Fix Volume Automatically Goes Down or Up in Windows 10
- How to Link Facebook to Twitter
The recent surge of online activity has prompted the downfall of the printer. In an era, where everything can be viewed online with ease, the relevance of the gigantic and bulky printer has started to decrease. However, we are yet to reach a stage where we can neglect the printing device altogether. Until then, if you do not possess the heavy Inkjet and want something printed urgently, here’s a guide to help you decipher how to print documents when you don’t have a printer.

- How to Print Documents When You Don’t Have a Printer
- Method 1: Print Documents as PDF files
- Method 2: Print Webpages as PDF files
- Method 3: Search for Wireless Printers Near You
- Method 4: Find Other Printing Services Around Your Location
- Method 5: Use Google Cloud Print
How to Print Documents When You Don’t Have a Printer
Method 1: Print Documents as PDF files
PDF is a universally accepted format that keeps the document exactly the same across different platforms and devices . There is a possibility that the PDF file of the document you need to print will do the trick instead. Even if softcopies are not an option in your situation, the PDF file makes it easy for you to save web pages and transfer them as documents for future printing. Here’s how you can print to PDF on your PC without a printer:
- Open the Word document that you want to print and click on the File option on the top left corner of the screen.

- From the options that appear, click on ‘Print.’ Alternatively, you can press Ctrl + P to open Print Menu

- Click on the ‘Printer’ drop-down menu and select ‘ Microsoft Print to PDF.’

- Once selected, click on ‘Print’ to continue.

- In the window that appears, type in the name of the PDF file and select the destination folder. Then click on ‘Save.’

- The PDF file will be printed without a printer in the destination folder.
Method 2: Print Webpages as PDF files
Browsers today have adapted to the requirements of the modern-day and introduced new features on their application. One such feature gives users the ability to print webpages as PDF documents on their PC. Here’s how you can print web pages as PDFs:
Open your browser and open the webpage you want to print.
Click on the three dots on the top right corner of the screen.

- From the various options, click on ‘Print.’ You can use the shortcut in the browser as well.

In the print window that opens up, click on the drop-down list in front of the ‘Destination’ menu.
Select ‘Save as PDF.’ You can then proceed to select the pages you want to download and the layout of the print.

- Once done, click on ‘Print’ and a window will appear asking you to select the destination folder. Select the folder and rename the file accordingly and then click on ‘Save’ again.

- The page will be printed as a PDF file without a printer.
Method 3: Search for Wireless Printers Near You
Even if you personally don’t own a printer, all hope is not lost. There is a remote possibility that someone in your neighbourhood or building owns a wireless printer. Once you have found a printer, you can ask the owner to let you take a print out. Here’s how you can scan for printers near you and print without owning a printer:
Press Windows Key + I to open the Settings app on your Windows device.
Click on ‘Devices.’
- From the panel on the left, click on the ‘Printers and Scanners’

- Click on ‘ Add a printer or scanner’ and your PC will find any printers that are operating near you.
Method 4: Find Other Printing Services Around Your Location
Some shops and services serve the specific purpose of getting print outs for their customers. You can search for print shops near your location and print documents there. Alternatively, you can head onto your University library or access the printer in your office to take urgent print outs. Printing options are also available in most internet cafes and public libraries. You can also use services such as PrintDog and UPrint that deliver large print outs to your home.
Method 5: Use Google Cloud Print
If you have a wireless printer at your home and are out of town, you can remotely print pages from your home printer. Head onto the Google Cloud Print website and see if your printer is eligible. Sign in to the app with your Google account and add your printer. Thereafter, while printing, click on the ‘Printers’ option and select your wireless printer to print documents remotely.
Q1. Where to print documents when you don’t have a printer?
With most documents beings shared and viewed through the screen, the printed page no longer holds the same value and the printer no longer seems worth the money. Having said that, there are still times where a hard copy of a document is required for a certain task. During instances like these, you can try using public printing services or ask your neighbours if they could give access to their printers for a brief period.
Q2. When you need to print something urgently, but there is no printer?
Such situations have happened to most of us. Try downloading the PDF of the document or webpage you want to print. The PDF should work as an alternative most of the time. If not, mail the PDF to any printing service near you and ask them to keep a print out ready. You will have to physically go and collect the printout but it is the fastest way possible.
Q3. How can I print from my phone without a printer?
You can print web pages and documents as PDF files from your phone and then print them as hard copies later. On the browser, tap on the three dots on the top right corner and select the ‘share’ option. From the various options available, tap on ‘Print’ and the webpage will be saved as a PDF. The same procedure can be used for Word documents.
Q4. Is there a printer that doesn’t need a computer?
Nowadays, wireless printers are the new norm. These printers often do not require physical connections with PCs or other devices and can download images and documents remotely.
Recommended:
- How To Clear Print Queue In Windows 10?
- Fix Common Printer Problems in Windows 10
- Share files and printers without HomeGroup on Windows 10
- How to Sync Google Calendar with Outlook
Printheads are an important part of printers as they host ink cartridges and keep them operating for high-quality prints. Your printer will frequently require a clean printhead which you can do yourself. However, it’s important to be gentle and careful while cleaning the printhead, as these components are delicate. In this guide, we will discuss various methods to clean HP printhead.
- How to Clean HP Printhead
- How to Clean HP Printhead with HP Expert
- How to Clean Printhead from Computer
- How to Clean Printhead Manually
- When Should I Clean Printhead
- Why Perform Nozzle Check before Cleaning?
How to Clean HP Printhead
A printhead on your printer can be cleaned by two methods, the first method involves steps using computer software, and the other method involves manually cleaning printer HP which can help with HP printer clogged ink nozzle.
Note: When manually cleaning your printer head, it is important to avoid damaging the printhead or ink cartridges, as this can lead to costly repairs at a service center. To prevent damage, make sure the printer is off and unplugged .
How to Clean HP Printhead with HP Expert
If your HP printer clogged ink nozzle and requires cleaning, you can use HP experts to clean it. Follow these simple steps to clean your HP printhead with HP experts:
On your computer, run Clean Printhead program.
If the Clean Printhead program does not work, manually open the cover of your printer and unplug the printer from the electric outlet.
Carefully remove all the ink cartridges from the printer and clean the contacts with a clean cloth.
Now, carefully clean the printhead contacts.
Carefully reinsert the cartridges back into the printer.
Now, plug the printer back into the electric outlet.
Now, let the printer boot up.
Now, perform a test print with an empty sheet to see if the printhead has been cleaned.
To clean the printhead properly, you may have to perform this procedure many times.
Note: If you continue to receive bad prints even after following the above-mentioned steps for HP ink tank printer head cleaning, the issue can be caused by other problems with the printer that cannot be helped with cleaning printer HP. You should consider taking your printer to a repair center to diagnose and resolve the issue.
How to Clean Printhead from Computer
You can also clean your computer’s HP printhead. Follow these simple steps to clean HP printhead on your computer.
Click on Start on your computer.
Search for and open the Control Panel.
- Here, click on View devices and printers
Note : Here, you will find a list of any printers you have connected to previously as well as the ones you currently use).
- Click on the printer icon and select Properties.
Note : If you see an indication that your ink cartridges are all full but your print jobs are fuzzy or smudged, then, this is a clear sign that you need to clean the printhead to resolve the HP printer clogged ink nozzle issue.
Click on Printing Preferences , and then navigate to the Service tab.
Click on Printer Services in the next window.
Locate and click on Clean Printheads , to start the process of cleaning the printhead without manually removing it.
How to Clean Printhead Manually
You can also manually perform HP ink tank printer head cleaning. Follow these simple steps to clean your printhead manually.
- Turn on the printer, and then open the access door.
Note: Opening the access door varies by printer model.
The printer carriage will move to the center, and you can access the printhead and cartridges .
Before you unplug your device from the outlet, wait until the cartridges have stopped moving.
Remove the cartridges by lifting them or pushing on the tab that holds them.
Place the cartridges on a piece of clean paper. To properly clean printer HP, ensure the nozzle is pointing away from the surface.
Clean the contacts located on the bottom of ink cartridges with a clean cloth ( preferably lint-free). Make sure you don’t touch or damage the cartridge.
Note: The contacts should be pointing away from any surface to avoid damage. The nozzle should not be pointing down to prevent the rest of the ink in the chamber from draining out.
- You can also use a cotton or foam rubber swab moistened with bottled water to gently clean it off.
Note: Do not use alcohol or any other cleaning fluid to clean the printer contact points or printheads to avoid an HP printer clogged ink nozzle issue with the printer.
Dry the contact points for 10 minutes before replacing the ink cartridge in the printer. You can also use cotton swabs to dry the contacts.
Now, inside your printer, locate any contact points and print carriages that need HP ink tank printer head cleaning, then clean them with a cloth or a swab.
Wait for around five minutes for the print carriage to dry, and then reinsert the ink cartridges into the printer.
Carefully snap the cartridges into place, and make sure they’re secure before you plug in the power cord.
Close the printhead cover and wait for the initialization process to finish the cleaning printer HP.
When Should I Clean Printhead
When you have not used your printer for a long time, your printer’s printhead may get dirty. Users generally should print a few pages with their printer at least once a month to avoid dirty printhead issues and maintain print quality. However, even if you use your printer regularly, you may encounter a dirty printhead issue and need to clean the HP printhead.
It is easy to diagnose this problem, you can determine if the issue is caused by the printhead by just looking at your printer. You can keep the following points in mind to know when to clean the printhead.
- If the LED screen or the PC is telling you that the ink is full in the cartridges but none is passing through the paper during printing, this is because the printhead on your HP printer clogged ink nozzle and needs cleaning.
- If you can print but the print quality is poor , such as blurry images and missing words on paper, this could be a sign of a clogged printhead on your HP printer.
Why Perform Nozzle Check before Cleaning?
However, before you start the HP ink tank printer head cleaning, you will have to perform a nozzle check to make sure the issue is indeed caused by the printhead. A nozzle check not only helps you understand the cause of the problem , but you will also be able to keep your printer, printhead, ink, and cartridges safe.
Q. Why can’t I print from an HP printer?
Ans. If your printhead is clogged, you may not be able to print documents properly.
Q. Can I clean the printhead on my computer?
Ans. Yes , you can clean the printheads on your computer by navigating to the Control Panel .
Q. Can ink cartridges cause printheads to malfunction?
Ans. Yes , if there is an ink spill or other printer malfunctions, the printhead may get affected and require cleaning and maintenance.
Recommended : How to Print When You Don’t Have a Printer
We hope this guide was helpful to you and you were able to find methods on how to clean HP printhead. Let us know which method worked best for you. If you have any suggestions or queries for us, please let us know in the comment section.
