Clear your computer browsing history for privacy: Browsing history can be helpful at times when you want to visit a particular page which you visited in past but sometimes it can also give away your privacy as anyone with access to your laptop can view the pages visited by you. All web browsers keep a list of the web pages you have visited in the past which is termed as history. If the list keeps on growing then you can face issues with your PC such as browser becoming slow or random restarts etc, so it is advised that you clear your browsing data every now and then.

You can delete all the stored data such as history, cookies, passwords, etc with just a single click so that nobody can invade your privacy and it also helps in improving the performance of the PC. But there are many browsers out there such as Google Chrome, Mozilla Firefox, Microsoft Edge, Safari, etc. So without wasting any time let’s see How to clear browsing history in any web browser with the help of the below-listed tutorial.
- How to Clear Browsing History in Any Browser
- Delete browsing history Google Chrome Desktop
- Delete Browsing History of Google Chrome in Android or iOS
- Delete Browsing History on Safari Browser on iOS
- Delete Browsing History from Mozilla Firefox
- Delete Browsing History from Microsoft Edge
- Delete Browsing History from Safari Browser on Mac
- Delete Browsing History from Internet Explorer
How to Clear Browsing History in Any Browser
Let’s start with the methods to clear browsing history in all browsers one by one.
Delete browsing history Google Chrome Desktop
In order to delete browsing history on Google Chrome , you will need to first open Chrome then click on the three dots (Menu) from the top right corner.
1.Click on the three dots and navigate to Menu> More Tools >Clear Browsing Data.

2.You need to decide the period for which you are deleting the history date. If you want to delete from the beginning you need to choose the option to delete browsing history from the beginning.

Note: You can also select several other options such as Last hour, Last 24 hours, Last 7 days, etc.
3.Click on Clear Data to start deleting the browsing history from the time you have started browsing.
Delete Browsing History of Google Chrome in Android or iOS
In order to start the process of deleting browsing history from Google Chrome on Android and iOS device , you need to click on Settings > Privacy > Clear Browsing data.


On the Android device, Google Chrome will give you the option to choose the period for which you want to delete the history data. If you want to delete the history from the beginning you just need to choose “ beginning of time ” to delete all data. On an iPhone, Chrome will not give you the option to select browsing history time rather it will delete from the beginning.
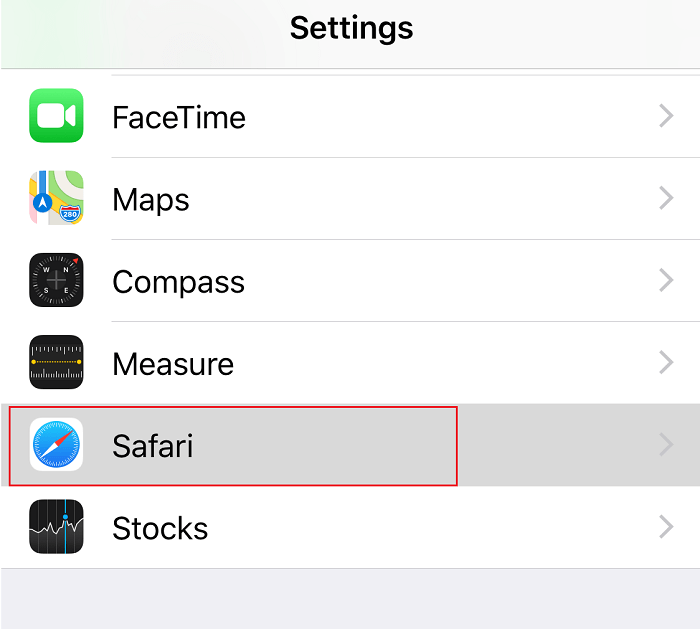
Delete Browsing History on Safari Browser on iOS
If you are using the iOS device and want to delete browsing history from Safari Browser, you need to navigate to the Settings section on your device then navigate to Safari > Clear History and Website Data . Now you need to confirm your choice and to proceed further.
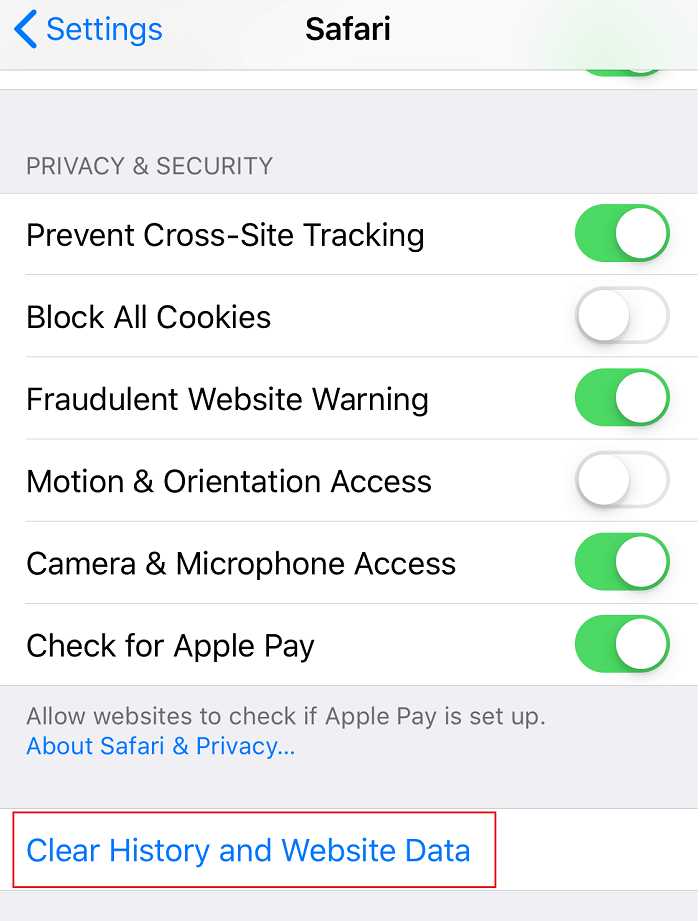
This will delete all history, cookies, and cache of your browser.
Delete Browsing History from Mozilla Firefox
Another popular browser is Mozilla Firefox which a lot of people uses daily. If you use Mozilla Firefox and want to clear browsing history then you need to open Firefox then follow the steps below:
1.Open Firefox then click on the three parallel lines (Menu) and select Options.

2.Now select Privacy & Security from the left-hand menu and scroll down to History section.

Note: You can also directly navigate to this option by pressing Ctrl + Shift + Delete on Windows and Command + Shift + Delete on Mac.
3.Here click on the Clear History button and a new window will open.

4.Now select the time range for which you want to clear history & click on Clear Now.

Delete Browsing History from Microsoft Edge
Microsoft Edge is another browser which comes pre-installed with the Windows operating system. To clear browsing history in Microsoft Edge you need to open Edge then navigate to Menu > Settings > Clear Browsing Data.


Here you need to choose options regarding what you want to delete and hit the Clear button. Moreover, you can turn on the feature of deleting all history whenever you leave the browser.
Delete Browsing History from Safari Browser on Mac
If you are using Safari Browser on Mac and want to delete browsing history, you need to navigate to History > Click on Clear History option . You can select the time period you wish to delete the data. It will delete browsing history, caches, cookies, and other browsing related files.

Delete Browsing History from Internet Explorer
In order to delete browsing history from Internet Explorer, you need to click on Menu > Safety > Delete Browsing History. Moreover, you can press Ctrl+Shift+Delete button to open this Window.


Once you will delete browsing history, it will keep cookies and temporary files. You need to uncheck “ Preserve Favorites website data ” option to make sure that Internet Explorer deletes everything.
Above-mentioned all methods will help you to delete browsing history from all types of browsers. However, every time you don’t want the browser to store your browsing history you can always use Private mode in Browsers.
Recommended:
- Fix DLL Not Found or Missing on your Windows Computer
- Windows 10 Clock Time Wrong? Here is how to fix it!
- Difference Between Google Chrome And Chromium?
- 6 Ways to Delete a Stuck Print Job in Windows 10
I hope this article was helpful and you can now easily Clear Browsing History in Any Browser, but if you still have any questions regarding this tutorial then feel free to ask them in the comment’s section.
Cancel or Delete a Stuck Print Job in Windows 10: Printing job in windows 10 can be really demanding. Printers can turn out to be really frustrating as sometimes the printing queue gets stuck in between and there is no way either to cancel or delete the print job from the queue. To get the printing queue working and start printing your documents again the methods explained below can be really helpful in Windows 10.

- 6 Ways to Delete a Stuck Print Job in Windows 10
- Method 1: Manually Clear Print Queue
- Method 2: Cancel the stuck print job using the Command prompt (CMD)
- Method 3: Delete the stuck print job using services.msc
- Method 4: Delete the Stuck Print job using Devices & Printers
- Method 5: Remove the stuck print job by updating the Printer’s driver
- Method 6: Reinstall your Printer Drivers
6 Ways to Delete a Stuck Print Job in Windows 10
Make sure to create a restore point just in case something goes wrong.
Method 1:Manually Clear Print Queue
Command prompt can be used to stop and start the print spooler which can remove the stuck print job. To perform the process following steps should be followed:
1.Click the Start button or press the Windows key.
2.Type Command Prompt in the Search.
3.Right-click on Command Prompt and select Run as Administrator .

4.A new window of Command Prompt will open, type net stop spooler and then press Enter on the keyboard.

5.Open File Explorer on your system from the start menu, desktop or toolbar, alternatively you can press Windows key + E .
6.Locate the address bar in the file explorer window, and type C:\Windows\System32\Spool\Printers and press enter on the keyboard.

7.A new folder will open, select all the files in that folder by pressing Ctrl and A then pressing the delete key on the keyboard.

8.Close the folder and return to Command Prompt then type net start spooler and press Enter on the keyboard.

9.This is how you can make the stuck print job to work properly.
Method 2: Cancel the stuck print job using the Command prompt (CMD)
Command prompt can be used to delete the content of the Printers folder which can remove the stuck print job. This is one of the quickest ways to remove the stuck print job. To perform the process following steps should be followed.
1.Press Windows Key + X then select Command Prompt (Admin).

2.Type the following command into cmd and hit Enter:
net stop spooler

del %systemroot%\System32\spool\printers\* /Q /F /S

net start spooler

3.This will successfully Cancel or Delete a Stuck Print Job in Windows 10.
Method 3: Delete the stuck print job using services.msc
1.Press Windows Key + R to open Run dialog box then type services.msc and hit Enter.

2.In the services window, right-click on Print Spooler service and select “ Stop ”. In order to perform this, you have to be logged in as Administrator-mode.

3.Open File Explorer on your system from the start menu, desktop or toolbar, you can also press Windows key + E .
4.Locate the address bar in the file explorer window, and type C:\Windows\System32\Spool\Printers and press enter on the keyboard.
5.A new folder will open, select all the files in that folder by pressing Ctrl and A then pressing the delete key on the keyboard.
6.Close the folder return to the services window and again select the Print Spooler service, right click on it and select Start .

This method will successfully Cancel or Delete a Stuck Print Job in Windows 10 , but if you still stuck then follow the next method.
Method 4: Delete the Stuck Print job using Devices & Printers
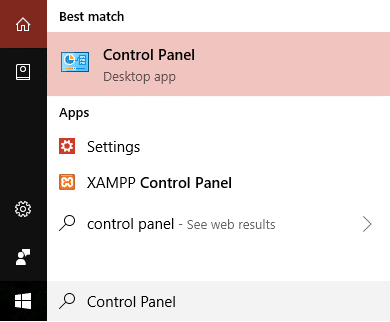
If clearing the spooler and restarting it again is not working and you are still stuck with your print job then you can identify the document which is stuck and get it clear. Sometimes, a single document creates the whole problem. One document which is not able to be print will block the whole queue. Also, sometimes you might need to cancel all the printing documents and then forward them to printing again. To cancel or restart the printing process of a document you can follow these steps.
1.Press Windows Key to bring up search then type Control an click on Control Panel.
2.Click on Hardware and Sound then click on Devices and Printers .

3.In the new window, you can see all the printers which are connected to your computer.
4.Right click on the printer which is stuck and select See what’s printing .

5.In the new window, a list of all documents which are present in the queue will be present.
6.Select the first document in the list then right-click on it and select Restart from the list.

7.If the printer makes noise and starts to work then you are done here.
8.If the printer is still stuck then again right-click on the document and select Cancel.
9.If the problem still persists then in the printer window click on Printer and select Cancel All Documents .

After this, all documents in the print queue should disappear and you can give a command to the printer again and it should work fine.
Method 5: Remove the stuck print job by updating the Printer’s driver
If clearing the spooler and canceling or restarting the document from the printing queue does not works then you can try to update the printer’s driver to delete a stuck Print job in Windows 10. To update the driver follow these steps.
1.Press Windows key + X then select Device Manager.

2.Expand Print queues then select the printer for which you want to update the drivers.
3.Right-click on the selected Printer and select Update driver.

4.Select Search automatically for updated driver software.

5.Windows will automatically install the latest drivers available for your printer.

Manually Install the Latest Printer Drivers
1.Press Windows Key + R then type “ services.msc ” and hit enter.
2.Find Print Spooler service then right click on it and select Stop.
3.Again press Windows Key + R then type printui.exe /s /t2 and hit enter.
4.In the Printer Server Properties window search for the printer which is causing this issue.
5.Next, remove the printer and when asked for confirmation to remove the driver as well, select yes.

6.Now again go to services.msc and right-click on Print Spooler and select Start.

7.Next, navigate to your printers manufacturer website, download and install the latest printer drivers from the website.
For example , in case you have an HP printer then you need to visit HP Software and Drivers Downloads page . Where you can easily download the latest drivers for your HP printer.
8.If you’re still not able to cancel or remove a stuck print job in Windows 10 then you can use the printer software that came with your printer. Usually, these utilities can detect the printer on the network and fix any issues that are causing the printer to appear offline.
For example, you can use HP Print and Scan Doctor to fix any issues regarding HP Printer.
Method 6: Reinstall your Printer Drivers
1.Press Windows Key + R then type control printers and hit Enter to open Devices and Printers.

- Right-click on your printer and select “ Remove device ” from the context menu.

3.When the confirm dialog box appears , click Yes.

4.After the device is successfully removed, download the latest drivers from your printer manufacturer website .
5.Then reboot your PC and once the system restarts, press Windows Key + R then type control printers and hit Enter.
Note: Make sure your printer is connected to the PC via USB, ethernet or wirelessly.
6.Click on the “ Add a printer ” button under Device and Printers window.

7.Windows will automatically detect the printer, select your printer and click Next.

- Set your printer as default and click Finish.

This is how you can update the driver and after this, you can try to print the documents once again.
Recommended:
- How to Remove Malware from your PC in Windows 10
- Set Daily Bing Image As Wallpaper On Windows 10
- Restore Old Desktop Icons in Windows 10
- Fix Spacebar Not Working on Windows 10
I hope this article was helpful and you can now easily Cancel or Delete a Stuck Print Job in Windows 10 , but if you still have any questions regarding this guide then feel free to ask them in the comment’s section.
