Are you in dire need of printing a document but can’t do so because of a stuck print job in Windows 10? Here are some ways to clear the print queue in Windows 10 easily.
Printers may appear easy to use but can be very flimsy at times. Handling print Queue when you urgently want to use a printer can be quite frustrating. The print queue not only prevents the present document but all future documents from printing. The problem is not hard to detect either. If the message ‘Printing’ remains indefinitely even though the paper is not stuck and the ink is right, then certainly there is a Print queue issue. There are certain ways that can be used to clear the print queue in Windows 10 .

- Why does a print job gets stuck in Windows 10?
- How To Clear Print Queue In Windows 10?
- Method 1: Manually Clearing and Restarting the Print Spooler
- Method 2: Clear Print Queue using a Batch File for the Print Spooler
- Method 3: Clear Print Queue Using Command Prompt
- Method 4: Use the Management Console
Why does a print job gets stuck in Windows 10?
The answer lies in the fact that the printing document isn’t directly sent for printing. The document is first received at the spooler , i.e., a program used to manage and queue the print jobs. This spooler is particularly helpful while rearranging the order of print jobs or deleting them entirely. A stuck print job prevents the documents in the queue from printing, which affects all the documents further down the queue.
Often you can solve the error by deleting the print job from the queue. To delete a stuck print job in Windows 10, go to ‘Printers’ in the setting and click on ‘ Open Queue .’ Cancel the print job causing a problem, and you are good to go. If you can’t delete a particular print job, then try deleting the entire print queue. If this doesn’t work either, then try restarting all your devices. Unplug all your connections and plug them to reboot your device completely. This is the first approach that you should have for a stuck print job. If these traditional methods don’t work, then here are some other detailed methods for clearing a print job in Windows 10.
How To Clear Print Queue In Windows 10?
There are a few methods that can be employed to clear a print job in Windows 10. Clearing and restarting the Print Spooler is one of the best methods to use for fixing the stuck print job. It doesn’t delete your documents but creates an illusion that the documents are being sent for the first time to the printer. The process is done by stopping the Print Spooler until you clear the entire temporary cache used by the spooler and then starting it again. This can be accomplished by using a manual method or by making a batch file.
Method 1: Manually Clearing and Restarting the Print Spooler
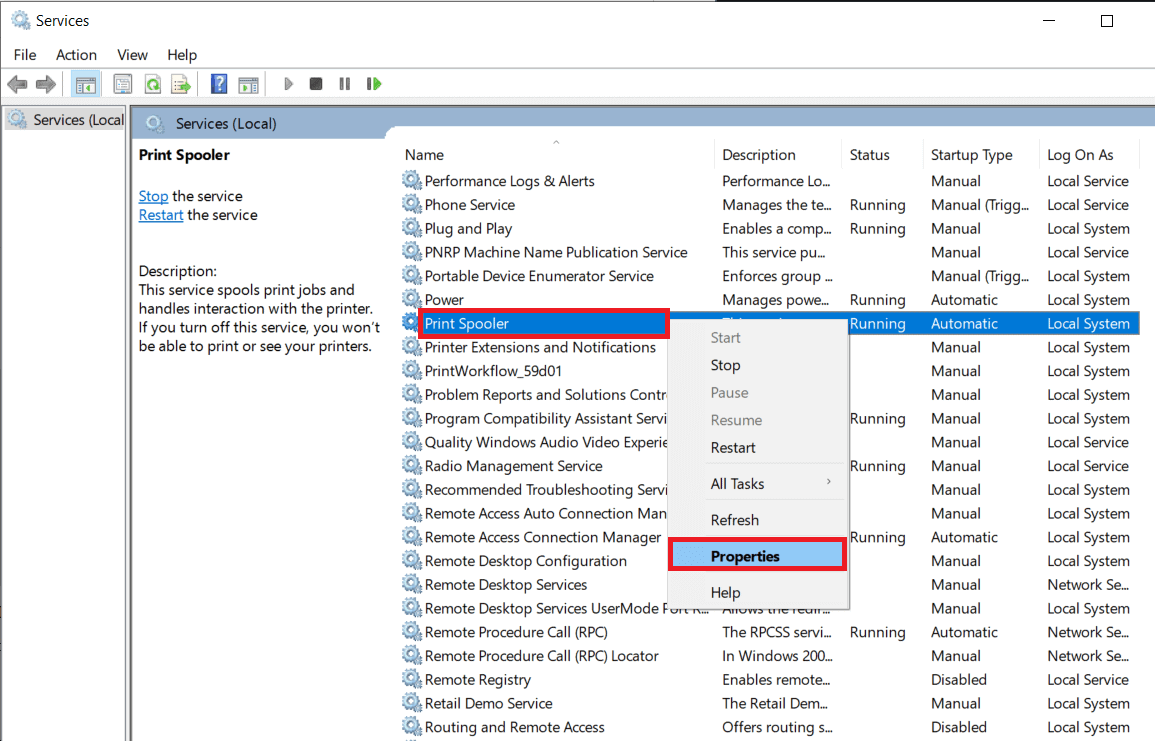
- Type ‘ Services .’ in the Windows search bar and open the ‘ Services ’ app.

- Find ‘ Print Spooler ’ in the menu and double-click to open the Properties .

- Click on ‘ Stop ’ in the Properties tab and minimize the window to use it again later.

- Open ‘ File Explorer ’ and go to the below address location:
C:\Windows\System 32\spool\PRINTERS

You may be asked for permission to access the location. Click on ‘ Continue ’ to move forward.
Once you reach the destination, select all the files and press Delete on your keyboard.
Now go back to the Spooler properties window and click on ‘ Start .’

Click on ‘ Ok ’ and close the ‘ Services ’ app.
This will restart the spooler, and all the documents would be sent to the printer for printing.
Method 2: Clear Print Queue using a Batch File for the Print Spooler
Creating a batch file is a viable option if your print jobs frequently get stuck. Using the Services app every now and then can be a hassle that can be solved by a batch file.
Open a text editor like Notepad on your computer.
Paste the commands below as separate lines.
Net stop spooler

Del/Q/F/S “%windir%\System32\spool\PRINTERS\*.*”

Net start spooler

- Click on ‘ File ’ and choose ‘ Save as .’ Name the file with the extension ‘ .bat ’ at the end and choose ‘ All files (.) ’ in the ‘ Save as type ’ menu. Click on Save , and you are good to go.

- Simply double-click on the batch file, and the work will be done . You can place it at the most accessible place on your desktop for easy access.
Method 3: Clear Print Queue Using Command Prompt
You can delete a stuck print job in Windows 10 by using Command Prompt as well. Using the method will stop and start the print spooler again.
- Type ‘ cmd ’ in the search bar. Right-click on the ‘ Command Prompt ’ app and choose the run as administrator option.

- Type the command ‘net stop spooler ’, which will stop the spooler.

- Again type the following command and hit Enter:
Del %systemroot%\system32\spool\printers\*/Q
This will do the same task as the methods above.
Start the spooler again by typing the command ‘ net start spooler ’ and press enter .
Method 4: Use the Management Console
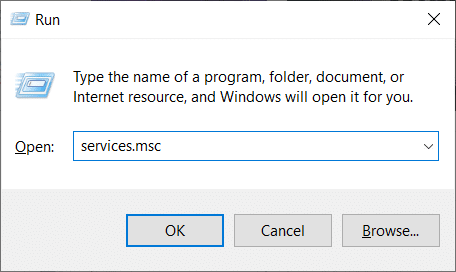
You can use the service.msc, shortcut in the management console to clear the print queue in Windows 10. This method will stop the spooler and clear it to delete a stuck print job:
Press the Windows Key + R key together to open the run window.
Type ‘ Services.msc ’ and hit Enter .
Note: You can also access the ‘ Services ’ window via Windows Management. Right-click the Windows icon and choose Computer Management. Choose Services and Application then double-click on Services.

- In the Services window, right-click on Print Spooler and select Properties.

- Click on the ‘ Stop ’ button to stop the Print Spooler service.

Minimize the window and open file explorer. Type the address ‘C:\ Windows\ System32\ Spool\ Printers’ or navigate to the address manually.
Select all the files in the folder and delete them. They were the files that were in the print queue at the instance.
Go back to the Services window and click on the ‘ Start ’ button.

Recommended:
- Fix Common Printer Problems in Windows 10
- Fix Printer Driver is unavailable on Windows 10
- How To Lock Or Unlock Cells In Excel?
- How to Fix Whatsapp Images Not Showing In Gallery
We hope the above guide was helpful and you were able to successfully clear the print queue in Windows 10. If you’re still stuck, then there may be compatibility issues with the printer and the data to be printed. Outdated printer drivers can also be an issue. You can also run the Windows Printer Troubleshooter to identify the correct problem. It will help you fix the errors in the print jobs . Follow the methods above to delete a stuck print job and clear the print queue in Windows 10, and you shouldn’t have any problems.
Are you in dire need of printing a document but can’t do so because of a stuck print job in Windows 10? Here are some ways to clear the print queue in Windows 10 easily.
Printers may appear easy to use but can be very flimsy at times. Handling print Queue when you urgently want to use a printer can be quite frustrating. The print queue not only prevents the present document but all future documents from printing. The problem is not hard to detect either. If the message ‘Printing’ remains indefinitely even though the paper is not stuck and the ink is right, then certainly there is a Print queue issue. There are certain ways that can be used to clear the print queue in Windows 10 .
- Why does a print job gets stuck in Windows 10?
- How To Clear Print Queue In Windows 10?
- Method 1: Manually Clearing and Restarting the Print Spooler
- Method 2: Clear Print Queue using a Batch File for the Print Spooler
- Method 3: Clear Print Queue Using Command Prompt
- Method 4: Use the Management Console
Why does a print job gets stuck in Windows 10?
The answer lies in the fact that the printing document isn’t directly sent for printing. The document is first received at the spooler , i.e., a program used to manage and queue the print jobs. This spooler is particularly helpful while rearranging the order of print jobs or deleting them entirely. A stuck print job prevents the documents in the queue from printing, which affects all the documents further down the queue.
Often you can solve the error by deleting the print job from the queue. To delete a stuck print job in Windows 10, go to ‘Printers’ in the setting and click on ‘ Open Queue .’ Cancel the print job causing a problem, and you are good to go. If you can’t delete a particular print job, then try deleting the entire print queue. If this doesn’t work either, then try restarting all your devices. Unplug all your connections and plug them to reboot your device completely. This is the first approach that you should have for a stuck print job. If these traditional methods don’t work, then here are some other detailed methods for clearing a print job in Windows 10.
How To Clear Print Queue In Windows 10?
There are a few methods that can be employed to clear a print job in Windows 10. Clearing and restarting the Print Spooler is one of the best methods to use for fixing the stuck print job. It doesn’t delete your documents but creates an illusion that the documents are being sent for the first time to the printer. The process is done by stopping the Print Spooler until you clear the entire temporary cache used by the spooler and then starting it again. This can be accomplished by using a manual method or by making a batch file.
Method 1: Manually Clearing and Restarting the Print Spooler
- Type ‘ Services .’ in the Windows search bar and open the ‘ Services ’ app.
- Find ‘ Print Spooler ’ in the menu and double-click to open the Properties .
- Click on ‘ Stop ’ in the Properties tab and minimize the window to use it again later.
- Open ‘ File Explorer ’ and go to the below address location:
C:\Windows\System 32\spool\PRINTERS
You may be asked for permission to access the location. Click on ‘ Continue ’ to move forward.
Once you reach the destination, select all the files and press Delete on your keyboard.
Now go back to the Spooler properties window and click on ‘ Start .’
Click on ‘ Ok ’ and close the ‘ Services ’ app.
This will restart the spooler, and all the documents would be sent to the printer for printing.
Method 2: Clear Print Queue using a Batch File for the Print Spooler
Creating a batch file is a viable option if your print jobs frequently get stuck. Using the Services app every now and then can be a hassle that can be solved by a batch file.
Open a text editor like Notepad on your computer.
Paste the commands below as separate lines.
Net stop spooler

Del/Q/F/S “%windir%\System32\spool\PRINTERS\*.*”

Net start spooler
- Click on ‘ File ’ and choose ‘ Save as .’ Name the file with the extension ‘ .bat ’ at the end and choose ‘ All files (.) ’ in the ‘ Save as type ’ menu. Click on Save , and you are good to go.
- Simply double-click on the batch file, and the work will be done . You can place it at the most accessible place on your desktop for easy access.
Method 3: Clear Print Queue Using Command Prompt
You can delete a stuck print job in Windows 10 by using Command Prompt as well. Using the method will stop and start the print spooler again.
- Type ‘ cmd ’ in the search bar. Right-click on the ‘ Command Prompt ’ app and choose the run as administrator option.
- Type the command ‘net stop spooler ’, which will stop the spooler.
- Again type the following command and hit Enter:
Del %systemroot%\system32\spool\printers\*/Q
This will do the same task as the methods above.
Start the spooler again by typing the command ‘ net start spooler ’ and press enter .
Method 4: Use the Management Console
You can use the service.msc, shortcut in the management console to clear the print queue in Windows 10. This method will stop the spooler and clear it to delete a stuck print job:
Press the Windows Key + R key together to open the run window.
Type ‘ Services.msc ’ and hit Enter .
Note: You can also access the ‘ Services ’ window via Windows Management. Right-click the Windows icon and choose Computer Management. Choose Services and Application then double-click on Services.
- In the Services window, right-click on Print Spooler and select Properties.
- Click on the ‘ Stop ’ button to stop the Print Spooler service.
Minimize the window and open file explorer. Type the address ‘C:\ Windows\ System32\ Spool\ Printers’ or navigate to the address manually.
Select all the files in the folder and delete them. They were the files that were in the print queue at the instance.
Go back to the Services window and click on the ‘ Start ’ button.
Recommended:
- Fix Common Printer Problems in Windows 10
- Fix Printer Driver is unavailable on Windows 10
- How To Lock Or Unlock Cells In Excel?
- How to Fix Whatsapp Images Not Showing In Gallery
We hope the above guide was helpful and you were able to successfully clear the print queue in Windows 10. If you’re still stuck, then there may be compatibility issues with the printer and the data to be printed. Outdated printer drivers can also be an issue. You can also run the Windows Printer Troubleshooter to identify the correct problem. It will help you fix the errors in the print jobs . Follow the methods above to delete a stuck print job and clear the print queue in Windows 10, and you shouldn’t have any problems.

- How to Fix Slow Network Printing in Windows 10
- Method 1: Troubleshoot Printer Connection
- Method 2: Run Printer Troubleshooter
- Method 3: Update Windows
- Method 4: Modify Printer Preferences
- Method 5: Repair System Files
- Method 6: Verify Printer Port Settings
- Method 7: Delete Temporary files (Print Spooler)
- Method 8: Change Print Spooler Recovery Settings
- Method 9: Update or RollBack Printer Driver
- Method 10: Reinstall Printer Drivers
- Method 11: Remove & Add Printer Again
How to Fix Slow Network Printing in Windows 10
Here are some indispensable reasons that cause delay in printing to network printer on your Windows 10 PC. Read them carefully to find which one troubles you.
- Printer is not turned on.
- Printer is not connected to your computer.
- The Wi-Fi or USB connection is not set properly.
- A loose connection or outdated USB drivers also causes trouble.
- Few essential services are not running on your PC.
- A large list of files is queued for the further printing process.
- The operating system is outdated.
- There are a few corrupt and broken components of internal files on your PC.
If your internet connection is unstable and inadequate. this could cause a slow network printing issue. If there is any interference or obstacles between your PC and router, it might also cause the discussed problem.
Check the network speed of your computer by running a Speedtest .

Follow the below criteria and make sure these are satisfied by your computer.
- Clear all the obstructions in between the way of the router if the signal strength of your network is very low.
- Your internet connection might be slow if many devices are connected to the same network, so try to avoid it.
- Always prefer buying a router or modem that is verified by your ISP (Internet Service Provider).
- It is not recommended to use old, damaged, or broken cables, replace the cables if it is necessary.
- Make sure that wires of the modem to the wall and wires from the modem to the router are out of any disturbance.
If you face any internet connectivity issues, check our guide How to Troubleshoot Network Connectivity Problems on Windows 10 to troubleshoot the same.

Here are some amazing hacks that will help you fix slow printing problem on your device. But, before following the below-mentioned methods, reboot your Windows 10 PC to resolve any temporary glitches associated with the device. If you did not attain any fix for the issue after rebooting your computer, follow the below-mentioned methods.
Method 1: Troubleshoot Printer Connection
When you face delay in printing to network printer, the device wants to tell users that there is something wrong with the communication established between the printer and the system through the USB cable or network connection. To solve this issue, ensure whether the following steps are satisfied or not.
- To restart your printer , turn off the power supply of the printer & then switch it ON again .
- Now again check the connection of your printer .
- If you have connected your printer using a USB cable, make sure your cable is working properly and the connections to the ports are fitted tight. You could also switch the USB port to see if this resolves the problem.
- If you have connected your printer through wired networks, check whether the connection to your cable is properly done or not. Also, you can check whether the signal to your printer is flashing or not.
- If the connection of your system with the printer is made through a wireless network, make sure your printer is connected to your computer network & the wireless icon will lit-up to show that you are connected.
Method 2: Run Printer Troubleshooter
The easiest and quickest way to solve any problem with a device or a feature is to run the troubleshooter associated with it. Windows 10 includes a troubleshooter tool for a wide variety of issues, and printer problems are also one of them. The Printer troubleshooter automatically performs several actions like restarting the print spooler service, clearing corrupt spooler files, checking whether the existing printer drivers are outdated or corrupt, etc. Refer to the steps listed below to run Printer Troubleshooter.
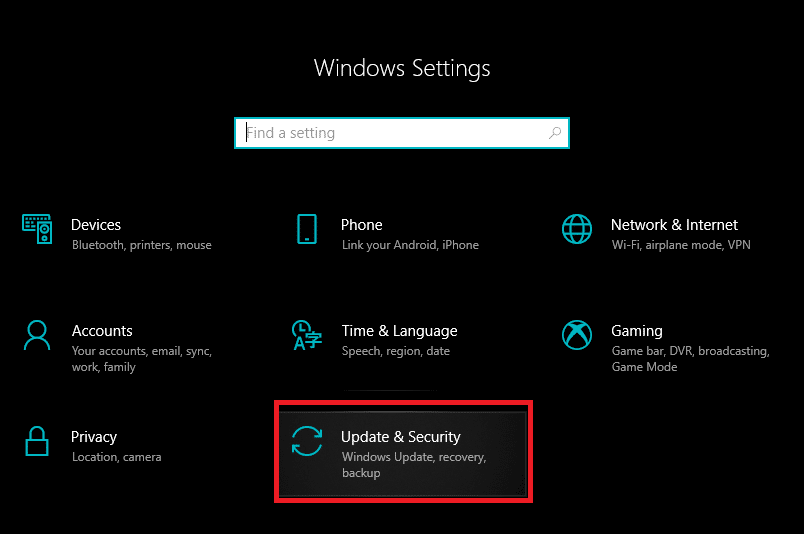
Press Windows + I keys simultaneously to launch Settings .
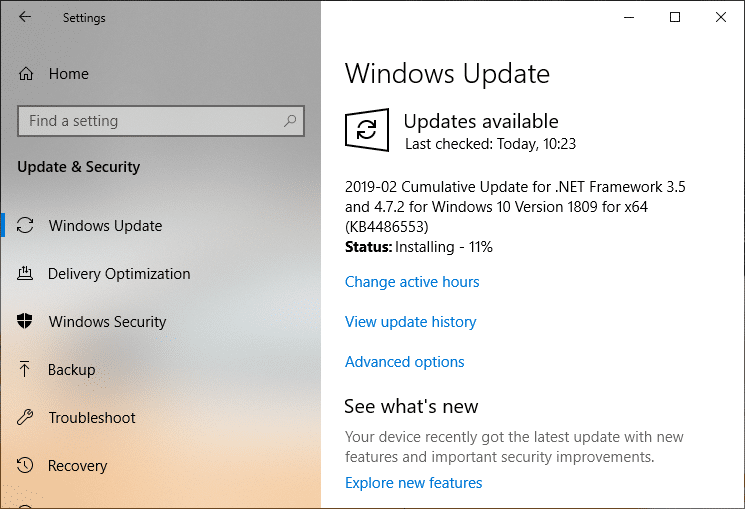
Click on the Update & Security tile, as shown.

Go to Troubleshoot menu in the left pane.
Select Printer troubleshooter and click on Run the troubleshooter option.

- Wait for the troubleshooter to detect issues and follow the on-screen instructions to apply the fix.
Check if you have fixed slow network printing Windows 10 issue.
Method 3: Update Windows
Also, if there are any bugs in your PC, they can only be fixed after a Windows update . Microsoft releases regular updates to fix all these bugs thereby fixing slow network printing Windows 10 issue. Hence, ensure if you have updated your Windows Operating System and if there are any updates pending in action, use our guide How to Download and Install Windows 10 Latest Update

After updating your Windows Operating System, check whether you can print pages without any issues.
Method 4: Modify Printer Preferences
It is a well-known fact that, the quality settings of your printer consume different amounts of ink levels as well. If the printing quality is set to Best, then the printing speed will be definitely slow. You can change the printer preferences as instructed below.
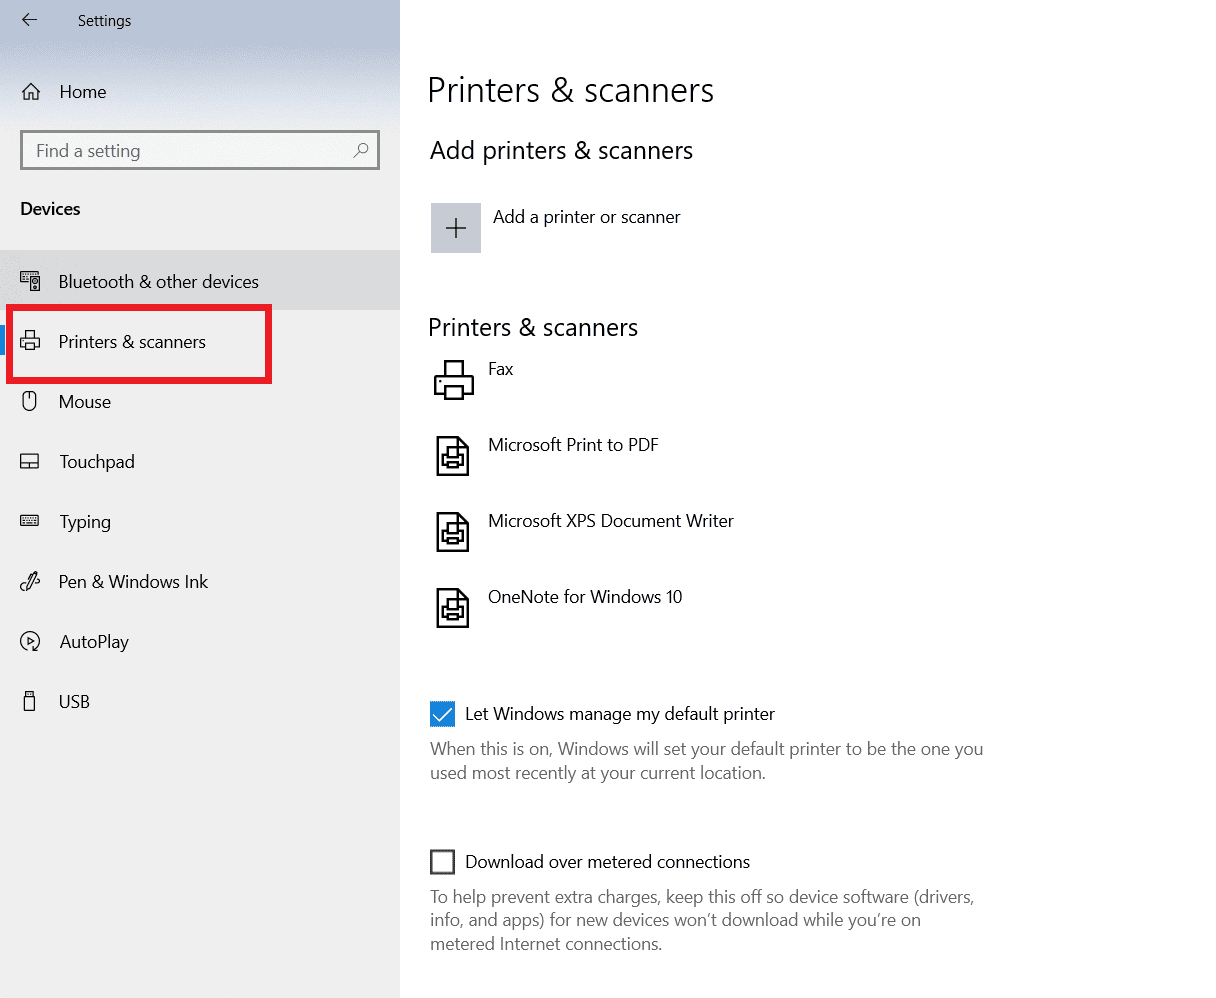
- Hit the Windows key and type Printers & scanners , then click on Open .

- Then, select your printer and click on Manage .

- Now, click on Printing preferences .

In the next window, switch to the Paper/Quality tab and choose Plain Paper in the Media / Paper Type field under the Tray Selection menu.
Then, select Draft, Normal or Standard under the Quality Settings or Print Quality menu.
Save the changes by pressing OK . Now, check if the printing speed is increased or not.
Method 5: Repair System Files
If there are any corrupt system files in your Windows Operating system, your PC may face a lot of internet connectivity issues. If you are experiencing slow network printing Windows 10 issue very recently, there are some chances that your computer files have become corrupt or damaged. Luckily, your Windows 10 PC has inbuilt repair tools like SFC (System File Checker) and DISM (Deployment Image Servicing and Management) that will help you fix all the corrupt files. Read our guide on How to Repair System Files on Windows 10 and follow the steps as instructed to repair all your corrupt files.

Method 6: Verify Printer Port Settings
Few users have suggested that slow printing problem on your device can be resolved by tweaking some printer port settings as instructed below.
- Hit the Windows key and type Control panel , and click on Open .

- Set View by > Category , then click on the View devices and printers .

- Now, right-click on your printer and select Properties .

Switch to the Ports tab and find the port to which your device is connected.
Then, click the checkbox that hosts the USB pin of the printer.
Save the changes by clicking Apply > OK .
Note: It is also quite possible that your printer is working just fine, but you have been sending the print request to the wrong printer. This might be the case if there are multiple printers installed on your computers. Set the one you are trying to use as the default printer to resolve the issue. Hence, right-click on your printer and select Set as default printer .

Method 7: Delete Temporary files (Print Spooler)
A print spooler is a mediating file/tool that coordinates between your computer and the printer. The spooler manages all the print jobs you send to the printer and lets you delete a print job that is still being processed. Problems might be encountered if the Print Spooler service is corrupt or if the temporary files of the spooler become corrupt. Restarting the service and deleting these temporary files should help you to fix slow printing Windows 10 problems on your computer.
Note: Before we delete the print spooler files, we will need to halt the Print Spooler service that constantly runs in the background.
- Hit the Windows key and type Services , then click on Open .

- Scan the list of Local Services to find the Print Spooler service. Once found, right-click on the Print Spooler service and select Properties from the context menu (or double-click on a service to access its properties)
- Click on the Stop button to stop the service.
Note: Minimize the Services window instead of closing as we will need to restart the service after deleting the temporary files.

- Now, open up the Windows File Explorer (Windows key + E) and navigate to the following path – C:\WINDOWS\system32\spool\printers .
Note: You can also launch the run command box, type %WINDIR%\system32\spool\printers , and hit Enter to reach the required destination directly.

Press Ctrl + A to select all the files in the printer’s folder and hit the delete key on your keyboard to delete them.
Maximize/switch back to the Services application window and click on the Start button to restart the Print Spooler service.

You should now be able to fix slow network printing problem and be able to print your documents without any issues.
Method 8: Change Print Spooler Recovery Settings
Any incorrect recovery settings configuration of the print spooler service may also cause delay in printing to network printer. Therefore, you need to make sure that recovery settings are correct otherwise Printer spooler will not start automatically.
Open the Services window as you did earlier.
Locate Print Spooler then right-click on it and select Properties.

- Switch to the Recovery tab and ensure that three failure tabs are set to Restart the Service.

- Click Apply followed by OK to save the settings.
Now see if you’re able to fix the problem in your printer.
Method 9: Update or RollBack Printer Driver
Every computer peripheral has a set of software files associated with it to communicate with your computer and the OS effectively. These files are known as device drivers. These drivers are unique for each device and manufacturer. Also, it is important to have the correct set of drivers installed in order to use an external device without facing any issues.
Option I: Update Printer Driver
Drivers are also constantly updated to stay compatible with the new Windows versions. If your drivers are not updated to their latest versions, update them by following our guide How to Update Device Drivers on Windows 10 .

Option II: Roll Back Printer Driver Updates
Sometimes, the current version of printer drivers may cause any conflicts and, in this case, you have to restore previous versions of installed drivers. This process is called Roll back of drivers and you can easily roll back your computer drivers to their previous state by following our guide How to Rollback Drivers on Windows 10 .

Wait until the previous versions of drivers are installed on your Windows 10 PC. Once done, check if you have fixed slow printing problem on your device.
Method 10: Reinstall Printer Drivers
Incompatible drivers must be reinstalled to fix slow printing Windows 10 issues. You are advised to reinstall device drivers only if you cannot attain any fix by updating them. Steps to reinstall drivers are very easy and you can do so by using a third-party application or by implementing the steps manually as instructed in our guide How to Uninstall and Reinstall Drivers on Windows 10

After reinstalling printer drivers, check if you can fix the discussed issue.
Note: Few users have suggested that re-installing printer drivers in compatibility mode have helped them fix the discussed issue. Here are a few instructions regarding the same.
- After uninstalling the driver go to your printers manufacturer’s website (e.g. Hp ) and download the latest drivers for your printer.

- Right-click on the setup file and select Properties.
Note: If the drivers are in a zip file make sure to extract all the files and then right-click on the .exe file.

Switch to the Compatibility Tab and click on Run this program in Compatibility mode .
From the drop-down select Windows 7 or 8 and then click on Run this program as an administrator .

Finally, double-click on the setup file and wait for the drivers to be installed on your device.
Once finished, reboot your PC and see if you can fix the printing issue on Windows 10 PC is fixed or not.
Method 11: Remove & Add Printer Again
If all these steps do not work to fix delay in printing to network printer, you might need to completely uninstall the existing drivers and the printer and then reinstall them. The process of doing the same is simple but rather lengthy but this seems to fix the discussed issue on your Windows PC. Anyway, below are the steps to remove and add your printer back.
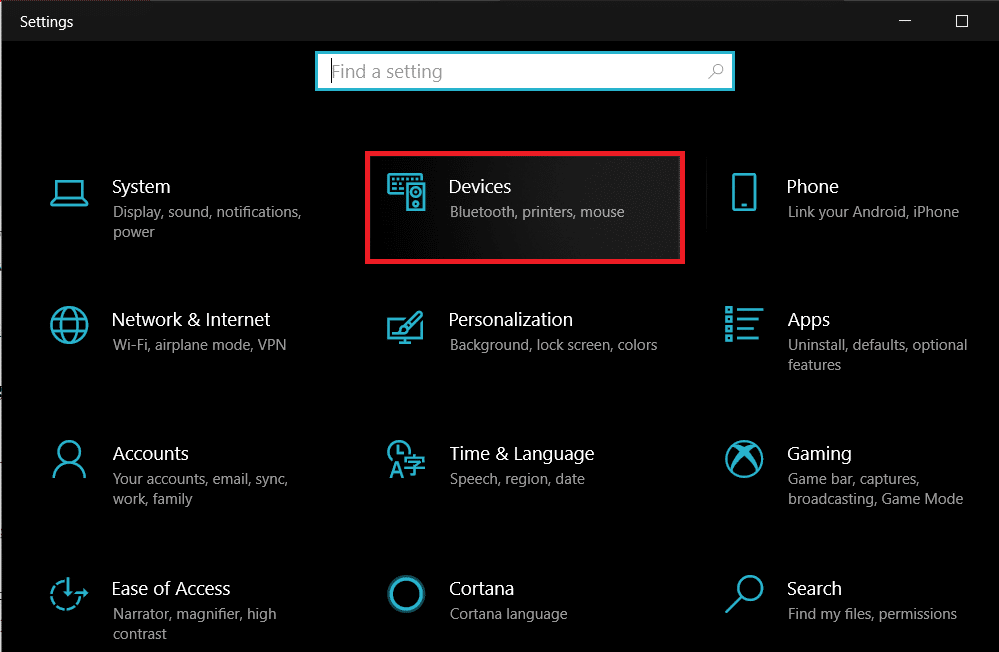
- Launch the Windows Settings and select Devices setting.

- Move to the Printers & scanners settings in the left pane.
- Find the problematic printer in the right-side panel and single click on it to access its options. Select Remove Device , let the process complete, and then close Settings.

- Click on Windows keys and type Print Management in the search bar, then click on Open

- Double-click on All Printers (in the left panel or right panel, both are fine) and press Ctrl + A keys together to select all connected printers.

- Right-click over any printer and select Delete .

Now, it is time to add the printer back, but first, unplug the printer cable from your computer and perform a restart. Once the computer boots back on, properly reconnect the printer.
Follow steps 1 and step 2 of this method to open the Printer & Scanner settings .
Click on the Add a printer & scanner button at the top of the window.

- Windows will now automatically start looking for any connected printers. If Windows successfully detects the connected printer, click on its entry in the search list and select Add device to add it back otherwise, click on The printer that I want isn’t listed hyperlink.

- In the following window, select the appropriate option by clicking on its radio button and click on Next .
Note: For example, select My printer is a little older. Help me find it if your printer doesn’t use USB for connection or select Add a Bluetooth, wireless, or network discoverable printer to add a wireless printer.

- Now, reinstall your printer .
Now that you have successfully reinstalled your printer, try printing a test page to ensure everything is right back on track.
- Hit Windows + I keys to open Settings and click on Devices .
- On the Printers and Scanners page, click on the printer you just added back and would like to test, followed by a click on the Manage button.

- Finally, click on the Print a test page option. Muffle your ears & listen carefully for the sound of your printer printing a page and rejoice.

Recommended:
- Fix Intel Wireless AC 9560 Not Working
- Fix 0x800f0831 Windows 10 Update Error
- Fix Epson Scanner Cannot Communicate in Windows 10
- Fix Error Printing in Windows 10
If you’re facing the error message “ The print spooler service is not running ” when you try to print a document or any file then don’t worry as we are going to see how to fix print spooler keeps stopping on Windows 10 issue . After facing this error, you may try to start the print spooler service but you will notice that it is automatically stopped after a few seconds. It seems like the print spooler service keeps crashing on Windows 10. But before going to fix the issue lets us see what this Print spooler actually is?

What is Print Spooler?
Print spooler is a utility program that comes with the Windows operating system which helps in managing all the print jobs users sent to their printer. The print spooler helps your Windows to interact with the printer, and orders the print jobs in your queue. If the print spooler service isn’t running, your printer won’t work.

Now you might be wondering what is the cause behind this error? Well, there can be many reasons why you’re facing this issue but the main cause seems to be the outdated, incompatible printer drivers. Normally if the print spooler service stops working, it will not pop-up or show any error or warning message. But in this case, you will receive an error message pop-up, so without wasting any time let’s see How to Fix Print Spooler Keeps Stopping Automatically with the help of the below-listed troubleshooting guide.
- Fix Print Spooler Keeps Stopping on Windows 10
- Method 1: Delete content from the Spool folder
- Method 2: Restart your Print Spooler service
- Method 3: Set Print Spooler Service to Automatic
- Method 4: Change the Print Spooler Recovery Options
- Method 5: Update your Printer driver
- Method 6: Take Ownership of spoolsv.exe
- Method 7: Delete unnecessary key from Registry
- Method 8: Reinstall your Printer Drivers
- Method 9: Scan your PC with Anti-Malware
Fix Print Spooler Keeps Stopping on Windows 10
Make sure to create a restore point just in case something goes wrong.
Method 1: Delete content from the Spool folder
Using this approach, you have to delete all the content inside the PRINTERS and drivers folder. This method works for all Windows OS right from Windows 10 till Windows XP. To solve using this approach, the steps are:
1.Open the File Explorer then navigate to the following path: C:\Windows\System32\spool
2.Double-click on “ drivers ” folder then delete all files & folders under it.

3.Similarly, you have to delete all contents from the PRINTERS folder and then restart the “ Print Spooler ” service.
4.Then reboot your system to save changes.
Method 2: Restart your Print Spooler service
In this approach, you have to restart your Print Spooler Services. To do this the steps are –
1.Press Windows Key + R then type “ services.msc ” (without quotes) and hit Enter to open the Services window.

2.Scroll down & look for Print Spooler service and then select it.

3.Right-click on Print Spooler service then select Restart.
4.Now check whether the printer is working or not. If your printer is working then this means you were able to Fix Print Spooler Keeps Stopping on Windows 10 issue.
Method 3: Set Print Spooler Service to Automatic
1.Use the keyboard shortcut key combination Windows key + R to open the Run application.
2.Type “ services.msc ” and hit Enter to open the Services window.

- Right-click Print Spooler & choose the Properties.

4.Change the “ Startup type ” to ‘ Automatic ’ from the drop-down list & then click Apply > OK.

See if you’re able to Fix Print Spooler Keeps Stopping on Windows 10 issue, if not then continue to the next method.
Method 4: Change the Print Spooler Recovery Options
In case the Print Spooler recovery settings are not configured properly, then in case of any failure, the print spooler will not restart automatically. To recover that the steps are –
1.Press Windows Key + R then type service.msc and hit Enter.
2.Right-click Print Spooler & select Properties.
3.Switch to the Recovery tab then make sure the First failure, Second failure, & Subsequent failures are set to “ Restart the Service ” from their respective drop-downs.

4.Then, click Apply followed by OK.
Method 5: Update your Printer driver
1.Press Windows Key + R then type “ services.msc ” and hit enter.
2.Find Print Spooler service then right-click on it and select Stop.

3.Again press Windows Key + R then type printui.exe /s /t2 and hit enter.
4.In the Printer Server Properties window search for the printer which is causing this issue.
5.Next, remove the printer, and when asked for confirmation to remove the driver as well, select yes.

6.Now again go to services.msc and right-click on Print Spooler and select Start.

7.Next, navigate to your printer manufacturer website, download and install the latest printer drivers from the website.
For example , in case you have an HP printer then you need to visit HP Software and Drivers Downloads page . Where you can easily download the latest drivers for your HP printer.
8.If you’re still not able to fix Print Spooler Keeps Stopping issue then you can use the printer software that came with your printer. Usually, these utilities can detect the printer on the network and fix any issues that are causing the printer to appear offline.
For example, you can use HP Print and Scan Doctor to fix any issues regarding HP Printer.
Method 6: Take Ownership of spoolsv.exe
1.Open the File Explorer then navigate to this path: C:\Windows\System32
2.Next, find ‘ spoolsv.exe ’ then right-click on it and select Properties.

3.Switch to the “ Security ” tab.
4.Now under Group and user names choose your user account & then click on the “ Advanced ” button.

5.Now click on “ Change ” next to the current Owner .

6.Now from the “ Select User or Group ” window click on the Advanced button at the bottom.

7.Next, click on Find Now then select your user account then click OK.

8.Again click OK on the next window.

9.You will be again on the Advanced Security Settings window of spoolsv.exe , just click Apply followed by OK.

10.Now under spoolsv.exe Properties window , select your user account (which you selected in step 7) then click on the Edit button.

11.Checkmark “ Full control ” then click Apply followed by OK.

- Restart Print Spooler service (Run > services.msc > Print Spooler).
13.Reboot your system to apply changes and see if you’re able to Fix Print Spooler Keeps Stopping on Windows 10 issue .
Method 7: Delete unnecessary key from Registry
Note: Make sure to back up your Registry just in case something goes wrong then you can easily restore the registry using this backup.
1.Press Windows Key + R then type regedit and hit Enter to open Registry Editor.
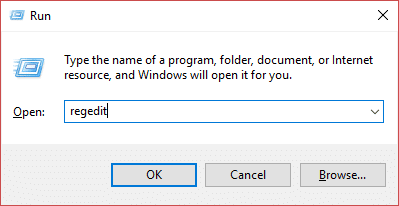
2.Now navigate to the following registry key:
HKEY_LOCAL_MACHINE\SYSTEM\CurrentControlSet\Control\Print\Providers
3.Under Providers you will find two default sub-keys which are LanMan Print Services and Internet Print Provider.

4.Above two sub-keys are the default and should not be deleted.
5.Now apart from the above sub-keys delete any other key present under Providers.
6.In our case, there is an additional subkey which is Printing Services.
7.Right-click on Printing Services then select Delete.

8.Close Registry Editor & Restart Print Spooler service.
Method 8: Reinstall your Printer Drivers
1.Press Windows Key + R then type control printers and hit Enter to open Devices and Printers.

- Right-click on your printer and select “ Remove device ” from the context menu.

3.When the confirm dialog box appears , click Yes.

4.After the device is successfully removed, download the latest drivers from your printer manufacturer’s website .
5.Then reboot your PC and once the system restarts, press Windows Key + R then type control printers and hit Enter.
Note: Make sure your printer is connected to the PC via USB, Ethernet, or wirelessly.
6.Click on the “ Add a printer ” button under the Device and Printers window.

7.Windows will automatically detect the printer, select your printer and click Next.

- Set your printer as default and click Finish.

Method 9: Scan your PC with Anti-Malware
Malware can cause tremendous trouble in printing services. It can corrupt system files or may change any values in the registry. The possibilities of creating issues by malware are endless. So, it is recommended to download and install applications like Malwarebytes or other anti-malware applications to scan for malware in your system. Scanning your PC for malware may fix the Print Spooler stopping issue.
1.Download and install CCleaner & Malwarebytes.
- Run Malwarebytes and let it scan your system for harmful files.

3.If malware is found it will automatically remove them.
4.Now run CCleaner and in the “Cleaner” section, under the Windows tab, we suggest checking the following selections to be cleaned:
5.Once you’ve made certain the proper points are checked, simply click Run Cleaner, and let CCleaner run its course.
6.To clean your system further select the Registry tab and ensure the following are checked:
7.Select Scan for Issue and allow CCleaner to scan, then click Fix Selected Issues.
8.When CCleaner asks “ Do you want backup changes to the registry? ” select Yes.
9.Once your backup has completed, select Fix All Selected Issues.
10.Restart your PC to save changes.
Recommended:
- Kill Resource Intensive Processes with Windows Task Manager (GUIDE)
- Clear Clipboard using Command Prompt or Shortcut
- What is a VPN and how it works?
- Install Group Policy Editor (gpedit.msc) on Windows 10 Home
I hope this article was helpful and now you can easily Fix Print Spooler Keeps Stopping on Windows 10 , but if you still have any questions regarding this tutorial then feel free to ask them in the comment section.
How to Get Your Printer Back Online: There may be situations where you need to print any file for an urgent meeting and you need to submit those files in 30 minutes. So what you usually do is open the file and go to print option to print the document. But suddenly you noticed that in the bottom right corner of your system the status of your printer is showing as offline. This is a usual problem for users because even when your Printer is clearly ON and ready to print, the status is showing offline.
This is caused by the communication error viz The Active Directory Domain Services is Currently Unavailable error of the printer with your system. There is no particular cause for this error but the issue could be caused because of outdated or incompatible drivers, conflict of printer spooler services, a problem with physical or hardware connection of the printer to PC, etc. So without wasting any time let’s see How to Get Your Printer Back Online in Windows 10 with the help of the below-listed tutorial.
- How to Get Your Printer Back Online in Windows 10
- Method 1: Check Your Printer Connection
- Method 2: Update Printer Driver
- Method 3: Change the Printer Status
- Method 4: Restart Print Spooler Service
- Method 5: Use a Second Printer
- Method 6: Reinstall your Printer Drivers
How to Get Your Printer Back Online in Windows 10
Make sure to create a restore point just in case something goes wrong.
Method 1: Check Your Printer Connection
When there is an error showing your status of the printer as offline, the system wants to tell users that there is something wrong with the communication established between the printer and the system through the USB cable or network connection. To solve this issue the steps are:
- To restart your printer, off the power supply of the printer & then switch it ON again.
- Now again check the connection of your printer.
- If the connection of your system with the printer is made using a USB cable, make sure your cable is working properly and the connections to the ports are fitted tight. You could also switch the USB port to see if this resolves the problem.
- If the connection of your system with the printer is made through wired networks, check whether the connection to your cable is properly done or not. Also, you can check whether the signal to your printer is flashing or not.
- If the connection of your system with the printer is made through a wireless network, make sure your printer is connected to your computer network & the wireless icon will lit-up to show that you are connected.
If nothing works then you should try to run Printer Troubleshooter:
1.Type “troubleshooting” in Control Panel then click on Troubleshooting from the search result.
2.Next, from the left window pane select View all.
3.Then from the Troubleshoot computer problems list select Printer.

4.Follow on-screen instruction and let the Printer Troubleshooter run.
5.Restart your PC and you may be able to Get Your Printer Back Online in Windows 10, if not then continue with the next method.
Method 2: Update Printer Driver
1.Press Windows Key + R then type “ services.msc ” and hit enter.
2.Find Print Spooler service then right click on it and select Stop.
3.Again press Windows Key + R then type printui.exe /s /t2 and hit enter.
4.In the Printer Server Properties window search for the printer which is causing this issue.
5.Next, remove the printer and when asked for confirmation to remove the driver as well, select yes.
6.Now again go to services.msc and right-click on Print Spooler and select Start.
7.Next, navigate to your printers manufacturer website, download and install the latest printer drivers from the website.
For example , in case you have an HP printer then you need to visit HP Software and Drivers Downloads page . Where you can easily download the latest drivers for your HP printer.
8.If you’re still not able to fix Printer Offline Status then you can use the printer software that came with your printer. Usually, these utilities can detect the printer on the network and fix any issues that are causing the printer to appear offline.
For example, you can use HP Print and Scan Doctor to fix any issues regarding HP Printer.
Method 3: Change the Printer Status
1.Turn off your Printer and then again turn it back ON.
2.Now press the key combination Windows Key + I to open Settings.
3.Now click on “ Devices ” then from the left-hand side menu select “ Bluetooth & other devices ” option.

4.Under Related settings click on “ Devices and printers “.

5.Then, you have to right-click on the printer icon with a green check-mark and choose “ See what’s printing ”.

Note: If there is no default printer set, then right-click on your printer and select “ Set as default printer “.

6.You will see the printer queue, see if there are any unfinished tasks and make sure to remove them from the list.

7.Now from the printer queue window, select your Printer and uncheck the “Use Printer Offline” & “ Pause Printer ” option.

Method 4: Restart Print Spooler Service
1.Use the shortcut key combination Windows Key + R to open the Run application.
2.Now type in there “ services.msc ” and hit Enter or click OK.
3.Scroll down to look for “ Print Spooler ” from the service utility window an check whether the status is running or not.
4.If you cannot see the status, you can right-click on Print Spooler and choose “ Start ”.
5.Or else, double-click on Print Spooler service & make sure the Startup type is set to Automatic and the service is running, then click on Stop and then again click on start in order to restart the service.
6.Click Apply followed by OK.
7.After that, again try to add the printer and see if you’re able to Get Your Printer Back Online in Windows 10.
Method 5: Use a Second Printer
This approach of solving the issue will work only when the printer is connected via a network to the PC (instead of the USB cable). Otherwise, you can manually set your IP address for your printer.
1.Press Windows Key + I to open Settings then click on Devices.
2.From the left-hand menu click on “ Bluetooth & other devices “.
3.Now from the right window pane click on “ Devices and printers “.
4.Right-click on your printer and select Printer properties from the context menu.

5.Switch to Ports tab then click on the “ Add Port… ” button.

6.Choose “ Standard TCP/IP Port ” under Available port types and then click on the New Port button.

7.On the Add Standard TCP/IP Printer Port Wizard click on Next .

8.Now type in the Printers IP Address and Port name then click Next.

Note: You could easily find the IP address of your printer on the device itself. Or you could find these details on the manual that came with the printer.
9.Once you successfully added the Standard TCP/IP Printer, click Finish.

See if you’re able to Get Your Printer Back Online in Windows 10 , if not then you need to reinstall your printer drivers.
Method 6: Reinstall your Printer Drivers
1.Press Windows Key + R then type control printers and hit Enter to open Devices and Printers.
- Right-click on your printer and select “ Remove device ” from the context menu.
3.When the confirm dialog box appears , click Yes.
4.After the device is successfully removed, download the latest drivers from your printer manufacturer website .
5.Then reboot your PC and once the system restarts, press Windows Key + R then type control printers and hit Enter.
Note: Make sure your printer is connected to the PC via USB, ethernet or wirelessly.
6.Click on the “ Add a printer ” button under Device and Printers window.
7.Windows will automatically detect the printer, select your printer and click Next.
- Set your printer as default and click Finish.
Recommended:
- How to Change Default System Font in Windows 10
- What is an MKV file and how to open it?
- Fix Destination Path Too Long Error
- How to Find My Router’s IP Address?
I hope this article was helpful and now you can easily Get Your Printer Back Online in Windows 10 , but if you still have any questions regarding this guide then feel free to ask them in the comment’s section.
Forcefully Clear the Print Queue in Windows 10: Many of the printer users might have to face the circumstances where you are trying to print something but nothing happens. The reasons for not printing and the print job getting stuck can be many but there is one frequent cause that is when the printer queue has a stuck with its print jobs. Let me take a scenario where you previously tried to print something, but that time your printer was off. So, you skipped the printing of document at that moment & you forgot about it. Later or after few days, you again plan to give a print; but the job for printing is already listed in the queue and hence, as the queued job didn’t automatically get removed, you current print command will remain at the end of queue and won’t get print printed until all other listed jobs get printed.

There are cases when you can manually go in & remove the print job but this will keep on happening. In such type of scenario, you have to clear your system’s print queue manually following some specific steps. This article will show you how to Forcefully Clear the Print Queue in Windows 10 using the below-listed guide. In case your Microsoft Windows 7, 8, or 10 is having a lengthy list of corrupt print jobs, you can take adequate measure to Forcefully Clear the Print Queue by following the technique mentioned below.
- How to Forcefully Clear the Print Queue in Windows 10
- Method 1: Manually Clear Print Queue
- Method 2: Clear Print Queue Using Command Prompt
How to Forcefully Clear the Print Queue in Windows 10
Make sure to create a restore point just in case something goes wrong.
Method 1: Manually Clear Print Queue
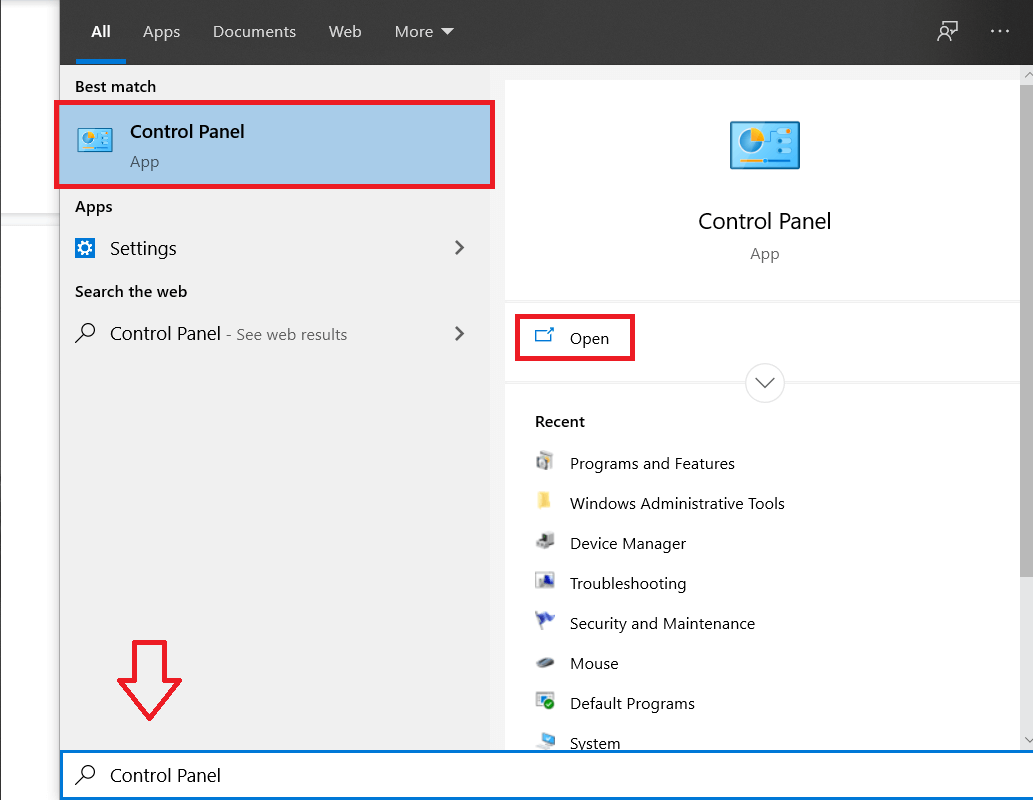
1.Go to Start and search “ Control Panel ”.
2.From “ Control Panel ”, go to “ Administrative Tools ”.

3.Double click the “ Services ” option. Scroll down in the list to search for “ Print Spooler ” service.

4.Now right-click on Print Spooler service and select “ Stop ”. In order to perform this, you have to be logged in as Administrator-mode.
5.It is to be noted that, at this stage, no user of this system will be able to print anything on any of your printers which are connected to this server.
6.Next, what you have to do is, to visit the following path: C:\Windows\System32\spool\PRINTERS
Alternatively, you can manually type “ %windir%\System32\spool\PRINTERS ” (without quotes) in your system Explorer’s address bar when your C drive is not having the default Windows partition.
7.From that directory, delete all the existing files from that folder . This action of your will clear all print queue jobs from your list. In case you are performing this on a server, it is a better thought to first make certain no other print jobs are in the list for processing, in association with any printers because the above step will also delete those print jobs from the queue as well.
8.One last thing left, is to go back to the “ Services ” window and from there right-click the Print Spooler service & choose “ Start ” for starting the print spooling service back again.
Method 2: Clear Print Queue Using Command Prompt
There is an alternate option also to perform the same entire cleaning queue process. Just you have to use a script, code it and execute it. What you can do is create a batch file (blank notepad > put the batch command > File > Save As > filename.bat as ‘All files’) with any file name (let suppose printspool.bat) and put the below-mentioned commands or you can even type them in the command prompt (cmd) also:
net stop spooler

del %systemroot%\System32\spool\printers\* /Q /F /S

net start spooler

Recommended:
- Logout of Gmail or Google Account Automatically (With Pictures)
- No Sound in Windows 10 PC [SOLVED]
- What is Checksum? And How to Calculate Checksums
- Disable Indexing in Windows 10 (Tutorial)
I hope the above steps were helpful and now you can Forcefully Clear the Print Queue in Windows 10 whenever you want but if you still have any questions regarding this tutorial then feel free to ask them in the comment’s section.
Windows updates are extremely important as they bring about a number of bug fixes and new features. Although, sometimes they might end up breaking a few things which worked just fine previously. New OS updates can often lead to some issues with external peripherals, particularly printers. Some common printer related problems you might experience after updating Windows 10 are printer not showing up in connected devices, unable to perform the print action, print spooler not running, etc.
Your printer woes can be due to a number of reasons. The most common culprits are outdated or corrupt printer drivers, problems with print spooler service, the new Windows update doesn’t support your printer, etc.
Fortunately, all your printer problems can be fixed by implementing some easy yet quick solutions. We have listed down five different solutions that you can try to get your printer to print again.

- How to fix various printer problems in Windows 10?
- Method 1: Run the Printer Troubleshooter
- Method 2: Delete the temporary files (Print Spooler) associated with your printer
- Method 3: Set a Default Printer
- Method 4: Update Printer Drivers
- Method 5: Remove and Add the Printer Again
How to fix various printer problems in Windows 10?
As mentioned earlier, there are a few different culprits that might be causing printer problems in Windows 10. Most users can solve these difficulties by running the built-in troubleshooter tool for printers. Other solutions include deleting temporary spool files, manually updating printer drivers, uninstalling and reinstalling the printer, etc.
Before we start implementing the more technical solutions, ensure that the printer and your computer are properly connected. For wired printers, check the condition of the connecting cables and make sure they are firmly connected & in their designated ports. Also, as trivial as it sounds, simply removing and reconnecting wires can also resolve any external device-related issues. Gently blow air into the ports to remove any dirt that might be clogging the connection. As for wireless printers, ensure that the printer and your computer are connected to the same network.
Another quick solution is to power cycle your printer. Turn off the printer and disconnect its power cable. Wait for about 30-40 seconds before plugging the wires back in. This will resolve any temporary issues and start the printer afresh.
If both of these tricks didn’t work, then it is time to move on to the advanced methods.
Method 1: Run the Printer Troubleshooter
The easiest and quickest way to solve any problem with a device or a feature is to run the troubleshooter associated with it. Windows 10 includes a troubleshooter tool for a wide variety of issues, and printer problems are also one of them. The printer troubleshooter automatically performs a number of actions like restarting the print spooler service, clearing corrupted spooler files, checking whether the existing printer drivers are outdated or corrupt, etc.
- The printer troubleshooter can be found within the Windows Settings application. To open Settings , press the Window key (or click on the start button) and then click on the cogwheel Settings icon above the power icon (or use the combination Windows key + I ).

- Now, click on Update & Security .
Switch to the Troubleshoot settings page by clicking on the same from the left-hand panel.
Scroll down on the right side until you find the Printer entry. Once found, click on it to open up available options and then select Run the troubleshooter .

Depending on the Windows version you are currently running, the Printer troubleshooter tool might be absent altogether. If that’s the case, click on the following link to download the required troubleshooter tool.
Once downloaded, click on the Printerdiagnostic10.diagcab file to launch the troubleshooter wizard, select Printer , and click on the Advanced hyperlink at the bottom left.

- In the following window, tick the box next to Apply repairs automatically and click on the Next button to start troubleshooting your printer.

Once you have completed the troubleshooting process, restart your computer, and then try using the printer.
Method 2: Delete the temporary files (Print Spooler) associated with your printer
Print spooler is a mediating file/tool that coordinates between your computer and the printer. The spooler manages all the print jobs you send to the printer and lets you delete a print job that is still being processed. Problems might be encountered if the Print Spooler service is corrupted or if the spooler’s temporary files become corrupt. Restarting the service and deleting these temporary files should help in fixing printer problems on your computer.
- Before we delete the print spooler files, we will need to halt the Print Spooler service that constantly runs in the background. To do so, type services.msc in either the run ( Windows key + R ) command box or the Windows search bar and hit enter. This will open up the Windows Services application .
Scan the list of Local Services to find the Print Spooler service. Hit the P key on your keyboard to jump ahead to the services starting with the alphabet P.
Once found, right-click on the Print Spooler service and select Properties from the context menu (or double-click on a service to access its Properties)
- Click on the Stop button to halt the service. Minimize the Services window instead of closing as we will need to restart the service after deleting the temporary files.

- Now, either open up the Windows File Explorer (Windows key + E) and navigate to the following path – C:\WINDOWS\system32\spool\printers or launch the run command box, type %WINDIR%\system32\spool\printers and press OK to reach the required destination directly.

Press Ctrl + A to select all the files in the printers folder and hit the delete key on your keyboard to delete them.
Maximize/switch back to the Services application window and click on the Start button to restart the Print Spooler service.
You should now be able to fix your printer problems and be able to print your documents without any hiccups.
Method 3: Set a Default Printer
It is also quite possible that your printer is working just fine, but you have been sending the print request to the wrong printer. This might be the case if there are multiple printers installed on your computers. Set the one you are trying to use as the default printer to resolve the issue.
- Press the Windows key and start typing Control Panel to look for the same. Click on Open when search results return.
- Select Devices & Printers .

- The following window will contain a list of all the printers you have connected to your computer. Right-click on the printer you would like to use and choose Set as default printer .

Method 4: Update Printer Drivers
Every computer peripheral has a set of software files associated with it to communicate with your computer and the OS effectively. These files are known as device drivers. These drivers are unique for each device and manufacturer. Also, it is important to have the correct set of drivers installed in order to use an external device without facing any issues. Drivers are also constantly updated to stay compatible with the new Windows versions.
The new Windows update you just installed might not support the old printer drivers, and therefore, you will need to update them to the latest available version.
- Right-click on the start button or press Windows key + X to bring up the Power User menu and click on Device Manager .

Click on the arrow next to Print queues (or Printers) to expand it and have a look at all your connected printers.
Right-click on the problematic printer and select Update Driver from the ensuing options menu.

- Select ‘ Search Automatically for updated driver software ’ in the resulting window. Follow any on-screen instructions you might receive to install the updated printer drivers.

You can also choose to install the latest drivers manually. Visit the driver downloads page of your printer manufacturer, download the required drivers, and run the downloaded file. Printer driver files are usually available in .exe file format, so installing them doesn’t require any additional steps. Open the file and follow the instructions.
Method 5: Remove and Add the Printer Again
If updating drivers didn’t work, you might need to completely uninstall the existing drivers and the printer and then reinstall them. The process of doing the same is simple but rather lengthy but this seems to fix some of the common printer problems. Anyway, below are the steps to remove and add your printer back.
- Open the Settings application (Windows key + I) and select Devices .
Move to the Printers & Scanners settings page.
Find the problematic printer in the right-side panel and single click on it to access its options. Select Remove Device , let the process complete, and then close Settings.

- Type Print Management in the Windows search bar (Windows key + S) and press enter to open the application.

- Double-click on All Printers (in the left panel or right panel, both are fine) and press Ctrl + A to select all connected printers.

- Right-click over any printer and select Delete .

Now, it is time to add the printer back, but first, unplug the printer cable from your computer and perform a restart. Once the computer boots back on, properly reconnect the printer.
Follow step 1 and step 2 of this method to open Printer & Scanner settings .
Click on the Add a printer & scanner button at the top of the window.

- Windows will now automatically start looking for any connected printers. If Windows successfully detects the connected printer, click on its entry in the search list and select Add device to add it back otherwise, click on The printer that I want isn’t listed hyperlink.

- In the following window, select the appropriate option by clicking on its radio button (For example, select ‘My printer is a little older. Help me find it’ if your printer doesn’t use USB for connection or select ‘Add a Bluetooth, wireless, or network discoverable printer’ to add a wireless printer) and click on Next .

- Follow the following on-screen instructions to reinstall your printer .
Now that you have successfully reinstalled your printer, let’s print a test page to ensure everything is right back on track.
Open up Windows Settings and click on Devices .
On the Printers and Scanners page, click on the printer you just added back and would like to test, followed by a click on the Manage button.

- Finally, click on the Print a test page option. Muffle your ears & listen carefully for the sound of your printer printing a page and rejoice.

Recommended:
- Fix Windows 7 Updates Not Downloading
- 10 Best Extratorrent.CC Alternative in 2020
- Fix Fallout New Vegas Out of Memory error
Fix Printer Driver is unavailable on Windows 10: If you’re not able to use your Printer and you face the error message that says “Driver is unavailable” then this means that the driver installed for your Printer is not compatible, outdated or corrupted. In any case, until you resolve this error you won’t be able to access your Printer. To view this message you need to head over to Devices and Printers then select your Printer and under Status, you will see “Driver is unavailable”.

This error message can be annoying, especially is you need to use the printer urgently. But don’t worry there are few easy fixes which can resolve this error and in no time you will be able to use your printer. So without wasting any time let’s see How to Fix Printer Driver is unavailable on Windows 10 with the help of the below-listed troubleshooting guide.
- Fix Printer Driver is unavailable on Windows 10
- Method 1: Uninstall the Printer Drivers
- Method 2: Make sure Windows is up to date
- Method 3: Verify the Admin Account
- Method 4: Install the Printer Drivers in Compatibility mode
- Method 5: Reinstall your Printer Drivers
- Method 6: Reset your PC
Fix Printer Driver is unavailable on Windows 10
Make sure to create a restore point just in case something goes wrong.
Method 1: Uninstall the Printer Drivers
1.Type control in Windows Search then click on the search result which says Control Panel.

2.From the Control Panel click on Hardware and Sound.

3.Next, click on Device and Printers.

4.Right-click on the printer device which shows the error “ Driver is unavailable ” and select Remove device.
5.Press Windows Key + R then type devmgmt.msc and hit Enter to open Device Manager.

6.Expand Print queues then right-click on your Printer device and select Uninstall.

Note: If you don’t have your device listed then don’t worry as it may already be removed when you remove the printer device from Devices and Printers.
7.Again click on Uninstall to confirm your actions and this will successfully remove the printer drivers from your PC.
8.Now press Windows Key + R then type appwiz.cpl and hit Enter.

9.From the Programs and Features window, uninstall any application related to your printer.

10.Disconnect your Printer from the PC, shut down your PC and router, power off your printer.
11.Wait for a few minutes then plug everything the back as it was earlier, make sure to connect your Printer to the PC using a USB cable and see if you’re able to Fix Printer Driver is unavailable on Windows 10.
Method 2: Make sure Windows is up to date
1.Press Windows Key + I to open Settings then click on Update & Security.
2.From the left-hand side, menu click on Windows Update.
3.Now click on the “ Check for updates ” button to check for any available updates.

4.If any updates are pending then click on Download & Install updates.
Once the updates are downloaded, install them and your Windows will become up-to-date.
Method 3: Verify the Admin Account
1.Press Windows Key + R then type control and hit Enter to open Control Panel.
2.Click on User Accounts then again click on User Accounts.

3.Now click on the “ Make changes to my account in PC settings ” link.

4.Click on the verify link and follow the on-screen instructions to verify your admin account.

5.Once finished, reboot your PC and again install the printer without any issues.
Method 4: Install the Printer Drivers in Compatibility mode
1.Press Windows Key + R then type devmgmt.msc and hit Enter to open Device Manager.
2.Expand Print queues then right-click on your Printer device and select Uninstall.
3.If you’re prompted to confirm then again click on the Uninstall button.
4.Now go to your printers manufacturer’s website and download the latest drivers for your printer.
5.Right-click on the setup file and select Properties.

Note: If the drivers are in a zip file make sure to unzip it then right-click on the .exe file.
6.Switch to the Compatibility Tab and checkmark “ Run this program in Compatibility mode “.
7.From the drop-down select Windows 7 or 8 and then checkmark “ Run this program as an administrator “.

8.Finally, double-click on the setup file and let the drivers install.
9.Once finished, reboot your PC and see if you’re able to fix the issue.
Method 5: Reinstall your Printer Drivers
1.Press Windows Key + R then type control printers and hit Enter to open Devices and Printers.
- Right-click on your printer and select “ Remove device ” from the context menu.
3.When the confirm dialog box appears , click Yes.
4.After the device is successfully removed, download the latest drivers from your printer manufacturer website .
5.Then reboot your PC and once the system restarts, press Windows Key + R then type control printers and hit Enter.
Note: Make sure your printer is connected to the PC via USB, Ethernet or wirelessly.
6.Click on the “ Add a printer ” button under Device and Printers window.
7.Windows will automatically detect the printer, select your printer and click Next.
- Set your printer as default and click Finish.
Method 6: Reset your PC
Recommended:
- Mouse Lags or Freezes on Windows 10? 10 Effective ways to fix it!
- 4 Ways to Clear Clipboard History in Windows 10
- How to Fix Computer Shuts Down Randomly
- Fix Logitech Wireless Mouse Not Working
That’s if you have successfully Fix Printer Driver is unavailable on Windows 10 but if you still have any questions regarding this article then please feel free to ask them in the comment section.

- How to Fix Error Printing in Windows 10
- What Causes Error Printing Message?
- What Causes Printer Status Error Printing on Windows 10?
- Method 1: Troubleshoot Hardware Issues
- Method 2: Troubleshoot Printer Connection
- Method 3: Run Printer Troubleshooter
- Method 4: Verify Printer Port Settings
- Method 5: Disable Print Spooler Service
- Method 6: Change Print Spooler Service Recovery Options
- Method 7: Update Printer Drivers
- Method 8: Roll Back Printer Driver Updates
- Method 9: Reinstall Printer Drivers
- Method 10: Reinstall Printer Drivers in Compatibility mode
- Method 11: Update Windows
- Method 12: Reconnect Printer
How to Fix Error Printing in Windows 10
The Error Printing message is generally caused by a loose connection or outdated printer drivers. When this dialogue box appears on your screen, it could be accompanied by an error code for reference or no code. Make sure to not confuse this issue with the Missing or Damaged ink cartridge errors. These are the different steps that you can use on your Windows 10 computer to solve the Error Printing message errors.
What Causes Error Printing Message?
We have listed the possible reasons that may cause the said error message in your PC.
- Windows 10 network printer error
- Windows cannot connect to the printer
- Status error printing
- Printer in error state
- Error printing wireless printer
- Printer error 0x00000709 in Windows 10
- Error printing HP/Brother/Canon/Epson
- Error printing Windows 10/11/7
- Printing issues with Windows 10 update
- Error printing PDF Windows 10
- Error printing restarting Windows 10
What Causes Printer Status Error Printing on Windows 10?
Here are some indispensable reasons that cause error printing message on your Windows 10 PC. Read them carefully to find which one troubles you.
- Printer is not turned on
- Printer is not connected to your computer
- The Wi-Fi or USB connection is not set properly
- A loose connection or outdated USB drivers also causes trouble
- Few essential services are not running on your PC
Here are some amazing hacks that will help you fix error printing message. But, before following the below-mentioned methods, reboot your Windows 10 PC to resolve any temporary glitches associated with the device. If you did not attain any fix for the issue after rebooting your computer, follow the below-mentioned methods.
Method 1: Troubleshoot Hardware Issues
Paper and ink are two essential components in the printing process. You have to place the paper on the tray and this will be pulled out of the device. Once the paper is printed, it will be again pulled out of the device. If any of these factors do not meet, then you will face the discussed problem.
If there is any damage to the paper tray, the device will fail to pull the paper, and result in an error printing Windows 10 message. Check if the paper tray is empty and broken. Replace the paper tray if broken.
If you find the tray is knocked out of its position, you can fix this easily by placing the paper tray in proper position . On the other hand, if the tray is broken, seek professional help to repair it.

Method 2: Troubleshoot Printer Connection
When you face printer status error printing error, the device wants to tell users that there is something wrong with the communication established between the printer and the system through the USB cable or network connection. To solve printer status error Windows 10 issue ensure whether the following steps are satisfied or not.
To restart your printer , switch off the power supply of the printer & then switch it ON again.
Now again check the connection of your printer .
If you have connected your printer using a USB cable, make sure your cable is working properly and the connections to the ports are fitted tight . You could also switch the USB port to see if this resolves the problem.
If you have connected your printer through wired networks, check whether the connection to your cable is properly done or not . Also, you can check whether the signal to your printer is flashing or not.
If the connection of your system with the printer is made through a wireless network, make sure your printer is connected to your computer network & the wireless icon will lit-up to show that you are connected.

Method 3: Run Printer Troubleshooter
The easiest and quickest way to solve any problem with a device or a feature is to run the troubleshooter associated with it. Windows 10 includes a troubleshooter tool for a wide variety of issues, and printer problems are also one of them. The printer troubleshooter automatically performs several actions like restarting the print spooler service, clearing corrupt spooler files, checking whether the existing printer drivers are outdated or corrupt, etc.
Press Windows + I keys to open Settings .
Now, click on Update & Security .

Switch to the Troubleshoot settings page by clicking on the same from the left-hand panel.
Select Printer under the Get up and running menu and follow the on-screen instructions to run the printer troubleshooter.
Check if you have fixed error printing Windows 10 issue.
Method 4: Verify Printer Port Settings
Few users have suggested that printer status error Windows 10 can be resolved by tweaking some printer port settings as instructed below.
- Hit the Windows key and type Control panel . Then, click on Open .

- Set View by > Category , then click on the View devices and printers option.

- Now, right-click on your printer and select Properties .

Switch to the Ports tab and find the port to which your device is connected.
Then, click the checkbox that hosts the USB pin of the printer.
Save the changes by clicking Apply and OK .
Note: It is also quite possible that your printer is working just fine, but you have been sending the print request to the wrong printer. This might be the case if there are multiple printers installed on your computers. Set the one you are trying to use as the default printer to resolve the issue. Hence, right-click on your printer and select Set as default printer .

Method 5: Disable Print Spooler Service
A print spooler is a mediating file/tool that coordinates between your computer and the printer. The spooler manages all the print jobs you send to the printer and lets you delete a print job that is still being processed. Problems might be encountered if the Print Spooler service is corrupted or if the temporary files of the spooler become corrupt. Restarting the service and deleting these temporary files should help in fixing error printing Windows 10 problems on your computer.
- Before we delete the print spooler files, we will need to halt the Print Spooler service that constantly runs in the background. To do so, hit the Windows key and type Services . Then, click on Open .

- Scan the list of Local Services to find the Print Spooler service. Once found, right-click on the Print Spooler service and select Properties from the context menu (or double-click on a service to access its Properties)

- Click on the Stop button to stop the service.
Note: Minimize the Services window instead of closing as we will need to restart the service after deleting the temporary files.

- Now, open up the Windows File Explorer by hitting the Windows + E keys together and navigate to the following path .
C:\WINDOWS\system32\spool\printers
Note: You can also launch the run command box, type %WINDIR%\system32\spool\printers command and hit Enter key to reach the required destination directly.

Press Ctrl + A keys simultaneously to select all the files in the printers folder and hit the delete key on your keyboard to delete them.
Maximize/switch back to the Services application window and click on the Start button to restart the Print Spooler service.

You should now be able to fix printer status error printing message and be able to print your documents without any issues.
Method 6: Change Print Spooler Service Recovery Options
Any incorrect recovery settings configuration of the print spooler service may also cause printer status error printing with your device. Therefore, you need to make sure that recovery settings are correct otherwise Printer spooler will not start automatically.
Open the Services window as you did in the previous method.
Locate Print Spooler then right-click on it and select Properties.

- Switch to the Recovery tab and ensure that three failure tabs are set to Restart the Service.

- Click Apply followed by OK to save the settings. Now see if you’re able to fix printer status error Windows 10.
Method 7: Update Printer Drivers
Every computer peripheral has a set of software files associated with it to communicate with your computer and the OS effectively. These files are known as device drivers. These drivers are unique for each device and manufacturer. Also, it is important to have the correct set of drivers installed to use an external device without facing any issues. Drivers are also constantly updated to stay compatible with the new Windows versions. If your drivers are not updated to their latest versions, update them by following our guide How to Update Device Drivers on Windows 10 .

Method 8: Roll Back Printer Driver Updates
Sometimes, the current version of printer drivers may cause any conflicts and in this case, you have to restore previous versions of installed drivers. This process is called rollback of drivers and you can easily roll back your computer drivers to their previous state by following our guide How to Rollback Drivers on Windows 10 .

Wait until the previous versions of drivers are installed on your Windows 10 PC. Once done, check if you have fixed error printing Windows 10 issue.
Method 9: Reinstall Printer Drivers
Incompatible drivers must be reinstalled to resolve error printing message problems. You are advised to reinstall device drivers only if you cannot attain any fix by updating them. Steps to reinstall drivers are very easy and you can do so by using a third-party application or by implementing the steps manually as instructed in our guide How to Uninstall and Reinstall Drivers on Windows 10

After reinstalling printer drivers, check if you can hear audio from Logitech speakers.
Method 10: Reinstall Printer Drivers in Compatibility mode
Few users have suggested that re-installing printer drivers in compatibility mode have helped them fix printer status error printing issue. Here are a few instructions regarding the same.
- Click on the Windows key and type Device manager . Then, click on Open .

- Expand Print queues then right-click on your Printer device and select Uninstall device .

If you’re prompted to confirm then again click on the Uninstall button.
Now go to your printer driver download webpage (e.g. HP ) and download the latest drivers for your printer.
Right-click on the setup file and select Properties.

Note: If the drivers are in a zip file make sure to extract all the files and then right-click on the .exe file.
Switch to the Compatibility Tab and click on Run this program in Compatibility mode .
From the drop-down select Windows 7 or 8 and then click on Run this program as an administrator .

Finally, double-click on the setup file and wait for the drivers to be installed on your device.
Once finished, reboot the PC and see if you can fix printer status error Windows 10 issue.
Method 11: Update Windows
Also, if there are any bugs in your PC, they can only be fixed after a Windows update . Microsoft releases regular updates to fix all these bugs thereby fixing error printing Windows 10 issue. Hence, ensure if you have updated your Windows Operating System and if any updates are pending in action, use our guide How to Download and Install Windows 10 Latest Update

After updating your Windows Operating System, check whether printer status error Windows 10 issue is resolved.
Method 12: Reconnect Printer
If all these steps do not work to fix printer status error Windows 10, you might need to completely uninstall the existing drivers and the printer and then reinstall them. The process of doing the same is simple but rather lengthy but this seems to fix error printing message on your Windows PC. Anyway, below are the steps to remove and add your printer back.
- Open the Settings application by pressing the Windows + I keys together and select Devices as shown.

Move to the Printers & scanners settings in the left pane.
Find the problematic printer in the right-side panel and single click on it to access its options. Select Remove Device , let the process complete, and then close Settings.

- Type Print Management in the Windows search bar and click Open to launch the application.

- Double-click on All Printers (in the left panel or right panel, both are fine) and press Ctrl + A to select all connected printers.

- Right-click over any printer and select Delete .

Now, it is time to add the printer back, but first, unplug the printer cable from your computer and perform a restart. Once the computer boots back on, properly reconnect the printer.
Follow the above steps 1 and 2 to open the Printer & Scanner settings.
Click on the Add a printer & scanner button at the top of the window.

- Windows will now automatically start looking for any connected printers. If Windows successfully detects the connected printer, click on its entry in the search list and select Add device to add it back otherwise, click on The printer that I want isn’t listed hyperlink.

- In the following window, select the appropriate option by clicking on its radio button (For example, select My printer is a little older. Help me find it if your printer doesn’t use USB for connection or select Add a Bluetooth, wireless, or network discoverable printer to add a wireless printer) and click on Next .

- Follow the on-screen instructions to reinstall your printer .

Now that you have successfully reinstalled your printer, try printing a test page to ensure everything is right back on track.
Open up Windows Settings and click on Devices .
On the Printers and Scanners page, click on the printer you just added back and would like to test, followed by a click on the Manage button.

- Finally, click on the Print a test page option. Muffle your ears & listen carefully for the sound of your printer printing a page and rejoice.

Recommended:
- Fix Unable to Install GarageBand on iOS
- Fix Error Code 0x80d0000a in Windows 10
- Fix Photoshop Dynamiclink Not Available in Windows 10
- Where is the WPS Button on Canon Printer?
Are you in dire need of printing a document but can’t do so because of a stuck print job in Windows 10? Here are some ways to clear the print queue in Windows 10 easily.
Printers may appear easy to use but can be very flimsy at times. Handling print Queue when you urgently want to use a printer can be quite frustrating. The print queue not only prevents the present document but all future documents from printing. The problem is not hard to detect either. If the message ‘Printing’ remains indefinitely even though the paper is not stuck and the ink is right, then certainly there is a Print queue issue. There are certain ways that can be used to clear the print queue in Windows 10 .
- Why does a print job gets stuck in Windows 10?
- How To Clear Print Queue In Windows 10?
- Method 1: Manually Clearing and Restarting the Print Spooler
- Method 2: Clear Print Queue using a Batch File for the Print Spooler
- Method 3: Clear Print Queue Using Command Prompt
- Method 4: Use the Management Console
Why does a print job gets stuck in Windows 10?
The answer lies in the fact that the printing document isn’t directly sent for printing. The document is first received at the spooler , i.e., a program used to manage and queue the print jobs. This spooler is particularly helpful while rearranging the order of print jobs or deleting them entirely. A stuck print job prevents the documents in the queue from printing, which affects all the documents further down the queue.
Often you can solve the error by deleting the print job from the queue. To delete a stuck print job in Windows 10, go to ‘Printers’ in the setting and click on ‘ Open Queue .’ Cancel the print job causing a problem, and you are good to go. If you can’t delete a particular print job, then try deleting the entire print queue. If this doesn’t work either, then try restarting all your devices. Unplug all your connections and plug them to reboot your device completely. This is the first approach that you should have for a stuck print job. If these traditional methods don’t work, then here are some other detailed methods for clearing a print job in Windows 10.
How To Clear Print Queue In Windows 10?
There are a few methods that can be employed to clear a print job in Windows 10. Clearing and restarting the Print Spooler is one of the best methods to use for fixing the stuck print job. It doesn’t delete your documents but creates an illusion that the documents are being sent for the first time to the printer. The process is done by stopping the Print Spooler until you clear the entire temporary cache used by the spooler and then starting it again. This can be accomplished by using a manual method or by making a batch file.
Method 1: Manually Clearing and Restarting the Print Spooler
- Type ‘ Services .’ in the Windows search bar and open the ‘ Services ’ app.
- Find ‘ Print Spooler ’ in the menu and double-click to open the Properties .
- Click on ‘ Stop ’ in the Properties tab and minimize the window to use it again later.
- Open ‘ File Explorer ’ and go to the below address location:
C:\Windows\System 32\spool\PRINTERS
You may be asked for permission to access the location. Click on ‘ Continue ’ to move forward.
Once you reach the destination, select all the files and press Delete on your keyboard.
Now go back to the Spooler properties window and click on ‘ Start .’
Click on ‘ Ok ’ and close the ‘ Services ’ app.
This will restart the spooler, and all the documents would be sent to the printer for printing.
Method 2: Clear Print Queue using a Batch File for the Print Spooler
Creating a batch file is a viable option if your print jobs frequently get stuck. Using the Services app every now and then can be a hassle that can be solved by a batch file.
Open a text editor like Notepad on your computer.
Paste the commands below as separate lines.
Net stop spooler

Del/Q/F/S “%windir%\System32\spool\PRINTERS\*.*”

Net start spooler
- Click on ‘ File ’ and choose ‘ Save as .’ Name the file with the extension ‘ .bat ’ at the end and choose ‘ All files (.) ’ in the ‘ Save as type ’ menu. Click on Save , and you are good to go.
- Simply double-click on the batch file, and the work will be done . You can place it at the most accessible place on your desktop for easy access.
Method 3: Clear Print Queue Using Command Prompt
You can delete a stuck print job in Windows 10 by using Command Prompt as well. Using the method will stop and start the print spooler again.
- Type ‘ cmd ’ in the search bar. Right-click on the ‘ Command Prompt ’ app and choose the run as administrator option.
- Type the command ‘net stop spooler ’, which will stop the spooler.
- Again type the following command and hit Enter:
Del %systemroot%\system32\spool\printers\*/Q
This will do the same task as the methods above.
Start the spooler again by typing the command ‘ net start spooler ’ and press enter .
Method 4: Use the Management Console
You can use the service.msc, shortcut in the management console to clear the print queue in Windows 10. This method will stop the spooler and clear it to delete a stuck print job:
Press the Windows Key + R key together to open the run window.
Type ‘ Services.msc ’ and hit Enter .
Note: You can also access the ‘ Services ’ window via Windows Management. Right-click the Windows icon and choose Computer Management. Choose Services and Application then double-click on Services.
- In the Services window, right-click on Print Spooler and select Properties.
- Click on the ‘ Stop ’ button to stop the Print Spooler service.
Minimize the window and open file explorer. Type the address ‘C:\ Windows\ System32\ Spool\ Printers’ or navigate to the address manually.
Select all the files in the folder and delete them. They were the files that were in the print queue at the instance.
Go back to the Services window and click on the ‘ Start ’ button.
Recommended:
- Fix Common Printer Problems in Windows 10
- Fix Printer Driver is unavailable on Windows 10
- How To Lock Or Unlock Cells In Excel?
- How to Fix Whatsapp Images Not Showing In Gallery
We hope the above guide was helpful and you were able to successfully clear the print queue in Windows 10. If you’re still stuck, then there may be compatibility issues with the printer and the data to be printed. Outdated printer drivers can also be an issue. You can also run the Windows Printer Troubleshooter to identify the correct problem. It will help you fix the errors in the print jobs . Follow the methods above to delete a stuck print job and clear the print queue in Windows 10, and you shouldn’t have any problems.
