Printing photos in grayscale is a useful technique to save colored ink on a printer. Sometimes, you can’t resist publishing in color but most photographs look the same. And sometimes, even better in black and white. To convert image to grayscale paint, all you need is black ink . In this article, we will teach you how to make a picture black and white in paint in Windows 10 and other ways to convert image to black and white.

- How to Convert Image to Grayscale Paint in Windows 10
- Method 1: Using MS Paint
- Method 2: Using Microsoft Photos
- Method 3: Using Microsoft Office
- Method 4: Using Print Dialog Box
How to Convert Image to Grayscale Paint in Windows 10
Advantages of converting image to black and white include:
- Texture may be captured beautifully in black and white photography.
- It is a great technique to keep the viewer’s attention on your subject without the colors distracting them.
- In many situations, the only distinctive features are light and shadows , making a black and white image appear more dramatic than a colored image.
Here are some methods showing you how to make a picture black and white in paint Windows 10 without sacrificing image quality.
Method 1: Using MS Paint
MS Paint has been a default program in Windows for many years. Along with its many features, it enables you to save an image in black and white format.
Note: This method doesn’t work for all images.
- Right-click on the image you want to convert and select Edit as shown. It will open the image in Paint .

- Click on File > Save As option as depicted below.

- Select Monochrome Bitmap from Save as type drop-down menu and click Save .
Note: If you don’t change the name, it will change/overwrite the original image. To avoid that you can save a new copy using a different name .

It will save the image in black and white format.
Method 2: Using Microsoft Photos
Microsoft Photos is a pre-installed program in all editions of Windows 10. It is simple to use and can convert image to grayscale paint fairly easily.
Note: Keep a copy of the original colored image in case the final result doesn’t satisfy you.
- Right-click on the image and click Open with > Photos as shown below.

- Click on Edit & Create option.

- Select Edit from the drop-down menu.

- You will see the following options: Crop & rotate, Filters, and Adjustments. Select Adjustments to adjust the brightness, colors and other settings

- Drag the Colour slider all the way to the left. The picture will go from color to black and white.

- To save the updated file with a new name, click on the Save a copy option shown highlighted.
Note: If you choose Save option, it will overwrite the original file. Only do it if you have a backup file saved somewhere else.

Method 3: Using Microsoft Office
If you have a word document with colored images and you want to convert them to black and white, you can utilise the Office suite built-in picture editing tools as explained below.
Note: This method does not work on certain images. Try using a different image if you run into this issue.
- In any of the Microsoft Office suite products viz Word , Excel, or PowerPoint, right-click the image and select Format Picture option as shown.

- Format Picture panel will appear on the right-hand side. Navigate to Picture tab depicted by image icon.
- Click Picture Color to expand it.

- Select Presets under Color Saturation .

- Select the black and white option shown in the preview.

Note: To save time, start by inserting all of your photographs into the document, presentation, or spreadsheet. Apply the saturation to one image, then choose the next and apply it with the Re-do feature to the selected image.
Method 4: Using Print Dialog Box
Suppose you found an image online and want to convert image to black and white. In this case, you can use your browser inbuilt print option to change its color using Microsoft Print to PDF option. Follow these steps to do the same:
- Navigate to the web page or online image you wish to the change the color of.

- Press Ctrl+P keys together. The Print dialog box will appear as shown.

- Select Microsoft Print to PDF option in Printer drop-down menu.

- Click on Color and select Black and White . The page will become monochrome.

- Click on Print to save your file as PDF in black & white format which you can print, if you want, now or later.
Recommended:
- How to Install Apple Mobile Device Support on Windows 10
- How to Print Large Images on Multiple Pages in Windows 11
- How to Change Spotify Playlist Picture
- How to Change Steam Profile Picture
A0 size papers are the largest size papers available to us as per ISO 216 paper size divisions. But how to print out a high-resolution image of this size? Especially when our systems can only print the largest sizes up to A3. Well, that points to a multi-page printout with combining a couple of pages will help you get the desired image. So this article will help you with how to print large images on multiple pages with understanding how to print image on multiple pages altogether on Windows 10 & 11.

- How to Print Large Image on Multiple Pages in Windows 10/11
- Method 1: With Microsoft Paint
- Method 2: Using Excel Spreadsheet
- Method 3: Via Microsoft Word
- Method 4: Through PDF Format
How to Print Large Image on Multiple Pages in Windows 10/11
Printing large images isn’t directly possible for large poster-sized images. Universally available sizes printable from Windows 10 and 11 are:
- US letter sizes and the US envelop sizes.
- A series (from A3 to A5), B4 to B6 print sizes, C size sheet, D size sheet, E size sheet.
- Envelop sizes, PRC envelops sizes, Japanese Envelop sizes, PRC sizes, Postcard sizes, and many more.
However, A3 is the largest direct printable size for the systems we are using now. And considering allowed print sizes in India, the Bureau of Indian Standards allows the ISO -A series size for drawing and other engineering works. This is why the largest size available in the country is A3x4 paper . After this brief but vital info about paper sizes, let’s move towards learning how to print large images on multiple pages.
Note: The methods and steps represented below are performed on Windows 11. The pictures, interface, and terminologies used are from Windows 11 which closely match Windows 10 too. Do verify before making any changes.
Method 1: With Microsoft Paint
Splitting a large image into numerous ones and printing it onto multiple pages can be easily done through Microsoft Paint. It is one of the ways to know how to print large image on multiple pages in Windows 10 and 11. To do so, follow these steps:
Locate your desired image in the File Explorer .
Right-click on it, and from the context menu, click the Open with > Paint app as depicted below.

- As the image opens in Paint, click on the File menu option from the top left corner.

- From the given list, select the Print option and then click on Page setup as shown.

- In the Page Setup window, choose your desired paper size from the Size: drop-down menu option.

6A. Adjust and verify the Orientation and Centring sections as per your output image preference.
6B. Type the number of pages required for the image to be split in the Fit to option box under the Scaling section. As shown below, if the image is required to be split into 16 separate images, type 4 by 4 page(s) in the boxes.

- After customization, click on the OK button.

- Next, click File > Print > Print as illustrated below.

Click on the printer you want to print with under the Select Printer section.
Then, click on Print . The copies will start to print according to the selection made.
Note: For demo purposes, we have selected the Microsoft Print to PDF option under the Select Printer section. Please select the printer available on your system to print your desired images.

Method 2: Using Excel Spreadsheet
Another way to learn how to print large image on multiple pages is by doing it on an Excel spreadsheet. You can print split images of a large one swiftly with Microsoft Excel as follows:
- Type Excel in the Windows search menu and click on Run as administrator .

- In the Excel window, go to Home and click on the Blank workbook option as shown.

- In the new blank workbook, click on the Insert tab.

- Click on the Pictures drop-down option and select This device to browse and pick your required image.

- A File explorer pop-up window will appear. Now, locate your picture and click on Insert .

- After the picture loads on the spreadsheet, click on the picture and hover on any of the corners when you see the cursor turn into an expanding arrow .

- Click and drag the image corners to increase its size.

- After you stretch the image to the desired size depicted in the Size section of the Picture Format ribbon, click on the File option.

9A. Click on the Print option and configure the Settings section as per your output image preferences.
9B. Verify the number of Pages your image will split in as per the size stretched and the Settings made.

Note: You can repeat steps 7, 8, and 9 to adjust the number of print copies you require of the image from the Settings until the desired preview is reached.
- Click on the Printer drop-down menu option to find and select the printer connected with your system.

- After completing these settings, select the number of copies from the Copies drop-down box. Then, click on the Print option to start the print.

Method 3: Via Microsoft Word
Microsoft Word is another alternative for you to know how to print large image on multiple pages. Follow the upcoming steps to do so:
- Type Word in the Windows search bar and click the Open option as shown below.

- Click on the View tab in the blank workbook.

- In the Page Movement section, select the Side to Side option shown highlighted.

- Click on the Insert tab and click the Pictures > This Device option as depicted below.

- Select and insert the desired image from the pop-up window into this Word file.

Right-click on the image and click the Wrap Text option.
To wrap and move the image freely in the Word file, select either Behind Text or In Front of Tex option.

- Then, stretch the image to desired width and height on the first page as shown.

- Similarly, add the same image on the second page and wrap the image as earlier.

- Stretch the second image to a degree where it will connect the first image as shown below.
Note: You can check the desired width and height in the Size section from the top right corner under Picture Format tab.

- Now, follow steps 8-11 from Method 2 for setting the image for printing and then start printing the image on multiple pages.
Method 4: Through PDF Format
PDF is another way with which you can split your larger resolution image into multiple images for printing. To get the answer to how to print large image on multiple pages questions, follow these steps:
Note: The following steps are performed on Adobe Acrobat DC . Make sure to have this software installed in your system before performing the upcoming steps.
Locate your desired image in the File Explorer .
Right-click on it, and from the context menu, click the Open with > Choose another app option as depicted below.
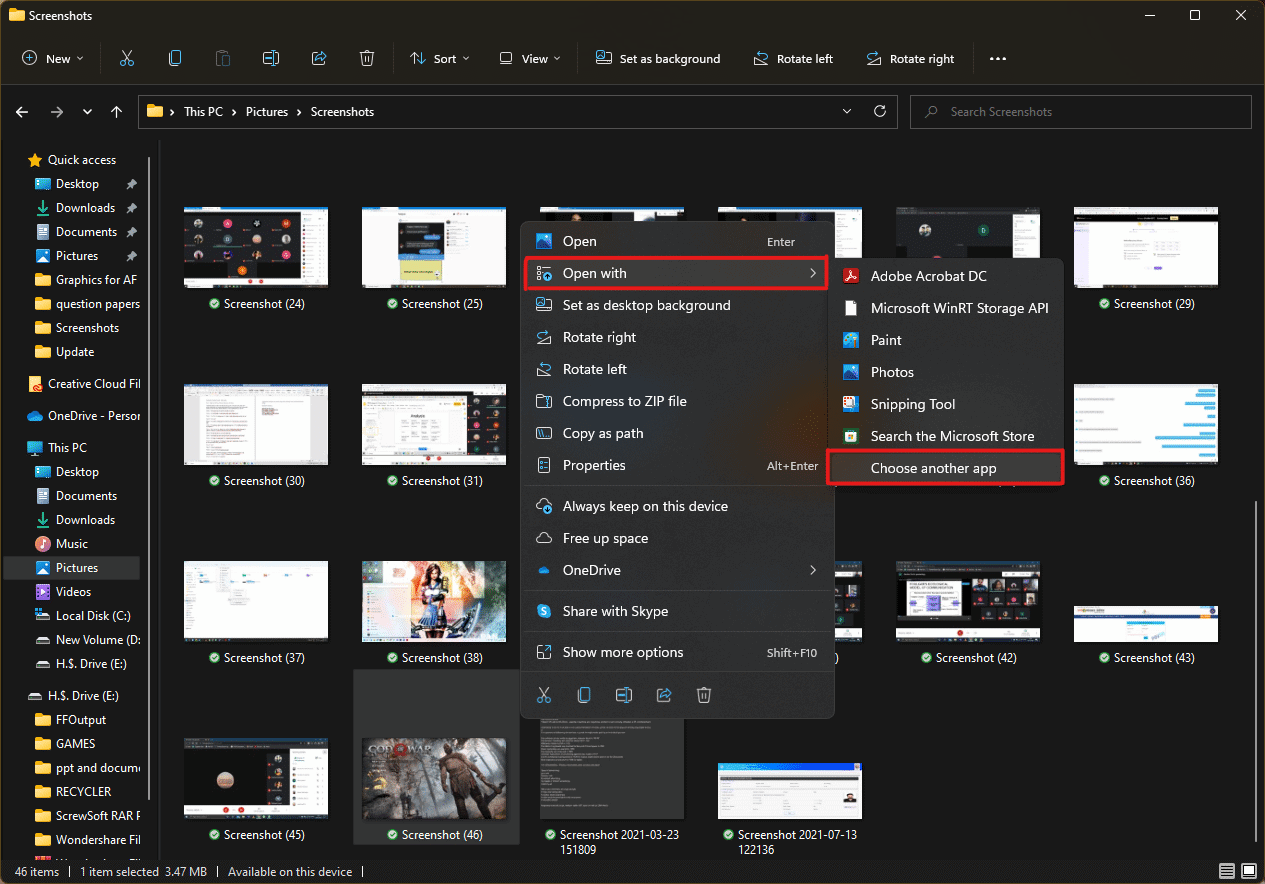
- How do you want to open this file? pop-up will appear with a list of installed apps in the system. Find and select Adobe Acrobat DC and click on OK .
Note: You can click on More apps to further expand the list of apps if you didn’t find Adobe Acrobat earlier.

- After the image opens in Adobe Acrobat, press the key combination Ctrl + P to open the Print window.

- Click on the Poster tab to split images.

- Click on the Page setup… button to configure the page sizes of the split images.

- Configure the Orientation settings and Paper size settings through the drop-down menu and click on OK .

- Select the printer a ttached to your system from the Printer drop-down menu option from the top left corner and click the Print option to start the printing process.

Recommended:
- How to Create a Hanging Indent in Word and Google Docs
- How to Reset Windows 11
- Fix Local Print Spooler Service Is Not Running
- How to Create PDF File in Windows 11
We hope you understood how to print large images on multiple pages in Windows 10/11 . Share your experiences in the comment section below with your queries and suggestions. Also, let us know which topic you want us to explore next.
