
- How to Create Multiple FedEx Shipping Labels
- What is FedEx Prepaid Shipping Label?
- How to Create FedEx Shipping Label?
- How to Create FedEx Shipping Label without Account?
- Is There a Way to Create Multiple FedEx Labels at Once?
- Can I Create Multiple FedEx Shipping Labels at Once?
- Can You Put Multiple Shipping Labels on One Package?
- Can You Use the Same FedEx Label for Multiple Packages?
- Can You Do Batch Shipping with FedEx?
- How to Create Multiple FedEx Shipping Labels?
- How to Create Multiple FedEx Shipping Labels from Excel?
- How to Contact FedEx Ship Manager?
How to Create Multiple FedEx Shipping Labels
Keep reading further to find the steps explaining how to create multiple FedEx shipping labels and FedEx prepaid shipping label in detail with useful illustrations for better understanding.
What is FedEx Prepaid Shipping Label?
A prepaid shipping label is one on which the shipping cost has already been covered , allowing the shipper to just drop it off at the post office or hand it to the courier without any further fees . When returning items with pre-paid shipping labels, the buyer will send the package, and the online merchant will receive it. The most frequent justification for buying pre-paid courier shipping labels is refunding from buyers to vendors. On their website, FedEx offers FedEx prepaid shipping labels for sale. You can send the prepaid label to your customer with the package or via email once you have completed filling out the necessary information. There is no expiration date on the FedEx prepaid label.
How to Create FedEx Shipping Label?
A return shipping label is a pre-paid, pre-addressed shipping label that is used to facilitate returns for customers (if needed). Many small enterprises depend heavily on shipping. Whether your small business is delivering LCD panels or figurines, you must include an exact shipping label on the package in order for it to reach its destination. Customers of FedEx have the option to generate shipping labels on the company’s website for instant printing.
This guide will show you how to create FedEx shipping labels on your devices. Simply follow the instructions exactly, and the steps will be clear:
Note : In the upcoming steps, we will see the procedure to create a return shipment label .
- Visit the FedEx website on your browser.

- Enter your USER ID and PASSWORD and click on LOG IN .
Note : If you don’t already have an account, click on CREATE A USER ID and follow the onscreen instructions to open a FedEx account .

- Hover the mouse pointer over the Shipping tab and click on Create a Shipment .

- On the FedEx Ship Manager page, click on the Ship tab > Create Return Shipment .

Fill out the Return Package To part with the shipment information for your organization .
Then, enter the Return Package From section with the contact’s necessary shipping information , including their complete name , address , and phone number .

From the Package & Shipment Details section, select the desired return label type from the drop-down menu options.
Choose your desired return delivery option from the drop-down menu under Package type , which includes two-day or overnight delivery, by clicking the button.
Enter the necessary package information , such as the weight of the returned item, the number of packages in the shipment being returned, and the kind of package being returned (such as a container, tube, or packet).

- Examine the billing details that will instantly show up in the Billing Details section. Click the Bill transportation to drop-down option and enter a different 9-digit FedEx account number to modify the billing account.

- Scroll down and click on the Ship option from the Complete your Shipment section to complete the shipping and review the information.

- On the screen, the tracking number will also be visible. Click on the Print option.
Also Read : How to Create Slack Channel
How to Create FedEx Shipping Label without Account?
FedEx enables you to send a single box worldwide and pay with your credit card without need an account number if you ship a few times a year. This guide will show you how to create FedEx shipping labels without account on your devices. Simply follow the instructions exactly, and the steps will be clear:
Navigate to the FedEx Login page on your browser.
Click on the Create a one-time credit card shipment option.

- Then, enter the From Address and To Address fields from the Address Information section.

Proceed to enter the details for the Shipment Details and Payment sections.
Confirm your shipping from the Confirmation section and Print the label.

Also Read : How to Reactivate USPS.com Account
Is There a Way to Create Multiple FedEx Labels at Once?
Yes , you can use the FedEx Web Services API or any other label-creation service to create multiple FedEx shipping labels at once. You may make shipments, generate and retrieve labels, track shipments, and modify account information via the API.
Can I Create Multiple FedEx Shipping Labels at Once?
Yes , you can use FedEx Ship Manager or FedEx Ship Manager Lite to create multiple FedEx shipping labels simultaneously. For each package you want to mail, you must first establish a shipment. You can make numerous shipments at once using batch processing, or you can do it one at a time. Using a label printer, you may print the shipping labels for all of the packages at once after creating the shipments. Alternatively, you can print the shipping labels later by saving them as PDF files.
Can You Put Multiple Shipping Labels on One Package?
No , that can cause confusion and muddle the goods delivery. Select one label, and either ship the products individually or stick it on the package. A shipment may be shipped to the incorrect location or experience a delay in transit if it has multiple labels. This can lead to misunderstanding and can confuse recipients. It is typically better to use a single, transparent label that contains all the information required for the product to be delivered to the proper location. If many labels are required, make carefully arrange them such that no crucial information is hidden or obscured.
Can You Use the Same FedEx Label for Multiple Packages?
No , that can confuse the delivery of the products. Choose one label, attach it to the package, or mail the items separately. If a shipment contains many labels, it may be delivered to the wrong place or incur a delay in transit. This could cause miscommunication and perplexing recipients. Generally speaking, it is preferable to use a single, transparent label that includes all the necessary details for the goods to be delivered to the correct location. If numerous labels are required, place them carefully so that no critical information is hidden or obscured.
Can You Do Batch Shipping with FedEx?
Yes , you can do batch shipping with FedEx concurrently using FedEx Ship Manager or FedEx Ship Manager Lite. You must create a shipment before you can mail any packages. Batch processing allows you to send out several shipments at once, or you can send them one at a time. After establishing the shipments, you may print the shipping labels for all of the packages at once using a label printer. By storing the shipping labels as PDF files , you may even print them later.
How to Create Multiple FedEx Shipping Labels?
This guide will show you how to create multiple FedEx shipping labels with Ordoro (a small software company that offers an all-in-one, web-based platform that helps eCommerce sellers manage) on your devices. Simply follow the instructions exactly, and the steps will be clear:
Visit the Ordoro website on your browser.
Click on the Orders option from the top-left area of the screen.

Choose an order by selecting the appropriate checkbox .
Select the Package Type you want the order to be shipped in and FedEx as your shipper.
If appropriate, select Additional Options from the drop-down menu and enter the package’s weight , dimensions , and any other shipper-specific choices.
To access the Multi-Package Label modal, click the plus (+) button.
Selecting + Add another package will add a new package with the values from the previous package already filled in.
If necessary, adjust the declared value per package , dry ice weight , and weight .
Note : You’ll notice that each time you add or change a package, the label cost at the top of the modal is updated.
Select Save to return to the label panel after leaving it.
Under the Shipping Info section on the right-hand side, you can see which orders have Multi-Packages applied and how many earlier label productions there are.
When you’re prepared, select the orange Create Label option.
Go to the Shipped page and check the information for Weight and Requested Shipping Method under the Shipping Label Created heading to determine which orders were sent as multi-package shipments.
Also Read : Create Multiple Gmail Accounts Without Phone Number Verification
How to Create Multiple FedEx Shipping Labels from Excel?
Use third-party shipping software that connects with FedEx and enables Excel data import if you want to create multiple FedEx shipping labels from Excel. Ordoro is the third-party shipping application that is best suited for this task. This tutorial will demonstrate how to use Ordoro on your devices to create numerous FedEx shipment labels. If you simply adhere to the directions exactly, the stages will be obvious:
Gather the shipping details to make your labels into an Excel spreadsheet . This should contain the name and address of the recipient , the package’s weight and size , and any other pertinent information.
Create a file with comma-separated values using the data you exported from your Excel spreadsheet .
Become a member of Ordoro , a shipping application that connects with FedEx and lets you input data from a CSV file.
Use the shipping program’s instructions to import your CSV file and generate your mailing labels .
After printing the labels , affix them to your parcels .
Note : Remember that based on the shipping application you select, the particular processes may change. For more comprehensive instructions, it’s a good idea to consult the documentation or get in touch with the software’s customer service.
How to Contact FedEx Ship Manager?
There might be a time when you need to contact FedEx if you use them for your shipping needs. There are a number of various methods you can contact FedEx to address your problem fast, depending on your problem and where you are located.
- Consult FedEx’s website for country-specific Contact Information : Depending on the nation or region you are calling from, different numbers apply. FedEx has locations all throughout the world, and each location has a unique phone number. Visit the Customer Support page to view a list of contact information for each region. You can also email some foreign offices using their email addresses.
- Ask the FedEx Virtual Assistant a Question : By visiting the Virtual Assistant Support page, you can access FedEx’s virtual assistant . To begin, just type in your query and adhere to the instructions.

Recommended :
- NextDNS Review, Features, Pros and Cons
- How to Find Printer IP Address on Windows 10
- DoorDash is Picking Up Packages for You
- How to Print Large Images on Multiple Pages in Windows 11
Not many people know that printers also have a unique dedicated IP address like a PC or smartphone. This IP address helps devices identify the printer and connect it to a Wi-Fi network as well. Apart from this, you also need to know about your printer IP address to troubleshoot any related technical issues shortly. So, if you were also wondering how to find printer IP address Windows 10 using cmd, this article is for you. Read till the end to know a quick resolution for how to find the IP address of a printer on Windows 7 and 10.

- How to Find Printer IP Address on Windows 10
- Method 1: By Printing Configuration Sheet
- Method 2: Using Control Panel
- Method 3: Via Computer Settings
- Method 4: Through Router Setup Page
- How to Find Printer IP Address Windows 10 using CMD?
- How to Find Printer IP Address Windows 7?
How to Find Printer IP Address on Windows 10
Finding your printer’s IP address is not that difficult. The methods mentioned in this article are easy, quick, and above all, suitable for beginners. You do not need much tech knowledge to figure out anything.
Method 1: By Printing Configuration Sheet
To your surprise, you can find your printer IP address by simply printing the configuration sheet.
- For wireless printers , you can print the sheet by long pressing the power button for around 10 seconds.
- On other printers , you will have to print the configuration sheet through Settings or Control . Simply go to Menu > Information > Print Configuration/Config report .
Method 2: Using Control Panel
This is how to find the IP address of a printer via PC Control Panel:
- From the Windows search bar, search for Control Panel and press the Enter key to open it.

- Next, click on Hardware and Sound .

- Click on the Devices and Printers option.

- Right-click on the desired printer and choose Properties from the context menu.

- Now, switch to the Ports tab to see the IP address of that printer .
Note : Your printer driver will either use a WSD (Web Services for Devices) or TCP/IP port to connect securely. Accordingly, three or five tabs will appear after you click on Properties.
Also Read : How to Find IP Address from Xbox Live Gamertag
Method 3: Via Computer Settings
This is one of the easiest methods to find the IP address of your printer without going through too much hassle. Here is how to do it:
- Press the Windows key and click on Settings .

- Click on Devices .

- Click on Printers & scanners from the left pane menu.

- Next, click on the desired printer > Manage option.

- Click on Printer properties .

6A. Locate the IP address in the Location section of the General tab.
6B. Or, click on the Ports tab and select the port with a check mark.
Note : If you are still unable to locate your printer IP address, click on Configure Port option.
Method 4: Through Router Setup Page
This method is helpful for people who have access rights to their routers. It will help in finding the IP address using the router setup menu page.
Open desired web browser on your PC/laptop.
Type 192.168.1.1 in the address bar and press the Enter key on your keyboard.

- Next, enter your router Username and Password and click on Login .

- Now, locate the Connected Devices section where you will find all the information, including device name, interface, and IP address.
Also Read : Where is the WPS Button on Canon Printer?
How to Find Printer IP Address Windows 10 using CMD?
Follow the below-mentioned steps to know how to find printer IP address Windows 10 using CMD:
- Press the Windows key and open Command Prompt from the search bar.

- Next, type the following command and press Enter key.
ipconfig

Now you will have complete information on all the network devices connected as well as your printer IP address .
How to Find Printer IP Address Windows 7?
Here are the steps you need to follow for your how to find printer IP address Windows 7 query:
Open the Control Panel on your Windows 7 PC/laptop.
Click on Hardware and Sound > Device and Printers .
Right-click on the desired printer and click on the Printer properties option from the context menu.

- Click on the Ports tab and locate the desired printer with the IP address mentioned.
Q1. What is an IP address for a printer?
Ans . The IP address of your printer can be understood as a unique identification number assigned to your device . This number helps them to connect to a network connection.
Q2. Does my printer have an IP address?
Ans . Yes, every printer has an IP address that helps it to connect to a computer or laptop using the Wi-Fi network.
Q3. Why is my PC not finding my printer?
Ans . If your PC is unable to find your printer, you can try a few things. For instance, ensure that you have properly connected the printer cable. If it is a wireless printer, you can troubleshoot internet connection by restarting router or modem.
Recommended :
- Application Integration Top New Trends Expected in 2023
- PC Positive vs Negative Pressure Fan: Which is Better?
- Fix Server IP Address Could Not be Found on Windows 10
- Add a Printer in Windows 10 [GUIDE]
A0 size papers are the largest size papers available to us as per ISO 216 paper size divisions. But how to print out a high-resolution image of this size? Especially when our systems can only print the largest sizes up to A3. Well, that points to a multi-page printout with combining a couple of pages will help you get the desired image. So this article will help you with how to print large images on multiple pages with understanding how to print image on multiple pages altogether on Windows 10 & 11.

- How to Print Large Image on Multiple Pages in Windows 10/11
- Method 1: With Microsoft Paint
- Method 2: Using Excel Spreadsheet
- Method 3: Via Microsoft Word
- Method 4: Through PDF Format
How to Print Large Image on Multiple Pages in Windows 10/11
Printing large images isn’t directly possible for large poster-sized images. Universally available sizes printable from Windows 10 and 11 are:
- US letter sizes and the US envelop sizes.
- A series (from A3 to A5), B4 to B6 print sizes, C size sheet, D size sheet, E size sheet.
- Envelop sizes, PRC envelops sizes, Japanese Envelop sizes, PRC sizes, Postcard sizes, and many more.
However, A3 is the largest direct printable size for the systems we are using now. And considering allowed print sizes in India, the Bureau of Indian Standards allows the ISO -A series size for drawing and other engineering works. This is why the largest size available in the country is A3x4 paper . After this brief but vital info about paper sizes, let’s move towards learning how to print large images on multiple pages.
Note: The methods and steps represented below are performed on Windows 11. The pictures, interface, and terminologies used are from Windows 11 which closely match Windows 10 too. Do verify before making any changes.
Method 1: With Microsoft Paint
Splitting a large image into numerous ones and printing it onto multiple pages can be easily done through Microsoft Paint. It is one of the ways to know how to print large image on multiple pages in Windows 10 and 11. To do so, follow these steps:
Locate your desired image in the File Explorer .
Right-click on it, and from the context menu, click the Open with > Paint app as depicted below.

- As the image opens in Paint, click on the File menu option from the top left corner.

- From the given list, select the Print option and then click on Page setup as shown.

- In the Page Setup window, choose your desired paper size from the Size: drop-down menu option.

6A. Adjust and verify the Orientation and Centring sections as per your output image preference.
6B. Type the number of pages required for the image to be split in the Fit to option box under the Scaling section. As shown below, if the image is required to be split into 16 separate images, type 4 by 4 page(s) in the boxes.

- After customization, click on the OK button.

- Next, click File > Print > Print as illustrated below.

Click on the printer you want to print with under the Select Printer section.
Then, click on Print . The copies will start to print according to the selection made.
Note: For demo purposes, we have selected the Microsoft Print to PDF option under the Select Printer section. Please select the printer available on your system to print your desired images.

Method 2: Using Excel Spreadsheet
Another way to learn how to print large image on multiple pages is by doing it on an Excel spreadsheet. You can print split images of a large one swiftly with Microsoft Excel as follows:
- Type Excel in the Windows search menu and click on Run as administrator .

- In the Excel window, go to Home and click on the Blank workbook option as shown.

- In the new blank workbook, click on the Insert tab.

- Click on the Pictures drop-down option and select This device to browse and pick your required image.

- A File explorer pop-up window will appear. Now, locate your picture and click on Insert .

- After the picture loads on the spreadsheet, click on the picture and hover on any of the corners when you see the cursor turn into an expanding arrow .

- Click and drag the image corners to increase its size.

- After you stretch the image to the desired size depicted in the Size section of the Picture Format ribbon, click on the File option.

9A. Click on the Print option and configure the Settings section as per your output image preferences.
9B. Verify the number of Pages your image will split in as per the size stretched and the Settings made.

Note: You can repeat steps 7, 8, and 9 to adjust the number of print copies you require of the image from the Settings until the desired preview is reached.
- Click on the Printer drop-down menu option to find and select the printer connected with your system.

- After completing these settings, select the number of copies from the Copies drop-down box. Then, click on the Print option to start the print.

Method 3: Via Microsoft Word
Microsoft Word is another alternative for you to know how to print large image on multiple pages. Follow the upcoming steps to do so:
- Type Word in the Windows search bar and click the Open option as shown below.

- Click on the View tab in the blank workbook.

- In the Page Movement section, select the Side to Side option shown highlighted.

- Click on the Insert tab and click the Pictures > This Device option as depicted below.

- Select and insert the desired image from the pop-up window into this Word file.

Right-click on the image and click the Wrap Text option.
To wrap and move the image freely in the Word file, select either Behind Text or In Front of Tex option.

- Then, stretch the image to desired width and height on the first page as shown.

- Similarly, add the same image on the second page and wrap the image as earlier.

- Stretch the second image to a degree where it will connect the first image as shown below.
Note: You can check the desired width and height in the Size section from the top right corner under Picture Format tab.

- Now, follow steps 8-11 from Method 2 for setting the image for printing and then start printing the image on multiple pages.
Method 4: Through PDF Format
PDF is another way with which you can split your larger resolution image into multiple images for printing. To get the answer to how to print large image on multiple pages questions, follow these steps:
Note: The following steps are performed on Adobe Acrobat DC . Make sure to have this software installed in your system before performing the upcoming steps.
Locate your desired image in the File Explorer .
Right-click on it, and from the context menu, click the Open with > Choose another app option as depicted below.
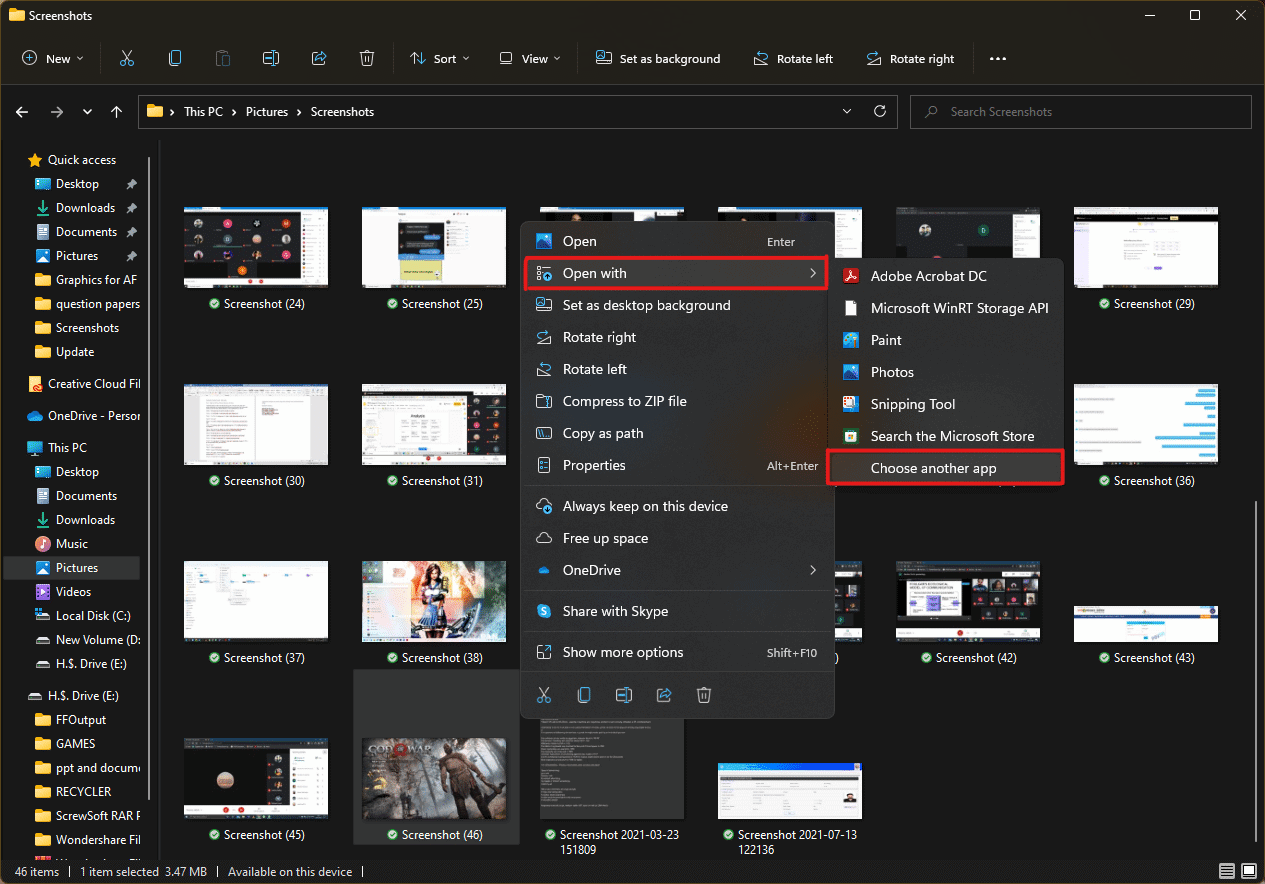
- How do you want to open this file? pop-up will appear with a list of installed apps in the system. Find and select Adobe Acrobat DC and click on OK .
Note: You can click on More apps to further expand the list of apps if you didn’t find Adobe Acrobat earlier.

- After the image opens in Adobe Acrobat, press the key combination Ctrl + P to open the Print window.

- Click on the Poster tab to split images.

- Click on the Page setup… button to configure the page sizes of the split images.

- Configure the Orientation settings and Paper size settings through the drop-down menu and click on OK .

- Select the printer a ttached to your system from the Printer drop-down menu option from the top left corner and click the Print option to start the printing process.

Recommended:
- How to Create a Hanging Indent in Word and Google Docs
- How to Reset Windows 11
- Fix Local Print Spooler Service Is Not Running
- How to Create PDF File in Windows 11
We hope you understood how to print large images on multiple pages in Windows 10/11 . Share your experiences in the comment section below with your queries and suggestions. Also, let us know which topic you want us to explore next.

- NextDNS Review, Features, Pros and Cons
- What is NextDNS?
- Features of NextDNS
- Pros and Cons of NextDNS
- How to Setup NextDNS
- Is NextDNS Safe?
- What Does it Cost?
- Alternatives of NextDNS
NextDNS Review, Features, Pros and Cons
Here, we have explained about NextDNS IP, its features and given a detailed review on pros and cons of this DNS.
What is NextDNS?
NextDNS provides several security and privacy features to help protect you online. It can block access to known malicious websites, prevent data leakage (such as sending your personal information to third parties without your consent), and offer protection against phishing attacks. When you type a website address into your browser, DNS is responsible for translating that address into the numerical IP address that your computer uses to connect to the internet. Overall, NextDNS is designed to help make your internet browsing experience safer and more secure by protecting you from online threats and improving your privacy.
Features of NextDNS
NextDNS provides users with protection against cyber threats such as phishing, malware, and other online dangers. The key features of NextDNS are mentioned below:
- Unlimited Configuration: It means that users can customize their DNS settings as much as they want without any limitations. This includes the ability to block or allow specific domains , create custom block lists and allow lists, and set up advanced filtering rules based on domain categories or specific URLs. With unlimited configuration, users have complete control over their online security and can tailor their DNS settings to meet their specific needs.
- Parental Control: NextDNS parent control feature allows users to set up filters and restrictions on their home network to protect their children from inappropriate content and other online dangers. With this feature, users can block access to specific websites or categories of websites, such as adult content or gambling sites. They can also set up time limits to control how long their children can spend online.
- Handshake: Handshake feature is used to securely authenticate devices when they connect to a NextDNS-protected network. When a device connects to the network, it sends a request to the NextDNS server to initiate a handshake. The NextDNS server then sends a unique, encrypted code to the device, which the device uses to authenticate itself and establish a secure connection. This handshake process helps to ensure that only authorized devices are able to connect to the network and access its resources.
- Tracking Protection: NextDNS tracking protection works by blocking DNS requests to known tracking domains. This can help to prevent websites and advertisers from tracking your online activity and sending you targeted ads based on your browsing history. When you enable tracking protection in NextDNS, the service will automatically block DNS requests to known tracking domains, so your device will not be able to connect to those servers and you will not receive tracking cookies or other tracking mechanisms.
- Custom Allow/deny List: In NextDNS, a custom allow list is a list of domains that you want to allow, even if they are on the NextDNS block list. A custom deny list is the opposite of an allow list. It is a list of domains that you want to block, even if they are not on the NextDNS block list. You can create custom allow and deny lists in the NextDNS dashboard. Once you have created a list, you can enable or disable it at any time, or edit it to add or remove domains as needed.
- Easy to Use: NextDNS is designed to be easy to use for people of all technical skill levels. The service provides a simple and intuitive interface that allows you to configure and customize your security and privacy settings with just a few clicks.
Further, will see the details of the NextDNS IP setup.
Pros and Cons of NextDNS
Here are some potential pros and cons of using NextDNS:
Pros:
- Easy to set up and use: NextDNS can be easily configured on most devices and operating systems, and does not require any additional software installation.
- Comprehensive protection: It uses multiple layers of protection, including real-time analysis of domains, reputation analysis, and machine learning algorithms, to identify and block malicious domains.
- Customization options: It allows users to customize their protection settings and create their own custom block lists and allow lists.
- Performance optimization: It claims to improve the performance of the internet connection by blocking ads and tracking domains, which can reduce the load on the device and the network.
Cons:
- Subscription-based service: NextDNS is a paid service, and users need to subscribe to one of the available plans to use it.
- Limited protection on mobile devices: While NextDNS can be used on mobile devices, it provides limited protection compared to desktop devices due to the constraints of the mobile operating system.
- Dependence on DNS: NextDNS IP works by intercepting DNS requests and redirecting them to its own servers, which means that it only provides protection when the DNS resolution is working correctly. In case of DNS issues or attacks, NextDNS may not be able to provide adequate protection.
Thus, this was the positive and negative review of NextDNS IP.
- Go to NextDNS website , and click on Try it now .


- After signing in, you will see your configuration setting dashboard, click on Security .
Note: Don’t turn off any of the default-enabled options. It is advised to turn on Enable AI-Driven Threat Detection if you frequently use the internet.

- Now, click on Privacy to quickly configure different parameters by toggling the buttons.

- You can also use the Native Tracking Protection by adding other devices, and choose the type of device you want to use NextDNS on.
- Then, click on Parental Control , and from there you can hide and filter out content that is not suitable for your children.

- By entering the domain in the field, click Allowlist to quickly whitelist the restricted website.

- Then you have the Analytics and Logs which will get you information regarding blacklisted domains.

- Finally click on Settings , by clicking on it you can alter a number of things, including the configuration name.

Go to your NextDNS dashboard.
Click on the Setup tab.

- Scroll down and then click on Setup guide .

- Finally, select your device name from the list.

Is NextDNS Safe?
Yes, according to the NextDNS review, it is generally considered to be a safe and reliable service for protecting against malicious websites, phishing attacks, and other online threats. The service works by using a combination of threat intelligence feeds, machine learning, and user feedback to identify and block malicious domains. When you use NextDNS, it acts as an intermediary between your device and the internet, routing your DNS queries through its servers and blocking any malicious domains it detects.
One advantage of NextDNS is that it does not require any special software to be installed on your device, which means it does not introduce any additional security vulnerabilities. Additionally, NextDNS encrypts all DNS traffic between your device and its servers, which helps to protect your privacy and prevent DNS spoofing attacks. We hope you now understand whether is NextDNS safe to use or not.
What Does it Cost?
The first thought before investing money in anything is asking about its costs. Now in the case of NextDNS, it offers a free subscription that gives minimal security. Domain blocking, cutting-edge threat intelligence, and encrypted DNS traffic are all included in this strategy.
NextDNS also offers paid plans that include additional features such as ad blocking, tracking protection, and support for custom configurations. Prices for these paid plans vary depending on the specific features and level of protection you need. Pro costs $1.99/ month, with a 17% discount for a single user, and for Business and Education, it costs the same at $19.90/ month yet again with a 17% discount. It’s pretty simple if you want to get access to more features then you will have to purchase the paid offers. We hope the NextDNS review was worthwhile.
Alternatives of NextDNS
Here are a few alternatives to NextDNS that you may consider:
- SafeDNS
SafeDNS is a cloud-based security solution. It works by intercepting DNS requests and redirecting them to its own servers, which use real-time analysis and machine learning algorithms to identify and block malicious domains. SafeDNS can be easily configured on most devices and operating systems and offers a range of customization options for advanced users. It also provides protection against ads, tracking domains, and other types of unwanted content, and claims to improve the performance of the internet connection.
SafeDNS offers a variety of subscription plans, including a free plan with basic protection, and paid plans with additional features and protection levels. It also offers a 30-day free trial for users to test the service before committing to a subscription.
- AdGuard
In addition to its DNS-based security, AdGuard offers a range of other products and services, including a standalone ad blocker for desktop and mobile devices, and a VPN service for online privacy and security. AdGuard is available as a paid service , with a range of subscription plans and pricing options.
- Webroot Software
Webroot Software is a cybersecurity company. It can be easily configured on most devices and operating systems and offers a range of customization options for advanced users.
- Quad9
Quad9 is a free, secure DNS service that was launched in 2016 by the Global Cyber Alliance. It blocks access to known malicious domains and phishing sites by using threat intelligence feeds from a variety of sources, including IBM X-Force . Your DNS requests are routed through a secure global network of servers by Quad9. When a query is made, the servers check a locally stored database of known malicious domains and return a response indicating whether the requested domain is safe to access or not.
- Fortinet
Fortinet is a multinational cybersecurity company that provides a range of security products and services, including, firewalls, antivirus, and VPN software. While Fortinet does not offer DNS resolution services, it does offer a number of security products and services that can be used to protect against malicious websites and online threats. For example, Fortinet’s firewall products can be configured to block access to known malicious domains, and its antivirus software can be used to scan and remove malware from a computer.
- Norton ConnectSafe
By preventing access to harmful sites, Norton ConnectSafe is a DNS-based protection service that tries to shield customers from online dangers. It can be readily configured on most devices and operating systems, and it offers three distinct protection levels for various threats. Norton ConnectSafe was designed to be easy to use and required no software installation. Users could simply change their DNS settings to point to the Norton ConnectSafe servers, and the service would start protecting their devices automatically.
- Neustar
Neustar is a technology company that provides a range of services and solutions in the areas of information services, analytics, and communication. Neustar is a registrar for several top-level domains (TLDs), including . biz , . co , . nyc , and . us . It also provides domain name management services , including hosting, DNS, and security.
- OpenDNS
The Domain Name System (DNS) services offered by OpenDNS assist in converting human-readable website addresses into computer-understandable IP addresses. The security and speed of your Internet connection can be increased by utilizing OpenDNS, which is one of its key advantages.
Hence, this was all about NextDNS review.
Q1. Is NextDNS a firewall?
Ans. NextDNS is not a traditional firewall in the sense of a network security system that controls the incoming and outgoing network traffic based on predetermined security rules. Instead, NextDNS provides a DNS (Domain Name System) service that helps to protect users from online threats.
Q2. Is NextDNS secure?
Ans. Using a trustworthy DNS provider, such as NextDNS, can increase the security of your internet connection by preventing access to known malicious domains and assisting in keeping your device from connecting to dangerous websites. A combination of security measures is always a good idea to use to help keep your devices and personal information safe online because no single security solution can offer full protection against all threats.
Q3. What is NextDNS IP address?
Ans. NextDNS IP has several DNS servers located around the world, and the specific Nextdns IP address of these servers will depend on the location of the user and the routing of the request.
Q4. Should you use NextDNS?
Ans. Whether or not to use NextDNS IP or any other internet security or privacy solution is a personal decision that depends on your individual needs and preferences. It is important to carefully consider your options and research different products and services to determine which one is the best fit for you.
Recommended:
- Tinder vs Bumble: The Best Dating App
- 21 Best RAM, GPU and CPU Overclocking Software
- Jasper AI reviews: Details, Pricing and Features
- NextDNS vs Cloudflare: Which is the Faster DNS?
NextDNS is a reputable provider of internet security. If you are concerned about internet security and privacy and are looking for a solution to help protect you from online threats and unwanted tracking, NextDNS may be worth considering. We hope that our NextDNS review was helpful in giving you an idea if you need it or not. Please go through the article and leave your queries in the comment section below.
