Rollo printers are often favored by e-commerce businesses, warehouses, and small to medium-sized enterprises for printing high-quality labels of different types and sizes. Among the key reasons why individuals are drawn towards this brand is its range of compatibility and connectivity. Guess what drives its performance? It’s the drivers that link your PC to the printer. If you’ve just purchased a Rollo printer, this guide will explain how to download and install a driver for it, both for wired and wireless versions. Let’s get into it.

- How to Download Rollo Printer Drivers
- How to Print with Rollo Wireless Printer
- How Rollo Printer Helps in Increasing Productivity
How to Download Rollo Printer Drivers
Rollo printers offer ease of use and reliable printing of various forms of labels such as shipping labels, barcodes, address labels, product labels, etc. Hence, they are often used for daily use purposes. Drivers translate the printing commands sent from the PC operating system into a format that the printer can understand and execute. It is important to install the correct drivers for the printer and keep them updated for precise & optimal performance.
Follow the steps below to install drivers for your Rollo wired printer on a Windows PC:
- Visit the official Rollo print setup guide website and click on Download Windows Driver .

Open the application file from the zip folder and follow the on-screen instructions to install.
Once installed, launch the Control Panel and click on Devices and Printers .
Right-click on Rollo Printer and select Printing preferences from the context menu.
In the Layout tab, click on Advanced .

- Select your preferred label size from the drop-down menu and click on OK to save the settings.
How to Print with Rollo Wireless Printer
You do not need to separately download and install drivers for Rollo Wireless printers. You can set it up using your smartphone only. Here’s how to set up and print using a Rollo Wireless printer:
Download the Rollo app from the Google Play Store or App Store .
Turn on the Rollo Printer and connect it to the same Wi-Fi network your phone is connected to.
Once connected, you can print the Test Label. You can also print directly from your Windows PC or Mac. Refer to the official page for more help.
Furthermore, the Rollo app also allows you to print labels directly from your favorite shipping platforms, such as eBay, Etsy, and Shopify. Simply choose the shipping platform you want to print from by selecting the Print from Other Apps option.
How Rollo Printer Helps in Increasing Productivity

The Rollo printer operates using thermal energy only, eliminating the need for ink when printing labels or pages. In addition, it offers a range of features that improve your printing efficiency and productivity:
- Seamless Printing: Rollo Printer boasts high-speed printing capabilities, ensuring quick and efficient printing of labels, receipts, and more.
- Wide Compatibility: This printer is compatible with various label types and sizes, making it versatile for different printing needs.
- Customize Label Easily: The user-friendly software enables effortless label creation, offering customization options for designs and text, thus streamlining the printing process.
- Auto-Cutting Functionality: Rollo Printer comes with an auto-cutting feature, saving you time and effort by neatly cutting the labels once the printing is complete.
Undoubtedly, Rollo printers are packed with cool features. However, maintaining it in optimal condition through proper care and maintenance is also important. So, always read the user manual to ensure its longevity.
Add a Printer in Windows 10: You have bought a new printer, but now you need to add that printer to your system or Laptop. But, you don’t have any idea what you must do to attach the printer. Then, you are at the right place, as in this article we are going to learn how to attach a local and wireless printer to the laptop and how to make that printer shared across the homegroup.

- How to Add a Printer in Windows 10 [GUIDE]
- Method 1: Add a Local Printer in Windows 10
- Method 2: Add a Wireless Printer in Windows 10
- Method 3: Add a Shared Printer in Windows 10
How to Add a Printer in Windows 10 [GUIDE]
Make sure to create a restore point just in case something goes wrong.
Let’s start then, we will cover all scenarios one by one:
Method 1: Add a Local Printer in Windows 10
1.First, connect your printer with PC and turn it on.
2.Now, go to start and click on the setting app.
3.Once, the setting screen appears, go to the “ Device ” option.

4.In the device screen, there will be multiple options on the left side of the screen, select “ Printers & Scanners ”.

5.After this there will be “ Add a printer or scanner ” option, this will show you all the printers which are already added. Now, choose the printer which you want to add to your desktop.
6.If the printer you want to add is not listed. Then, choose the link “ The printer that I want isn’t listed ” from the options present below.

It will open a troubleshooting guide that will show you all the available printer which you can add, find your printer in the list and add it to the desktop.

Method 2: Add a Wireless Printer in Windows 10
The different wireless printer has different methods for installation, it solely depends on the manufacturer of the printer. However, new age wireless printer has inbuilt functionality of installation, it gets automatically added to your system if both system and printer are in the same network.
- Firstly, do the initial wireless setting in the setup option from the LCD panel of the printer.
- Now, select your own Wi-Fi Network SSID , you can find this network at the Wi-Fi icon, which is on the bottom of your screen’s taskbar.
- Now, just enter your network password and it will connect your printer with the PC or laptop.
Sometimes, there is a case that you must connect your printer with the USB cable to install software. Otherwise, you can find your printer in the Setting->Device section . I have already explained the method to find the device in “ Add a Local Printer ” option.
Method 3: Add a Shared Printer in Windows 10
You need a Homegroup to share the printer with other computers. Here, we will learn to connect the printer with the help of homegroup. Firstly, we will create a homegroup and then add the printer to homegroup, so that it will get shared between all the computers connected in the same homegroup.
Steps to setup Homegroup
1.First, go to the taskbar and go to Wi-Fi, now right click on it and popup appears, pick option “ Open Network and Sharing Center ” in the pop-up.

2.Now, there will be homegroup option, if it is showing “ Joined ” it means homegroup already exists for the system else “ Ready to Create ” will be there, just click on that option.

3.Now, it will open homegroup Screen, just click on the “ Create a Homegroup ” option.

4.Click Next and a screen will appear, where you can choose what you want to share in the homegroup. Set “ Printer and device ” as shared, if it is not shared.

5.The window will create “ Homegroup Password ”, you will need this password if you want to join your computer to Homegroup.
6.After this click Finish , now your system connected to the homegroup.
Steps to Connect to a Shared Printer in Desktop
1.Go to the file explorer and click on the homegroup and then press “ Join Now ” button.

2.A screen will appear, click “ Next ”.

3.In the next screen, choose all the libraries and folder you want to share , choose “ Printer and Devices ” as shared and click Next.
4.Now, give the password in the next screen , which is generated by the window in the earlier step.
5.At last, just click Finish .
6.Now, in file explorer, go to network and you will your printer connected , and the name of the printer will appear on printer option.

These are a different method to attach the printer to your system. Hope this article proved helpful.
Recommended:
- How to Fix IP Address Conflict
- Microsoft Word has Stopped Working [SOLVED]
- How to Disable Google Chrome PDF Viewer
- Delete Gmail Account Permanently (With Pictures)
Hopefully, one of the above-mentioned methods will surely help you to Add a Printer in Windows 10 but if you still have any questions regarding this guide then feel free to ask them in the comment’s section.
The recent surge of online activity has prompted the downfall of the printer. In an era, where everything can be viewed online with ease, the relevance of the gigantic and bulky printer has started to decrease. However, we are yet to reach a stage where we can neglect the printing device altogether. Until then, if you do not possess the heavy Inkjet and want something printed urgently, here’s a guide to help you decipher how to print documents when you don’t have a printer.

- How to Print Documents When You Don’t Have a Printer
- Method 1: Print Documents as PDF files
- Method 2: Print Webpages as PDF files
- Method 3: Search for Wireless Printers Near You
- Method 4: Find Other Printing Services Around Your Location
- Method 5: Use Google Cloud Print
How to Print Documents When You Don’t Have a Printer
Method 1: Print Documents as PDF files
PDF is a universally accepted format that keeps the document exactly the same across different platforms and devices . There is a possibility that the PDF file of the document you need to print will do the trick instead. Even if softcopies are not an option in your situation, the PDF file makes it easy for you to save web pages and transfer them as documents for future printing. Here’s how you can print to PDF on your PC without a printer:
- Open the Word document that you want to print and click on the File option on the top left corner of the screen.

- From the options that appear, click on ‘Print.’ Alternatively, you can press Ctrl + P to open Print Menu

- Click on the ‘Printer’ drop-down menu and select ‘ Microsoft Print to PDF.’

- Once selected, click on ‘Print’ to continue.

- In the window that appears, type in the name of the PDF file and select the destination folder. Then click on ‘Save.’

- The PDF file will be printed without a printer in the destination folder.
Method 2: Print Webpages as PDF files
Browsers today have adapted to the requirements of the modern-day and introduced new features on their application. One such feature gives users the ability to print webpages as PDF documents on their PC. Here’s how you can print web pages as PDFs:
Open your browser and open the webpage you want to print.
Click on the three dots on the top right corner of the screen.

- From the various options, click on ‘Print.’ You can use the shortcut in the browser as well.

In the print window that opens up, click on the drop-down list in front of the ‘Destination’ menu.
Select ‘Save as PDF.’ You can then proceed to select the pages you want to download and the layout of the print.

- Once done, click on ‘Print’ and a window will appear asking you to select the destination folder. Select the folder and rename the file accordingly and then click on ‘Save’ again.

- The page will be printed as a PDF file without a printer.
Method 3: Search for Wireless Printers Near You
Even if you personally don’t own a printer, all hope is not lost. There is a remote possibility that someone in your neighbourhood or building owns a wireless printer. Once you have found a printer, you can ask the owner to let you take a print out. Here’s how you can scan for printers near you and print without owning a printer:
Press Windows Key + I to open the Settings app on your Windows device.
Click on ‘Devices.’
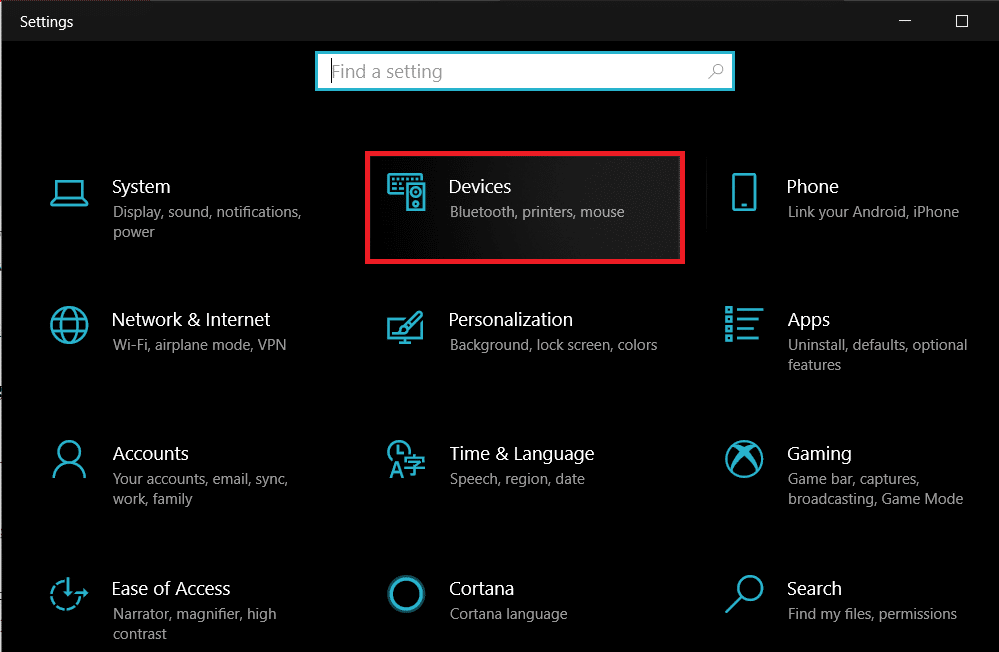
- From the panel on the left, click on the ‘Printers and Scanners’

- Click on ‘ Add a printer or scanner’ and your PC will find any printers that are operating near you.

Method 4: Find Other Printing Services Around Your Location
Some shops and services serve the specific purpose of getting print outs for their customers. You can search for print shops near your location and print documents there. Alternatively, you can head onto your University library or access the printer in your office to take urgent print outs. Printing options are also available in most internet cafes and public libraries. You can also use services such as PrintDog and UPrint that deliver large print outs to your home.
Method 5: Use Google Cloud Print
If you have a wireless printer at your home and are out of town, you can remotely print pages from your home printer. Head onto the Google Cloud Print website and see if your printer is eligible. Sign in to the app with your Google account and add your printer. Thereafter, while printing, click on the ‘Printers’ option and select your wireless printer to print documents remotely.
Q1. Where to print documents when you don’t have a printer?
With most documents beings shared and viewed through the screen, the printed page no longer holds the same value and the printer no longer seems worth the money. Having said that, there are still times where a hard copy of a document is required for a certain task. During instances like these, you can try using public printing services or ask your neighbours if they could give access to their printers for a brief period.
Q2. When you need to print something urgently, but there is no printer?
Such situations have happened to most of us. Try downloading the PDF of the document or webpage you want to print. The PDF should work as an alternative most of the time. If not, mail the PDF to any printing service near you and ask them to keep a print out ready. You will have to physically go and collect the printout but it is the fastest way possible.
Q3. How can I print from my phone without a printer?
You can print web pages and documents as PDF files from your phone and then print them as hard copies later. On the browser, tap on the three dots on the top right corner and select the ‘share’ option. From the various options available, tap on ‘Print’ and the webpage will be saved as a PDF. The same procedure can be used for Word documents.
Q4. Is there a printer that doesn’t need a computer?
Nowadays, wireless printers are the new norm. These printers often do not require physical connections with PCs or other devices and can download images and documents remotely.
Recommended:
- How To Clear Print Queue In Windows 10?
- Fix Common Printer Problems in Windows 10
- Share files and printers without HomeGroup on Windows 10
- How to Sync Google Calendar with Outlook
Rollo printers are often favored by e-commerce businesses, warehouses, and small to medium-sized enterprises for printing high-quality labels of different types and sizes. Among the key reasons why individuals are drawn towards this brand is its range of compatibility and connectivity. Guess what drives its performance? It’s the drivers that link your PC to the printer. If you’ve just purchased a Rollo printer, this guide will explain how to download and install a driver for it, both for wired and wireless versions. Let’s get into it.
- How to Download Rollo Printer Drivers
- How to Print with Rollo Wireless Printer
- How Rollo Printer Helps in Increasing Productivity
How to Download Rollo Printer Drivers
Rollo printers offer ease of use and reliable printing of various forms of labels such as shipping labels, barcodes, address labels, product labels, etc. Hence, they are often used for daily use purposes. Drivers translate the printing commands sent from the PC operating system into a format that the printer can understand and execute. It is important to install the correct drivers for the printer and keep them updated for precise & optimal performance.
Follow the steps below to install drivers for your Rollo wired printer on a Windows PC:
- Visit the official Rollo print setup guide website and click on Download Windows Driver .
Open the application file from the zip folder and follow the on-screen instructions to install.
Once installed, launch the Control Panel and click on Devices and Printers .
Right-click on Rollo Printer and select Printing preferences from the context menu.
In the Layout tab, click on Advanced .
- Select your preferred label size from the drop-down menu and click on OK to save the settings.
How to Print with Rollo Wireless Printer
You do not need to separately download and install drivers for Rollo Wireless printers. You can set it up using your smartphone only. Here’s how to set up and print using a Rollo Wireless printer:
Download the Rollo app from the Google Play Store or App Store .
Turn on the Rollo Printer and connect it to the same Wi-Fi network your phone is connected to.
Once connected, you can print the Test Label. You can also print directly from your Windows PC or Mac. Refer to the official page for more help.
Furthermore, the Rollo app also allows you to print labels directly from your favorite shipping platforms, such as eBay, Etsy, and Shopify. Simply choose the shipping platform you want to print from by selecting the Print from Other Apps option.
How Rollo Printer Helps in Increasing Productivity
The Rollo printer operates using thermal energy only, eliminating the need for ink when printing labels or pages. In addition, it offers a range of features that improve your printing efficiency and productivity:
- Seamless Printing: Rollo Printer boasts high-speed printing capabilities, ensuring quick and efficient printing of labels, receipts, and more.
- Wide Compatibility: This printer is compatible with various label types and sizes, making it versatile for different printing needs.
- Customize Label Easily: The user-friendly software enables effortless label creation, offering customization options for designs and text, thus streamlining the printing process.
- Auto-Cutting Functionality: Rollo Printer comes with an auto-cutting feature, saving you time and effort by neatly cutting the labels once the printing is complete.
Undoubtedly, Rollo printers are packed with cool features. However, maintaining it in optimal condition through proper care and maintenance is also important. So, always read the user manual to ensure its longevity.
