A pink screen or Pink Screen of Death error on a laptop refers to an issue with the display where everything appears to be a pink hue or color cast. This could be due to a hardware issue with the screen, graphics card, or driver issue. So, how to fix the pink screen on your laptop? Well, we will get into the details of fixing your pink screen with all possible methods. So, keep reading!

- How to Fix Pink Screen on Laptop
- Why is my Computer Screen Pink?
- Method 1: Troubleshoot Cable Connections
- Method 2: Update Graphics Drivers
- Method 3: Reset Monitor
- Method 4: Replace Graphics Card and Motherboard
- Method 5: Change Monitor
- How to Fix Pink Screen on Windows 10 Laptop
- Method 1: Troubleshoot GPU Temperature
- Method 2: Disconnect All Peripherals
- Method 3: Delete Temporary Files
- Method 4: Reinstall Problematic Games
- Method 5: Use Third-party Uninstaller
- Method 6: Perform Clean Boot
- Method 7: Consult Technician
How to Fix Pink Screen on Laptop
A pink screen on a laptop can be an indication of a hardware or software issue. If you are facing the same, you will get to know why my computer screen is pink and how to fix it in detail in this article.
Quick Answer Follow the below steps to troubleshoot pink screen: 1. Open Device Manager on your device. 2. Expand Display adapters , then right-click on your graphics card and select Update Driver . 3. Select S earch automatically for updated driver software . 4. If any update is available, Windows will automatically install the latest drivers. Once done, restart PC .
Why is my Computer Screen Pink?
A pink screen can occur due to various reasons. There is no fixed reason why is my computer screen pink. A pink screen on a computer can be typically caused by a problem with the graphics card or display drivers. This issue can result in a pink or reddish hue or color cast on the entire screen or in specific areas. It could also be due to outdated or incorrect drivers, graphics card hardware failure, or a loose cable connection between the graphics card and the display .
Now, let us see troubleshooting methods on how to fix the pink screen on the monitor.
Method 1: Troubleshoot Cable Connections
Loose or damaged cables can cause display issues such as a pink or reddish hue. Reinsert all the loose connections and see if that works. The steps to check the connections may vary depending on the type of cable, but typically involve the following:
- Turn off the monitor and unplug it from the power source.
- Locate the cable that connects the monitor to the computer.
- Disconnect the cable from both the monitor and the computer.
- Inspect the cable for any physical damage, such as fraying or cuts.
- If the cable is damaged, replace it with a new one.
- Connect the cable securely to both the monitor and the computer.
- Turn on the monitor and check if the pink screen issue has been resolved.
Method 2: UpdateGraphics Drivers
A common way to resolve a pink screen problem on a monitor is to update the graphics card driver. Display issues, such as a pink or reddish hue, might be brought on by outdated or corrupt drivers. Follow our guide on 4 ways to update Graphics Drivers in Windows 10 to update your drivers.

Method 3: Reset Monitor
Resetting a monitor to its default settings can sometimes be a useful troubleshooting method to fix a pink screen issue. The pink screen problem could have been caused by a display configuration error on your part. By resetting the monitor, it will revert back to its original settings and configuration, which may resolve any software or configuration-related problems.
Note: After the monitor has been reset, any display-related settings will be lost.
Method 4: Replace Graphics Card and Motherboard
A pink screen on a monitor can be caused by issues with either the graphics card or the motherboard, so it’s important to ensure that the graphics card is properly seated and connected to the motherboard and monitor. If you are using both the integrated and dedicated graphics card, try to switch between both of them. You can read our guide on 3 ways to check your Graphics card in Windows 10 . If these steps do not resolve the issue, it may be necessary to replace either the graphics card or the motherboard, depending on the root cause of the problem.

Method 5: Change Monitor
The last option to consider to fix the pink screen issue is to change the monitor. If the pink screen issue is no longer present when using the new monitor, it is likely that the issue was with the original monitor. In this case, the original monitor may need to be repaired or replaced.
How to Fix Pink Screen on Windows 10 Laptop
It can be frustrating when you are working and suddenly the screen turns pink, you cannot decode the reasons or neither the solution and the only voice in your mind is my computer screen is pink how do I fix it. Fortunately, there are several methods in addition to the previous heading you can take to try and resolve the issue without having to buy a new computer. Additionally, these troubleshooting methods can also be used to understand how to fix the pink screen on Windows 11 laptop.
Method 1: Troubleshoot GPU Temperature
If you are thinking why is my laptop screen pink, GPU overheating can be a reason. Keeping a constant check on the GPU temperature can help fix the issue.
Press the Ctrl + Shift + Esc keys together to launch the Task Manager .
Click Performance in the list of top tabs. Find the GPU option, then keep an eye on the temperatures.
Note: The temperature should be below 65° to 85°C.

Also Read : What is a Good Normal GPU Temp for Gaming?
Method 2: Disconnect All Peripherals
Peripherals such as external hard drives, printers, and USB devices can sometimes cause conflicts with the system, leading to display issues like a pink screen. Disconnecting all peripheral devices from your laptop is a troubleshooting step that can be taken to get to know how to fix the pink screen on Windows 10 laptop.
Method 3: Delete Temporary Files
Temporary files are those that the operating system or applications created with the intention that they only exist temporarily. These files may build up over time and impact performance, leading to display difficulties like a pink screen. You may learn how to delete the files by following our guide on how to delete temporary files in Windows 10 .

Method 4: Reinstall Problematic Games
In some cases, this issue may be caused by a problem with a game. If you believe a specific game is causing the issue, uninstalling and reinstalling the game can help to resolve the problem. Reinstalling the game can replace any missing or corrupted files that may have caused the pink screen issue, and allow you to run the game without encountering the display problem.
Note: For reference, we have taken Forza Horizon 4.
Press and hold Windows + I keys together to open Windows Settings .
Now, click on Apps .

- Now, search and click on Forza Horizon (FH4) and select Uninstall option.

Now, confirm the prompt if any, and reboot your PC once you have uninstalled Forza Horizon (FH4).
Then, download the game again from Microsoft Store .

Now, navigate to My downloads and launch the Forza Horizon 4 Installer file.
Follow the on-screen instructions to complete the installation of Forza Horizon on your PC.
Method 5: Use Third-party Uninstaller
An uninstaller is a software program designed to remove other software from your computer system. In case of a pink screen issue on your Windows 10 laptop, it’s possible that the issue may be caused by a harmful third-party app. Using an uninstaller can help to completely remove the app and its files, potentially resolving the pink screen issue. Some popular uninstallers include Revo Uninstaller , IObit Uninstaller , and CCleaner .
Method 6: Perform Clean Boot
You may require to perform a clean boot if you are facing this pink screen issue. Follow our guide perform clean boot in Windows 10 to resolve the issue.

Method 7: Consult Technician
If all other methods have failed, it’s advisable to take it to a technician as a last resort. A technician will have the necessary tools and expertise to diagnose the issue and recommend a solution. They may also be able to physically repair any hardware components that may be causing the problem. It’s important to find a reputable and experienced technician to ensure the best possible outcome for your laptop.
Recommended:
- How to Make a Finsta on Instagram
- Fix Office Update Error 30088 26 on Windows 10
- Fix This Application Made Too Many Requests Error
- What to Look for in a Gaming PC?
It is advised to try the various troubleshooting techniques indicated above in order to fix the problem. We hope we could provide you with all of the solutions for how to fix the pink screen on laptop . Please share your thoughts with us in the following comment sections.

- How to Fix Slow Network Printing in Windows 10
- Method 1: Troubleshoot Printer Connection
- Method 2: Run Printer Troubleshooter
- Method 3: Update Windows
- Method 4: Modify Printer Preferences
- Method 5: Repair System Files
- Method 6: Verify Printer Port Settings
- Method 7: Delete Temporary files (Print Spooler)
- Method 8: Change Print Spooler Recovery Settings
- Method 9: Update or RollBack Printer Driver
- Method 10: Reinstall Printer Drivers
- Method 11: Remove & Add Printer Again
How to Fix Slow Network Printing in Windows 10
Here are some indispensable reasons that cause delay in printing to network printer on your Windows 10 PC. Read them carefully to find which one troubles you.
- Printer is not turned on.
- Printer is not connected to your computer.
- The Wi-Fi or USB connection is not set properly.
- A loose connection or outdated USB drivers also causes trouble.
- Few essential services are not running on your PC.
- A large list of files is queued for the further printing process.
- The operating system is outdated.
- There are a few corrupt and broken components of internal files on your PC.
If your internet connection is unstable and inadequate. this could cause a slow network printing issue. If there is any interference or obstacles between your PC and router, it might also cause the discussed problem.
Check the network speed of your computer by running a Speedtest .

Follow the below criteria and make sure these are satisfied by your computer.
- Clear all the obstructions in between the way of the router if the signal strength of your network is very low.
- Your internet connection might be slow if many devices are connected to the same network, so try to avoid it.
- Always prefer buying a router or modem that is verified by your ISP (Internet Service Provider).
- It is not recommended to use old, damaged, or broken cables, replace the cables if it is necessary.
- Make sure that wires of the modem to the wall and wires from the modem to the router are out of any disturbance.
If you face any internet connectivity issues, check our guide How to Troubleshoot Network Connectivity Problems on Windows 10 to troubleshoot the same.

Here are some amazing hacks that will help you fix slow printing problem on your device. But, before following the below-mentioned methods, reboot your Windows 10 PC to resolve any temporary glitches associated with the device. If you did not attain any fix for the issue after rebooting your computer, follow the below-mentioned methods.
Method 1: Troubleshoot Printer Connection
When you face delay in printing to network printer, the device wants to tell users that there is something wrong with the communication established between the printer and the system through the USB cable or network connection. To solve this issue, ensure whether the following steps are satisfied or not.
- To restart your printer , turn off the power supply of the printer & then switch it ON again .
- Now again check the connection of your printer .
- If you have connected your printer using a USB cable, make sure your cable is working properly and the connections to the ports are fitted tight. You could also switch the USB port to see if this resolves the problem.
- If you have connected your printer through wired networks, check whether the connection to your cable is properly done or not. Also, you can check whether the signal to your printer is flashing or not.
- If the connection of your system with the printer is made through a wireless network, make sure your printer is connected to your computer network & the wireless icon will lit-up to show that you are connected.
Method 2: Run Printer Troubleshooter
The easiest and quickest way to solve any problem with a device or a feature is to run the troubleshooter associated with it. Windows 10 includes a troubleshooter tool for a wide variety of issues, and printer problems are also one of them. The Printer troubleshooter automatically performs several actions like restarting the print spooler service, clearing corrupt spooler files, checking whether the existing printer drivers are outdated or corrupt, etc. Refer to the steps listed below to run Printer Troubleshooter.
Press Windows + I keys simultaneously to launch Settings .
Click on the Update & Security tile, as shown.

Go to Troubleshoot menu in the left pane.
Select Printer troubleshooter and click on Run the troubleshooter option.

- Wait for the troubleshooter to detect issues and follow the on-screen instructions to apply the fix.
Check if you have fixed slow network printing Windows 10 issue.
Method 3: Update Windows
Also, if there are any bugs in your PC, they can only be fixed after a Windows update . Microsoft releases regular updates to fix all these bugs thereby fixing slow network printing Windows 10 issue. Hence, ensure if you have updated your Windows Operating System and if there are any updates pending in action, use our guide How to Download and Install Windows 10 Latest Update

After updating your Windows Operating System, check whether you can print pages without any issues.
Method 4: Modify Printer Preferences
It is a well-known fact that, the quality settings of your printer consume different amounts of ink levels as well. If the printing quality is set to Best, then the printing speed will be definitely slow. You can change the printer preferences as instructed below.
- Hit the Windows key and type Printers & scanners , then click on Open .

- Then, select your printer and click on Manage .

- Now, click on Printing preferences .

In the next window, switch to the Paper/Quality tab and choose Plain Paper in the Media / Paper Type field under the Tray Selection menu.
Then, select Draft, Normal or Standard under the Quality Settings or Print Quality menu.
Save the changes by pressing OK . Now, check if the printing speed is increased or not.
Method 5: Repair System Files
If there are any corrupt system files in your Windows Operating system, your PC may face a lot of internet connectivity issues. If you are experiencing slow network printing Windows 10 issue very recently, there are some chances that your computer files have become corrupt or damaged. Luckily, your Windows 10 PC has inbuilt repair tools like SFC (System File Checker) and DISM (Deployment Image Servicing and Management) that will help you fix all the corrupt files. Read our guide on How to Repair System Files on Windows 10 and follow the steps as instructed to repair all your corrupt files.

Method 6: Verify Printer Port Settings
Few users have suggested that slow printing problem on your device can be resolved by tweaking some printer port settings as instructed below.
- Hit the Windows key and type Control panel , and click on Open .

- Set View by > Category , then click on the View devices and printers .

- Now, right-click on your printer and select Properties .

Switch to the Ports tab and find the port to which your device is connected.
Then, click the checkbox that hosts the USB pin of the printer.
Save the changes by clicking Apply > OK .
Note: It is also quite possible that your printer is working just fine, but you have been sending the print request to the wrong printer. This might be the case if there are multiple printers installed on your computers. Set the one you are trying to use as the default printer to resolve the issue. Hence, right-click on your printer and select Set as default printer .

Method 7: Delete Temporary files (Print Spooler)
A print spooler is a mediating file/tool that coordinates between your computer and the printer. The spooler manages all the print jobs you send to the printer and lets you delete a print job that is still being processed. Problems might be encountered if the Print Spooler service is corrupt or if the temporary files of the spooler become corrupt. Restarting the service and deleting these temporary files should help you to fix slow printing Windows 10 problems on your computer.
Note: Before we delete the print spooler files, we will need to halt the Print Spooler service that constantly runs in the background.
- Hit the Windows key and type Services , then click on Open .

- Scan the list of Local Services to find the Print Spooler service. Once found, right-click on the Print Spooler service and select Properties from the context menu (or double-click on a service to access its properties)
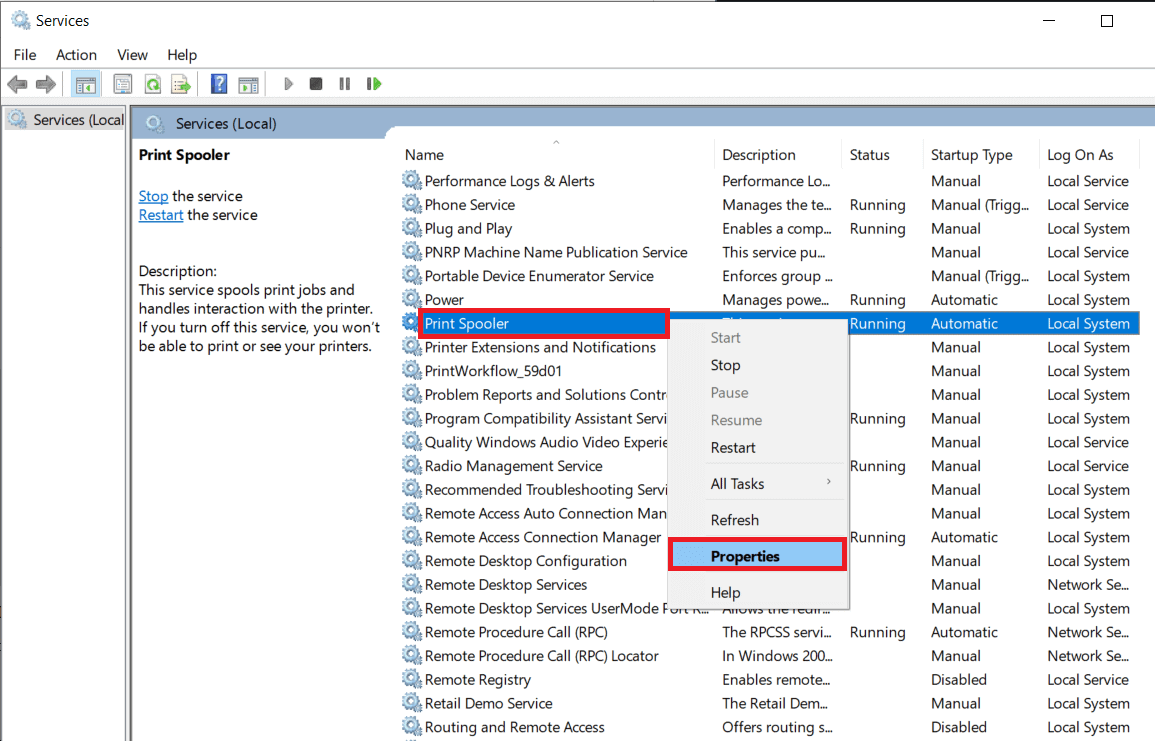
- Click on the Stop button to stop the service.
Note: Minimize the Services window instead of closing as we will need to restart the service after deleting the temporary files.

- Now, open up the Windows File Explorer (Windows key + E) and navigate to the following path – C:\WINDOWS\system32\spool\printers .
Note: You can also launch the run command box, type %WINDIR%\system32\spool\printers , and hit Enter to reach the required destination directly.

Press Ctrl + A to select all the files in the printer’s folder and hit the delete key on your keyboard to delete them.
Maximize/switch back to the Services application window and click on the Start button to restart the Print Spooler service.

You should now be able to fix slow network printing problem and be able to print your documents without any issues.
Method 8: Change Print Spooler Recovery Settings
Any incorrect recovery settings configuration of the print spooler service may also cause delay in printing to network printer. Therefore, you need to make sure that recovery settings are correct otherwise Printer spooler will not start automatically.
Open the Services window as you did earlier.
Locate Print Spooler then right-click on it and select Properties.

- Switch to the Recovery tab and ensure that three failure tabs are set to Restart the Service.

- Click Apply followed by OK to save the settings.
Now see if you’re able to fix the problem in your printer.
Method 9: Update or RollBack Printer Driver
Every computer peripheral has a set of software files associated with it to communicate with your computer and the OS effectively. These files are known as device drivers. These drivers are unique for each device and manufacturer. Also, it is important to have the correct set of drivers installed in order to use an external device without facing any issues.
Option I: Update Printer Driver
Drivers are also constantly updated to stay compatible with the new Windows versions. If your drivers are not updated to their latest versions, update them by following our guide How to Update Device Drivers on Windows 10 .

Option II: Roll Back Printer Driver Updates
Sometimes, the current version of printer drivers may cause any conflicts and, in this case, you have to restore previous versions of installed drivers. This process is called Roll back of drivers and you can easily roll back your computer drivers to their previous state by following our guide How to Rollback Drivers on Windows 10 .

Wait until the previous versions of drivers are installed on your Windows 10 PC. Once done, check if you have fixed slow printing problem on your device.
Method 10: Reinstall Printer Drivers
Incompatible drivers must be reinstalled to fix slow printing Windows 10 issues. You are advised to reinstall device drivers only if you cannot attain any fix by updating them. Steps to reinstall drivers are very easy and you can do so by using a third-party application or by implementing the steps manually as instructed in our guide How to Uninstall and Reinstall Drivers on Windows 10

After reinstalling printer drivers, check if you can fix the discussed issue.
Note: Few users have suggested that re-installing printer drivers in compatibility mode have helped them fix the discussed issue. Here are a few instructions regarding the same.
- After uninstalling the driver go to your printers manufacturer’s website (e.g. Hp ) and download the latest drivers for your printer.

- Right-click on the setup file and select Properties.
Note: If the drivers are in a zip file make sure to extract all the files and then right-click on the .exe file.

Switch to the Compatibility Tab and click on Run this program in Compatibility mode .
From the drop-down select Windows 7 or 8 and then click on Run this program as an administrator .

Finally, double-click on the setup file and wait for the drivers to be installed on your device.
Once finished, reboot your PC and see if you can fix the printing issue on Windows 10 PC is fixed or not.
Method 11: Remove & Add Printer Again
If all these steps do not work to fix delay in printing to network printer, you might need to completely uninstall the existing drivers and the printer and then reinstall them. The process of doing the same is simple but rather lengthy but this seems to fix the discussed issue on your Windows PC. Anyway, below are the steps to remove and add your printer back.
- Launch the Windows Settings and select Devices setting.

- Move to the Printers & scanners settings in the left pane.
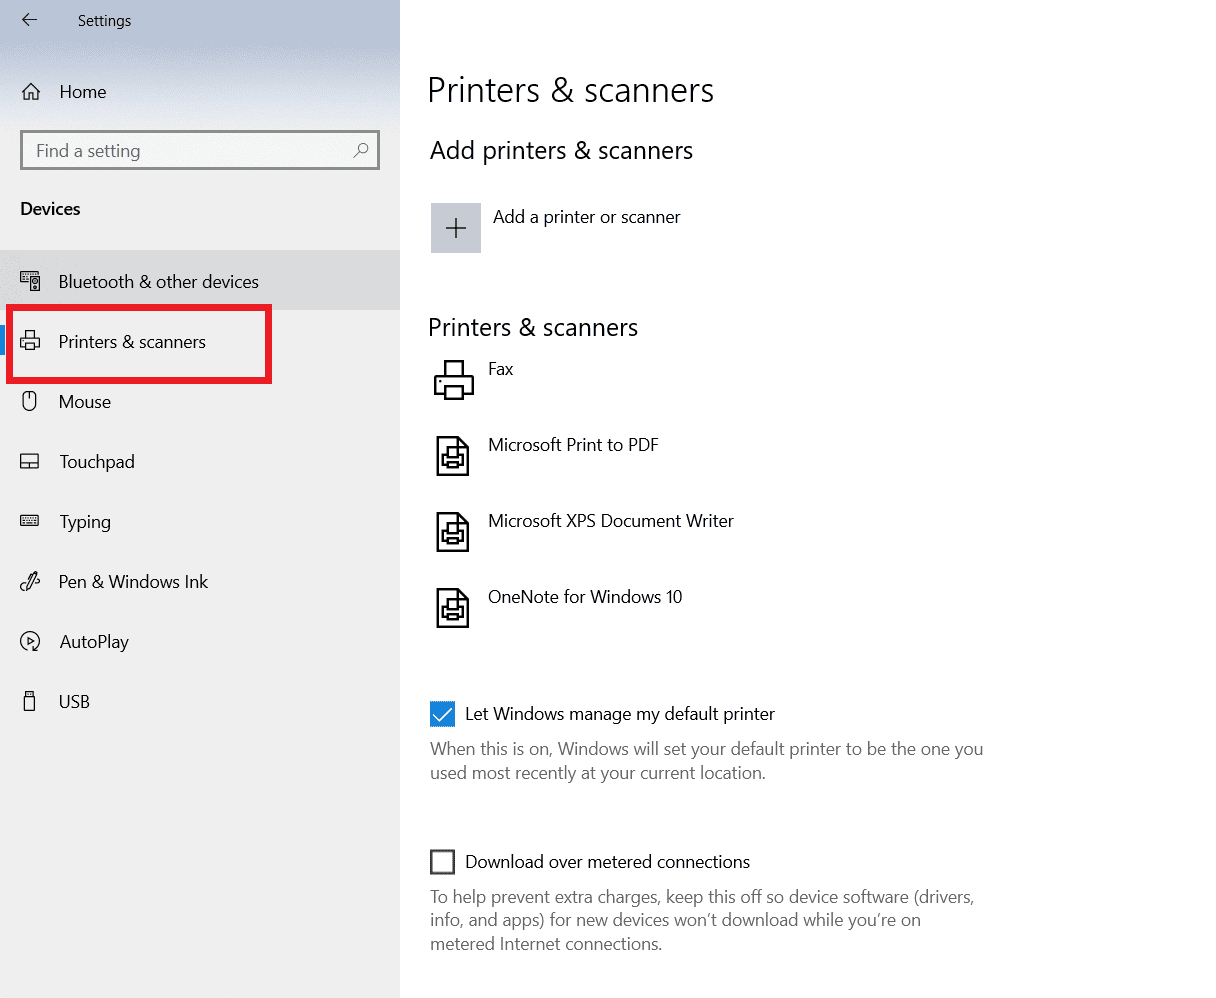
- Find the problematic printer in the right-side panel and single click on it to access its options. Select Remove Device , let the process complete, and then close Settings.

- Click on Windows keys and type Print Management in the search bar, then click on Open

- Double-click on All Printers (in the left panel or right panel, both are fine) and press Ctrl + A keys together to select all connected printers.

- Right-click over any printer and select Delete .

Now, it is time to add the printer back, but first, unplug the printer cable from your computer and perform a restart. Once the computer boots back on, properly reconnect the printer.
Follow steps 1 and step 2 of this method to open the Printer & Scanner settings .
Click on the Add a printer & scanner button at the top of the window.

- Windows will now automatically start looking for any connected printers. If Windows successfully detects the connected printer, click on its entry in the search list and select Add device to add it back otherwise, click on The printer that I want isn’t listed hyperlink.

- In the following window, select the appropriate option by clicking on its radio button and click on Next .
Note: For example, select My printer is a little older. Help me find it if your printer doesn’t use USB for connection or select Add a Bluetooth, wireless, or network discoverable printer to add a wireless printer.

- Now, reinstall your printer .
Now that you have successfully reinstalled your printer, try printing a test page to ensure everything is right back on track.
- Hit Windows + I keys to open Settings and click on Devices .
- On the Printers and Scanners page, click on the printer you just added back and would like to test, followed by a click on the Manage button.

- Finally, click on the Print a test page option. Muffle your ears & listen carefully for the sound of your printer printing a page and rejoice.

Recommended:
- Fix Intel Wireless AC 9560 Not Working
- Fix 0x800f0831 Windows 10 Update Error
- Fix Epson Scanner Cannot Communicate in Windows 10
- Fix Error Printing in Windows 10
