
- How to Insert a Line in Word
- Method 1: For Horizontal Lines
- Option I: Use Autoformat to Insert a Line
- Option II: Use Shape Menu
- Option III: Use Border from Ribbon
- Method 2: Vertical Lines
- Option I: Use Page Layout
- Option II: Use Shape Tab
- Option III: Use Border
How to Insert a Line in Word
You can insert horizontal as well as vertical lines in MS Word . Below we have shown both the methods to do so.
Method 1: For Horizontal Lines
Horizontal lines are used in a word when we want to separate the text section. Follow the methods below to insert horizontal lines:
Option I: Use Autoformat to Insert a Line
Autoformat is the easiest and the quickest way to insert a line in a word. Follow the steps below to insert a line using autoformat:
- On Plain Single Line
Follow these steps to use autoformat to insert a plain single line.
Open the Word document.
Place the cursor where you want to insert the line.
Type three hyphens(—) and press Enter key .

- On Plain Double Line
Here are the steps to use autoformat to insert a double line.
Go to the Word document and place the cursor where you want to insert the line.
Type three equal signs(===) and press Enter key .

- On Broken or Dotted Line
Follow the given steps to use autoformat to insert broken or dotted line.
Go to your Word document .
To insert a broken line, type three asterisks(***) and hit Enter key .

- On Bold Single Line
Below are the steps to use autoformat to insert bold single line.
Launch the Word file .
Type three underline symbols(___) and press Enter key to insert a bold single line.

- On Wavy Line
Follow the below steps to use autoformat to insert wavy line in Word file.
Open the Word document.
To insert a wavy line, type three tildes(~~~) and press Enter key .

- On Triple Line With a Thick Center
Here are the steps to use autoformat to insert a triple line with a thick center.
Launch your Word document .
Type three number signs(###) and hit the Enter key to insert a triple line with a thick center.

Option II: Use Shape Menu
The shape tab contains a variety of lines which includes straight lines, arrow lines, and a lot more. Follow the steps below to use the shape tab:
Open the Word document and place the cursor where you want to insert the line.
Click on the Insert tab from the ribbon .

- Click on the Shapes drop-down .

- Select the line that you want to insert from the Shapes list .

- Hold that line and drag it where you want to place it.

Option III: Use Border from Ribbon
Using border will help us insert the horizontal line in a text. Follow the methods below to use border:
Go to the Word document and place the cursor where you want to insert the line.
By default the Home tab will be open.

- Click on the bottom border drop-down.

- Select the Horizontal line.
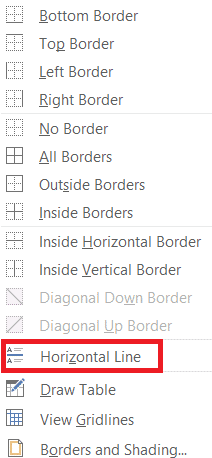
- Double click on the Horizontal line to change the look of the line.

- Change the height, width, color, and alignment from the Format Horizontal line dialog box.

Method 2: Vertical Lines
Vertical lines are used in a word to separate the column of texts. Follow the methods below to insert vertical lines:
Option I: Use Page Layout
Using the Page Layout will help us separate the text into columns. Follow the methods below to use page Layout:
Open the Word document where you want to insert the vertical line.
Select the document .

- Click on the Layout and select Columns .

- The Columns menu will appear. Click on More Columns .

- The Columns window will appear. Click on the number of columns that you want to add.

- Check the box next to the line between and then click on OK .

- This will split the page into two columns.

Option II: Use Shape Tab
Shape tab can be used to draw vertical lines as well. There are a variety of lines available in the shape tab. We can choose the lines as per our preference and draw them. Follow the methods below to insert shape tab:
Go to the Word document and place the cursor where you want to insert the vertical line.
Click on Insert and select Shapes .

- Select the Shapes from the drop-down menu.

Select the line as per your preference.
Hold the line and drag it to the place where you want.

Option III: Use Border
Follow the methods below to use a border while trying to insert a vertical line:
- By default when you open a new word document the Home tab will be opened.

- Select the place where you want to insert the border.

- Click on the bottom border drop-down menu.

- The border list will appear on the screen.

- Click on the left border .

- Finally, the border will be added to your screen.

Recommended:
- Fix Google Meet Grid View Extension
- Fix Word File Permission Error in Windows 10
- 19 Best Free GIF Editor
- 27 Best Alternatives to Microsoft Word
