A0 size papers are the largest size papers available to us as per ISO 216 paper size divisions. But how to print out a high-resolution image of this size? Especially when our systems can only print the largest sizes up to A3. Well, that points to a multi-page printout with combining a couple of pages will help you get the desired image. So this article will help you with how to print large images on multiple pages with understanding how to print image on multiple pages altogether on Windows 10 & 11.

- How to Print Large Image on Multiple Pages in Windows 10/11
- Method 1: With Microsoft Paint
- Method 2: Using Excel Spreadsheet
- Method 3: Via Microsoft Word
- Method 4: Through PDF Format
How to Print Large Image on Multiple Pages in Windows 10/11
Printing large images isn’t directly possible for large poster-sized images. Universally available sizes printable from Windows 10 and 11 are:
- US letter sizes and the US envelop sizes.
- A series (from A3 to A5), B4 to B6 print sizes, C size sheet, D size sheet, E size sheet.
- Envelop sizes, PRC envelops sizes, Japanese Envelop sizes, PRC sizes, Postcard sizes, and many more.
However, A3 is the largest direct printable size for the systems we are using now. And considering allowed print sizes in India, the Bureau of Indian Standards allows the ISO -A series size for drawing and other engineering works. This is why the largest size available in the country is A3x4 paper . After this brief but vital info about paper sizes, let’s move towards learning how to print large images on multiple pages.
Note: The methods and steps represented below are performed on Windows 11. The pictures, interface, and terminologies used are from Windows 11 which closely match Windows 10 too. Do verify before making any changes.
Method 1: With Microsoft Paint
Splitting a large image into numerous ones and printing it onto multiple pages can be easily done through Microsoft Paint. It is one of the ways to know how to print large image on multiple pages in Windows 10 and 11. To do so, follow these steps:
Locate your desired image in the File Explorer .
Right-click on it, and from the context menu, click the Open with > Paint app as depicted below.

- As the image opens in Paint, click on the File menu option from the top left corner.

- From the given list, select the Print option and then click on Page setup as shown.

- In the Page Setup window, choose your desired paper size from the Size: drop-down menu option.

6A. Adjust and verify the Orientation and Centring sections as per your output image preference.
6B. Type the number of pages required for the image to be split in the Fit to option box under the Scaling section. As shown below, if the image is required to be split into 16 separate images, type 4 by 4 page(s) in the boxes.

- After customization, click on the OK button.

- Next, click File > Print > Print as illustrated below.

Click on the printer you want to print with under the Select Printer section.
Then, click on Print . The copies will start to print according to the selection made.
Note: For demo purposes, we have selected the Microsoft Print to PDF option under the Select Printer section. Please select the printer available on your system to print your desired images.

Method 2: Using Excel Spreadsheet
Another way to learn how to print large image on multiple pages is by doing it on an Excel spreadsheet. You can print split images of a large one swiftly with Microsoft Excel as follows:
- Type Excel in the Windows search menu and click on Run as administrator .

- In the Excel window, go to Home and click on the Blank workbook option as shown.

- In the new blank workbook, click on the Insert tab.

- Click on the Pictures drop-down option and select This device to browse and pick your required image.

- A File explorer pop-up window will appear. Now, locate your picture and click on Insert .

- After the picture loads on the spreadsheet, click on the picture and hover on any of the corners when you see the cursor turn into an expanding arrow .

- Click and drag the image corners to increase its size.

- After you stretch the image to the desired size depicted in the Size section of the Picture Format ribbon, click on the File option.

9A. Click on the Print option and configure the Settings section as per your output image preferences.
9B. Verify the number of Pages your image will split in as per the size stretched and the Settings made.

Note: You can repeat steps 7, 8, and 9 to adjust the number of print copies you require of the image from the Settings until the desired preview is reached.
- Click on the Printer drop-down menu option to find and select the printer connected with your system.

- After completing these settings, select the number of copies from the Copies drop-down box. Then, click on the Print option to start the print.

Method 3: Via Microsoft Word
Microsoft Word is another alternative for you to know how to print large image on multiple pages. Follow the upcoming steps to do so:
- Type Word in the Windows search bar and click the Open option as shown below.

- Click on the View tab in the blank workbook.

- In the Page Movement section, select the Side to Side option shown highlighted.

- Click on the Insert tab and click the Pictures > This Device option as depicted below.

- Select and insert the desired image from the pop-up window into this Word file.

Right-click on the image and click the Wrap Text option.
To wrap and move the image freely in the Word file, select either Behind Text or In Front of Tex option.

- Then, stretch the image to desired width and height on the first page as shown.

- Similarly, add the same image on the second page and wrap the image as earlier.

- Stretch the second image to a degree where it will connect the first image as shown below.
Note: You can check the desired width and height in the Size section from the top right corner under Picture Format tab.

- Now, follow steps 8-11 from Method 2 for setting the image for printing and then start printing the image on multiple pages.
Method 4: Through PDF Format
PDF is another way with which you can split your larger resolution image into multiple images for printing. To get the answer to how to print large image on multiple pages questions, follow these steps:
Note: The following steps are performed on Adobe Acrobat DC . Make sure to have this software installed in your system before performing the upcoming steps.
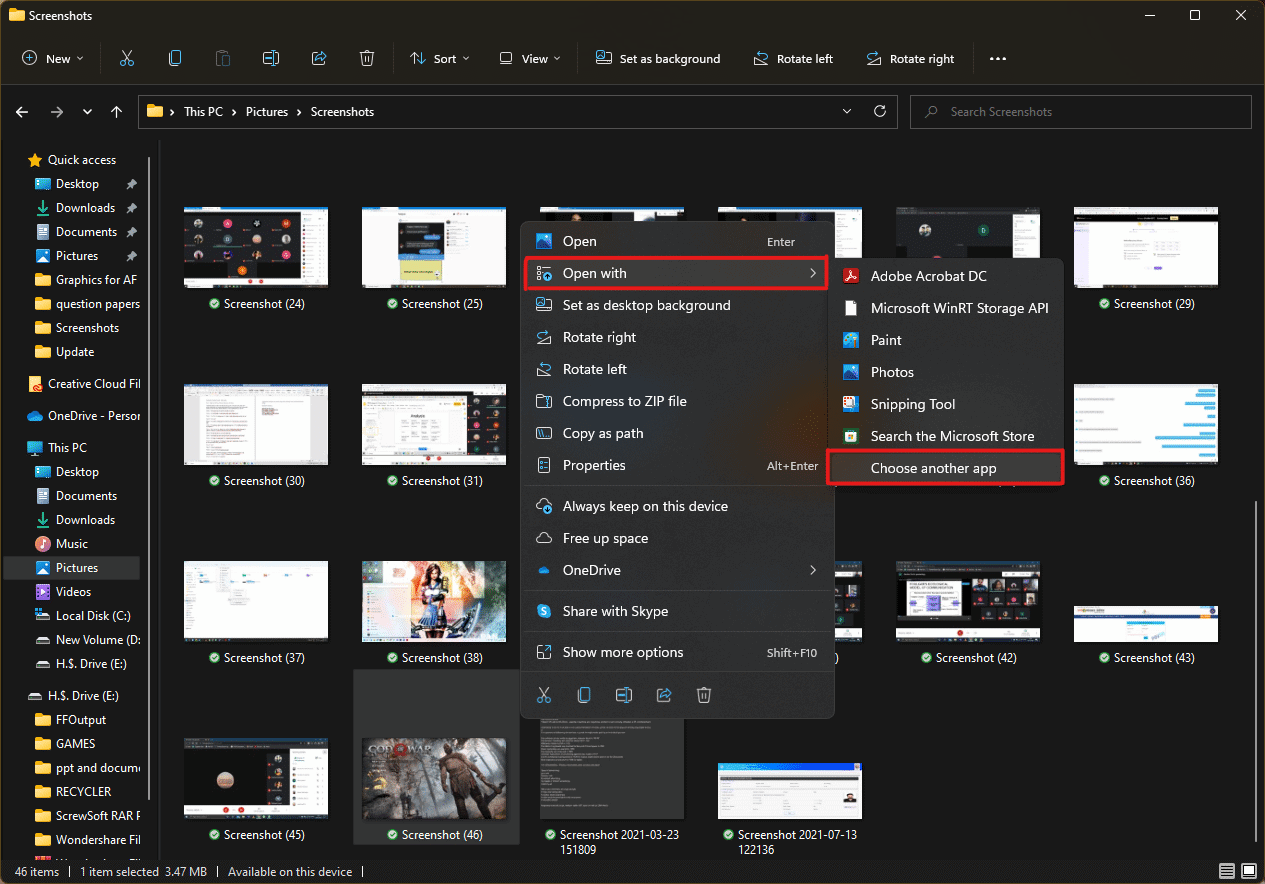
Locate your desired image in the File Explorer .
Right-click on it, and from the context menu, click the Open with > Choose another app option as depicted below.
- How do you want to open this file? pop-up will appear with a list of installed apps in the system. Find and select Adobe Acrobat DC and click on OK .
Note: You can click on More apps to further expand the list of apps if you didn’t find Adobe Acrobat earlier.

- After the image opens in Adobe Acrobat, press the key combination Ctrl + P to open the Print window.

- Click on the Poster tab to split images.

- Click on the Page setup… button to configure the page sizes of the split images.

- Configure the Orientation settings and Paper size settings through the drop-down menu and click on OK .

- Select the printer a ttached to your system from the Printer drop-down menu option from the top left corner and click the Print option to start the printing process.

Recommended:
- How to Create a Hanging Indent in Word and Google Docs
- How to Reset Windows 11
- Fix Local Print Spooler Service Is Not Running
- How to Create PDF File in Windows 11
We hope you understood how to print large images on multiple pages in Windows 10/11 . Share your experiences in the comment section below with your queries and suggestions. Also, let us know which topic you want us to explore next.
Does your printer fail to respond when you give the print command? If yes, there is no need to panic as you are not alone. Numerous people have encountered this problem while attempting to print documents from Windows 10 computer. A corrupt, obsolete, or damaged printer driver is the primary cause of this vexing Printer not responding error . The good news is that you can quickly resolve this issue by implementing the step-by-step methods listed in this guide.
Why is my device showing Printer driver is unavailable?
There are several reasons for the printer to become unresponsive and you can begin by testing the following:
- Check if the printer cables are properly attached to the computer
- Check if the printer is connected to Wi-Fi
- Make sure that the ink cartridges are not empty
- Check your system for alert lights or error messages
- If you just upgraded your computer from Windows 7 or 8 to Windows 10 and started facing printer issues, the update may have corrupted the printer driver
- It is possible that the original printer driver is incompatible with the latest version of Windows OS
Microsoft had stated that when Windows 10 was released, there would be no built-in backward compatibility with some apps and applications. However, numerous printer manufacturers were unable to update their drivers in time, which complicated the situation further.

What is the use of a printer driver?
Prior to understanding how to resolve the Printer not responding issue , it is imperative to learn about the printer drivers. It is a simple application that is mounted on the Windows 10 computer that allows interaction between the PC and the printer.
It performs two critical roles:
- The first function is to act as a link between the printer and your device. It allows your computer to recognize the printer hardware, its features, and specifics.
- Secondly, the driver is accountable for converting the print job data to signals which can be understood & implemented by the printer.
Each printer comes with its own special driver that is tailored to different operating system profiles such as Windows 7, Windows 8, or Windows 10. If your printer is not programmed correctly or mounts the wrong system driver, the computer would be unable to find it & process a print job.
Certain printers, on the other hand, can utilize generic drivers offered by Windows 10. This enables you to print without the need to install external vendor drivers.
- Fix Printer Not Responding Error in Windows 10
- Method 1: Run Windows Update
- Method 2: Update Your Printer Drivers
- Method 3: Reinstall Printer Driver
- Special Mention: Only for Plug–and–Play Printers
Fix Printer Not Responding Error in Windows 10
If you’re unable to print any internal document or a file that you downloaded from the internet then you may be facing the Printer driver is unavailable error. To resolve the printer not responding error, you can follow the below-listed troubleshooting steps.
Method 1: Run Windows Update
One possible reason for your Windows 10 computer to display the ‘Printer Driver is Unavailable’ error is because you are running an out-of-date operating system. To update your Windows OS, follow the below steps:
- Click the Start button and navigate to the Settings icon.
- Select Update & Security .

- Windows will check for updates and, if found, will automatically download and install them.

- Now, Restart your computer once the update process is complete.
You can now check if you’re able to fix printer is not responding error.
Method 2: Update Your Printer Drivers
To update your printer drivers, you can download the latest drivers from the manufacturer’s website. Drivers can also be downloaded from the manufacturer’s support site. To install the printer drivers downloaded from the manufacturer’s website, follow these steps:
- Search for Control Panel in the Windows search bar then click on the Control Panel from the search results.

- Make sure to select ‘ Large Icons ‘ from the ‘ View by: ‘ dropdown. Now look for Device Manager and click on it.

- Under the Device Manager window, locate the printer for which you want to install drivers for.

- Right-click the name of the printer and select Update Driver Software from the accompanying pop-up menu.

A new window will appear. If you’ve already downloaded drivers from the manufacturer’s website, choose the Browse my computer for driver software option.
Next, click on the Browse button and navigate to the place where you have downloaded the printer drivers from the manufacturer’s website.

Follow the on-screen instructions to install the drivers manually.
If you don’t have the downloaded drivers then select the option labeled Search automatically for updated driver software.

- Follow on-screen instructions to install the latest printer drivers.
Restart your PC and see if you’re able to fix the printer not responding issue.
Method 3: Reinstall Printer Driver
If you cannot print your document because of the error message ‘printer driver is unavailable,’ the best course of action would be to reinstall the printer driver. Follow these steps to fix printer is not responding error:
- Press Windows Key +R then type devmgmt.msc and click on OK.

- The Device Manager window will open. Expand Print queues and find your printer device.

Right-click on your printer device (with which you are facing the issue) and select Uninstall device option.
Remove the device from printer queues and restart your PC to finish the uninstallation.
After restarting your device, re-open Device Manager and click on Action .

- From the Action menu select Scan for hardware changes .

Windows will now reinstall the appropriate printer driver on your computer. Finally, restart the device and see if your printer is responding and you’re able to print your documents.
Special Mention: Only for Plug–and–Play Printers
After you reinstall the printer drivers, Windows will automatically detect your Printer. If it recognizes the printer, proceed with the on-screen instructions .
Unplug the printer from your computer. Also, remove any cords and wires that are connected between them.
Reconnect all and follow the Setup Wizard process.
If the Wizard is unavailable, navigate to Start > Settings > Devices > Printers & Scanners > Add a Printer or Scanner.

Q1. What should I do if my Printer Driver is not Installing?
If nothing happens when you double-click the installation file, try the following:
Click on Start , then navigate to Settings > Devices > Printers & scanners.
Select Print Server Properties under Related Settings.
Verify that your printer is specified under the Drivers tab.
If your printer is not visible, click Add under the Welcome to the Add Printer Driver Wizard then click on Next.
Pick the Device Architecture in the Processor Selection dialogue box. Once done, click Next.
Pick your Printer Manufacturer from the left pane. Then choose your Printer Driver from the right pane.
Finally, click on Finish and follow the on-screen instructions to add your driver.
Q2. How do I download the driver from the manufacture’s website?
Consult the service website for your printer manufacturer. To do so, conduct an internet search for the manufacturer of your printer followed by the term support, e.g., HP support .
Driver updates are available and accessible from a printer manufacturer’s website under the Drivers category. Certain support websites enable you to check specifically as per printer model code. Find and download the most recent driver for your printer and install it according to manufacturer installation directions.
A vast majority of drivers are executable files that you can simply install by double-clicking on them. After you have downloaded the file, begin the installation. Then, proceed with these steps to re-install the printer drivers:
Click on Start, then navigate to Settings > Devices > Printers & scanners.
Locate the printer under Printers & scanners. Select it, and then click on Remove device.
After deleting your printer, reinstall it using the Add a printer or scanner option.
Q3. What is the meaning of Printer Driver Unavailable?
The error printer driver is unavailable indicates that the driver mounted on your computer is incompatible with your printer or is outdated. If the machine is unable to identify the drivers, you will be unable to activate or print from your printer .
Recommended:
- How to Get Your Printer Back Online in Windows 10
- How to Print When You Don’t Have a Printer
- Fix Volume Automatically Goes Down or Up in Windows 10
- How to Link Facebook to Twitter
The Print Spooler Service stores printing instructions in the Windows operating system that it gives to the printer to complete a print job. It generally holds all printing documents in the list and thereafter transfers them one by one to the printer. The FIFO or First-In-First-Out strategy is used for printing the remaining documents in the queue. Sometimes, a printer may get stuck or stop functioning. If you are also dealing with the same problem, read our guide to fix Local Print Spooler Service is not running error in Windows 10.

- Fix Local Print Spooler Service is not running in Windows 10
- Method 1: Start or Restart Print Spooler Service
- Method 2: Start or Restart Print Spooler Dependencies
- Method 3: Clear Spooled Files
- Method 4: Run Printer troubleshooter
- Method 5: Reinstall Printer Drivers
Fix Local Print Spooler Service is not running in Windows 10
What is Print Spooler Service? – Local Print Spooler Service is based on two essential files, namely, spoolss.dll and spoolsv.exe . Since it is not stand-alone software, it depends on these two services: Dcom and RPC . The Print Spooler Service will stop operating if any of the said dependency services fail.
Why Print Spooler Service is not working? – If the print spooler service is not running on Windows 10 in the background, your printer will no longer receive the request and thus, the print operation will be unsuccessful. Reasons for this are:
- Third-party applications blocking this service.
- Print Spooler dependent services stopped working.
- Printer driver might be corrupt or outdated.
Method 1: Start or Restart Print Spooler Service
Most print spooler errors are prompted by an inactive or malfunctioning Print Spooler service. So, simply restarting the service and all its dependencies should theoretically solve the issue. To fix Local Print Spooler Service is not running error in Windows, you have to first ensure that:
- Print Spooler Service is in an active state.
- Its dependencies are also active and running.
Step I: Launch Services Window
Launch the Run dialog box by holding Windows + R keys together.
Type services.msc and click OK to launch Services window.

Case I: If Print Spooler is Inactive,
- Right-click on Print Spooler service then select Properties as shown.

- Print Spooler Properties (Local Computer) window will appear. Set the Startup type to Automatic as depicted below.

- Click the Start button and wait for the service status to show Running .

- Click Apply > OK to save these modifications and close the window.
Case II: If Print Spooler is Active,
- Right-click on Print Spooler service and click on Restart as illustrated below.

- The Print Spooler will restart now. Click OK to exit the window.
Method 2: Start or Restart Print Spooler Dependencies
The Print Spooler Service will stop operating if any of the said dependency services fail. Hence, ensuring that these are running is equally important.
Step I: Launch Services Window
Launch the Run dialog box by holding Windows + R keys together.
Type services.msc and click OK to launch Services window.
Step II: Check Print Spooler Activity Status
- Right-click on Print Spooler and select Properties as shown.

Now, Print Spooler Properties (Local Computer) window will appear. Here, switch to the Dependencies tab.
Click on the Remote Procedure Call (RPC) icon. Two options will be expanded:
- DCOM Server Process Launcher
- RPC Endpoint Mapper
Make a note of these names and Exit the window.

Step III: Start DCOM Server Process Launcher Service
- Navigate to the Services window again and search for DCOM Server Process Launcher.

Right-click on DCOM Server Process Launcher and click on Properties.
In DCOM Server Process Launcher Properties (Local Computer) window, set the Startup type to Automatic as depicted below.

Here, click on Apply and then click on the Start button.
Now, wait for some time and click on OK to exit the Properties window.
Step IV: Start RPC Endpoint Mapper Service
Navigate to the Services window again and search for RPC Endpoint Mapper.
Right-click on RPC Endpoint Mapper and select Properties.

In RPC Endpoint Mapper Properties (Local Computer) window, set the Startup type to Automatic as earlier.
Click Apply followed by OK to exit the Properties window.
Method 3: Clear Spooled Files
If you hit Ctrl + P on a document with several pages, chances are, the print spooler service will have a tough time managing the print jobs and end up glitching . Luckily, you can clear the print queue (spool files) manually and then restart the service to pull things back to normal.
Note: Before we clear these files, we will stop the print spooler service and then, start it thereafter.
- Open Services window, locate Print Spooler and right-click on it then click Stop as illustrated below.

Press Windows key + E to open File Explorer .
Navigate to C:\Windows\System32\spool\PRINTERS as shown.

- Delete the files in PRINTERS folder by pressing Ctrl + A keys and then, Delete key .

Now, Disconnect the printer from your Windows PC
Implement steps in Method 1 to start Print Spooler service.
- Reconnect your printer back to your PC and check if your printer works fine without any errors.
Method 4: Run Printer troubleshooter
Printer issues on Windows 10 are so abundant that Microsoft decided to include a troubleshooter for the same within the Operating system itself. The tool runs a bunch of pre-defined troubleshooting steps, for example, checking for spooler service errors, print queues, etc., and resolves them automatically.
Press Windows + I keys to launch Settings
Click the Update & Security tile as shown.

- Go to the Troubleshoot tab on the left pane.

- Click Additional Troubleshooters on the right pane.

- Under the Get up and running section, choose Printer troubleshooter, then click Run the troubleshooter button shown highlighted.

- This will launch the troubleshooter to begin Detecting problems as shown.

- Choose the printer you want to troubleshoot and click Next.

- Apply the fix as recommended by the troubleshooter and resume printing.
Method 5: Reinstall Printer Drivers
If your error message is regarding Print Spooler Service not running, simply replacing the current printer drivers, which are presumably corrupt or just outdated, with the latest set of driver files should settle any connection issue between the PC and the printer. Here’s how to do so:
- Press Windows + X keys . Click Device Manager from the given menu.

- Open the Print Queues category. Right-click on the connected Printer and click Uninstall device as illustrated below.

Now, disconnect the printer cable and restart the PC .
Once the PC has booted back on, ensure the internet connection is working perfectly and plug in the printer cable .
Windows will detect the connected hardware and automatically download & install the required driver files from the internet.
Q1. Why is my printer spooler service not running?
Ans. Your printer spooler service may not be running if it is being blocked by a third-party application, one or both of its dependent services are not running or the service failed to automatically get going on startup.
Q2. How do I start Print Spooler service in Windows 10?
Ans. To manually start the service, open the Services application and locate the Print Spooler service. Select it and click on the Start option that appears over the service description.
Recommended: How to Get Your Printer Back Online in Windows 10
A0 size papers are the largest size papers available to us as per ISO 216 paper size divisions. But how to print out a high-resolution image of this size? Especially when our systems can only print the largest sizes up to A3. Well, that points to a multi-page printout with combining a couple of pages will help you get the desired image. So this article will help you with how to print large images on multiple pages with understanding how to print image on multiple pages altogether on Windows 10 & 11.
- How to Print Large Image on Multiple Pages in Windows 10/11
- Method 1: With Microsoft Paint
- Method 2: Using Excel Spreadsheet
- Method 3: Via Microsoft Word
- Method 4: Through PDF Format
How to Print Large Image on Multiple Pages in Windows 10/11
Printing large images isn’t directly possible for large poster-sized images. Universally available sizes printable from Windows 10 and 11 are:
- US letter sizes and the US envelop sizes.
- A series (from A3 to A5), B4 to B6 print sizes, C size sheet, D size sheet, E size sheet.
- Envelop sizes, PRC envelops sizes, Japanese Envelop sizes, PRC sizes, Postcard sizes, and many more.
However, A3 is the largest direct printable size for the systems we are using now. And considering allowed print sizes in India, the Bureau of Indian Standards allows the ISO -A series size for drawing and other engineering works. This is why the largest size available in the country is A3x4 paper . After this brief but vital info about paper sizes, let’s move towards learning how to print large images on multiple pages.
Note: The methods and steps represented below are performed on Windows 11. The pictures, interface, and terminologies used are from Windows 11 which closely match Windows 10 too. Do verify before making any changes.
Method 1: With Microsoft Paint
Splitting a large image into numerous ones and printing it onto multiple pages can be easily done through Microsoft Paint. It is one of the ways to know how to print large image on multiple pages in Windows 10 and 11. To do so, follow these steps:
Locate your desired image in the File Explorer .
Right-click on it, and from the context menu, click the Open with > Paint app as depicted below.
- As the image opens in Paint, click on the File menu option from the top left corner.
- From the given list, select the Print option and then click on Page setup as shown.
- In the Page Setup window, choose your desired paper size from the Size: drop-down menu option.
6A. Adjust and verify the Orientation and Centring sections as per your output image preference.
6B. Type the number of pages required for the image to be split in the Fit to option box under the Scaling section. As shown below, if the image is required to be split into 16 separate images, type 4 by 4 page(s) in the boxes.
- After customization, click on the OK button.
- Next, click File > Print > Print as illustrated below.
Click on the printer you want to print with under the Select Printer section.
Then, click on Print . The copies will start to print according to the selection made.
Note: For demo purposes, we have selected the Microsoft Print to PDF option under the Select Printer section. Please select the printer available on your system to print your desired images.
Method 2: Using Excel Spreadsheet
Another way to learn how to print large image on multiple pages is by doing it on an Excel spreadsheet. You can print split images of a large one swiftly with Microsoft Excel as follows:
- Type Excel in the Windows search menu and click on Run as administrator .
- In the Excel window, go to Home and click on the Blank workbook option as shown.
- In the new blank workbook, click on the Insert tab.
- Click on the Pictures drop-down option and select This device to browse and pick your required image.
- A File explorer pop-up window will appear. Now, locate your picture and click on Insert .
- After the picture loads on the spreadsheet, click on the picture and hover on any of the corners when you see the cursor turn into an expanding arrow .
- Click and drag the image corners to increase its size.
- After you stretch the image to the desired size depicted in the Size section of the Picture Format ribbon, click on the File option.
9A. Click on the Print option and configure the Settings section as per your output image preferences.
9B. Verify the number of Pages your image will split in as per the size stretched and the Settings made.
Note: You can repeat steps 7, 8, and 9 to adjust the number of print copies you require of the image from the Settings until the desired preview is reached.
- Click on the Printer drop-down menu option to find and select the printer connected with your system.
- After completing these settings, select the number of copies from the Copies drop-down box. Then, click on the Print option to start the print.
Method 3: Via Microsoft Word
Microsoft Word is another alternative for you to know how to print large image on multiple pages. Follow the upcoming steps to do so:
- Type Word in the Windows search bar and click the Open option as shown below.
- Click on the View tab in the blank workbook.
- In the Page Movement section, select the Side to Side option shown highlighted.
- Click on the Insert tab and click the Pictures > This Device option as depicted below.
- Select and insert the desired image from the pop-up window into this Word file.
Right-click on the image and click the Wrap Text option.
To wrap and move the image freely in the Word file, select either Behind Text or In Front of Tex option.
- Then, stretch the image to desired width and height on the first page as shown.
- Similarly, add the same image on the second page and wrap the image as earlier.
- Stretch the second image to a degree where it will connect the first image as shown below.
Note: You can check the desired width and height in the Size section from the top right corner under Picture Format tab.
- Now, follow steps 8-11 from Method 2 for setting the image for printing and then start printing the image on multiple pages.
Method 4: Through PDF Format
PDF is another way with which you can split your larger resolution image into multiple images for printing. To get the answer to how to print large image on multiple pages questions, follow these steps:
Note: The following steps are performed on Adobe Acrobat DC . Make sure to have this software installed in your system before performing the upcoming steps.
Locate your desired image in the File Explorer .
Right-click on it, and from the context menu, click the Open with > Choose another app option as depicted below.
- How do you want to open this file? pop-up will appear with a list of installed apps in the system. Find and select Adobe Acrobat DC and click on OK .
Note: You can click on More apps to further expand the list of apps if you didn’t find Adobe Acrobat earlier.
- After the image opens in Adobe Acrobat, press the key combination Ctrl + P to open the Print window.
- Click on the Poster tab to split images.
- Click on the Page setup… button to configure the page sizes of the split images.
- Configure the Orientation settings and Paper size settings through the drop-down menu and click on OK .
- Select the printer a ttached to your system from the Printer drop-down menu option from the top left corner and click the Print option to start the printing process.
Recommended:
- How to Create a Hanging Indent in Word and Google Docs
- How to Reset Windows 11
- Fix Local Print Spooler Service Is Not Running
- How to Create PDF File in Windows 11
We hope you understood how to print large images on multiple pages in Windows 10/11 . Share your experiences in the comment section below with your queries and suggestions. Also, let us know which topic you want us to explore next.
