The recent surge of online activity has prompted the downfall of the printer. In an era, where everything can be viewed online with ease, the relevance of the gigantic and bulky printer has started to decrease. However, we are yet to reach a stage where we can neglect the printing device altogether. Until then, if you do not possess the heavy Inkjet and want something printed urgently, here’s a guide to help you decipher how to print documents when you don’t have a printer.

- How to Print Documents When You Don’t Have a Printer
- Method 1: Print Documents as PDF files
- Method 2: Print Webpages as PDF files
- Method 3: Search for Wireless Printers Near You
- Method 4: Find Other Printing Services Around Your Location
- Method 5: Use Google Cloud Print
How to Print Documents When You Don’t Have a Printer
Method 1: Print Documents as PDF files
PDF is a universally accepted format that keeps the document exactly the same across different platforms and devices . There is a possibility that the PDF file of the document you need to print will do the trick instead. Even if softcopies are not an option in your situation, the PDF file makes it easy for you to save web pages and transfer them as documents for future printing. Here’s how you can print to PDF on your PC without a printer:
- Open the Word document that you want to print and click on the File option on the top left corner of the screen.

- From the options that appear, click on ‘Print.’ Alternatively, you can press Ctrl + P to open Print Menu

- Click on the ‘Printer’ drop-down menu and select ‘ Microsoft Print to PDF.’

- Once selected, click on ‘Print’ to continue.

- In the window that appears, type in the name of the PDF file and select the destination folder. Then click on ‘Save.’

- The PDF file will be printed without a printer in the destination folder.
Method 2: Print Webpages as PDF files
Browsers today have adapted to the requirements of the modern-day and introduced new features on their application. One such feature gives users the ability to print webpages as PDF documents on their PC. Here’s how you can print web pages as PDFs:
Open your browser and open the webpage you want to print.
Click on the three dots on the top right corner of the screen.

- From the various options, click on ‘Print.’ You can use the shortcut in the browser as well.

In the print window that opens up, click on the drop-down list in front of the ‘Destination’ menu.
Select ‘Save as PDF.’ You can then proceed to select the pages you want to download and the layout of the print.

- Once done, click on ‘Print’ and a window will appear asking you to select the destination folder. Select the folder and rename the file accordingly and then click on ‘Save’ again.

- The page will be printed as a PDF file without a printer.
Method 3: Search for Wireless Printers Near You
Even if you personally don’t own a printer, all hope is not lost. There is a remote possibility that someone in your neighbourhood or building owns a wireless printer. Once you have found a printer, you can ask the owner to let you take a print out. Here’s how you can scan for printers near you and print without owning a printer:
Press Windows Key + I to open the Settings app on your Windows device.
Click on ‘Devices.’
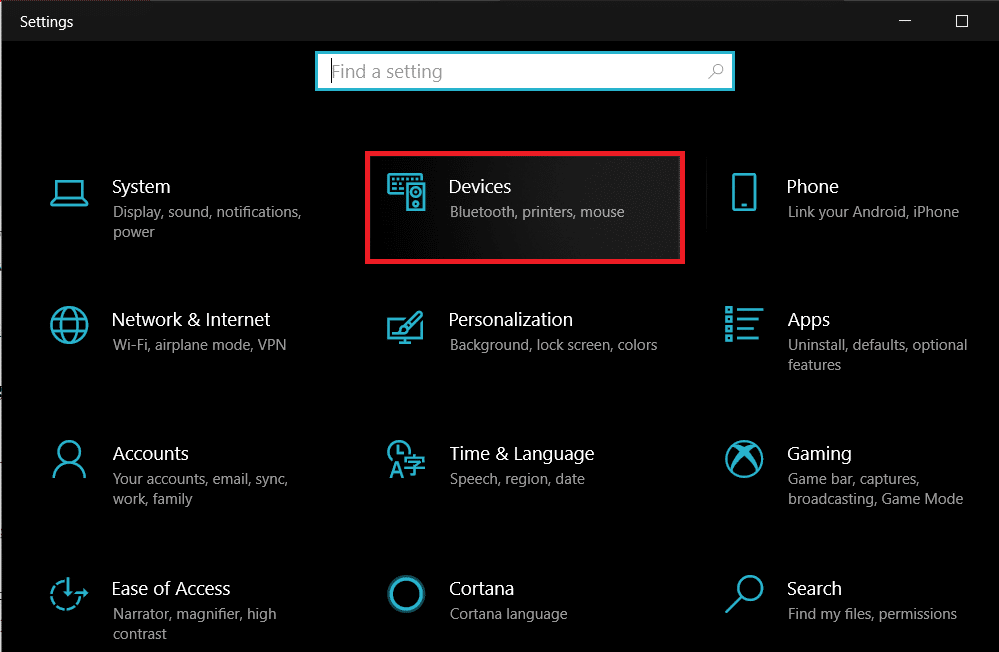
- From the panel on the left, click on the ‘Printers and Scanners’

- Click on ‘ Add a printer or scanner’ and your PC will find any printers that are operating near you.

Method 4: Find Other Printing Services Around Your Location
Some shops and services serve the specific purpose of getting print outs for their customers. You can search for print shops near your location and print documents there. Alternatively, you can head onto your University library or access the printer in your office to take urgent print outs. Printing options are also available in most internet cafes and public libraries. You can also use services such as PrintDog and UPrint that deliver large print outs to your home.
Method 5: Use Google Cloud Print
If you have a wireless printer at your home and are out of town, you can remotely print pages from your home printer. Head onto the Google Cloud Print website and see if your printer is eligible. Sign in to the app with your Google account and add your printer. Thereafter, while printing, click on the ‘Printers’ option and select your wireless printer to print documents remotely.
Q1. Where to print documents when you don’t have a printer?
With most documents beings shared and viewed through the screen, the printed page no longer holds the same value and the printer no longer seems worth the money. Having said that, there are still times where a hard copy of a document is required for a certain task. During instances like these, you can try using public printing services or ask your neighbours if they could give access to their printers for a brief period.
Q2. When you need to print something urgently, but there is no printer?
Such situations have happened to most of us. Try downloading the PDF of the document or webpage you want to print. The PDF should work as an alternative most of the time. If not, mail the PDF to any printing service near you and ask them to keep a print out ready. You will have to physically go and collect the printout but it is the fastest way possible.
Q3. How can I print from my phone without a printer?
You can print web pages and documents as PDF files from your phone and then print them as hard copies later. On the browser, tap on the three dots on the top right corner and select the ‘share’ option. From the various options available, tap on ‘Print’ and the webpage will be saved as a PDF. The same procedure can be used for Word documents.
Q4. Is there a printer that doesn’t need a computer?
Nowadays, wireless printers are the new norm. These printers often do not require physical connections with PCs or other devices and can download images and documents remotely.
Recommended:
- How To Clear Print Queue In Windows 10?
- Fix Common Printer Problems in Windows 10
- Share files and printers without HomeGroup on Windows 10
- How to Sync Google Calendar with Outlook
Are you in dire need of printing a document but can’t do so because of a stuck print job in Windows 10? Here are some ways to clear the print queue in Windows 10 easily.
Printers may appear easy to use but can be very flimsy at times. Handling print Queue when you urgently want to use a printer can be quite frustrating. The print queue not only prevents the present document but all future documents from printing. The problem is not hard to detect either. If the message ‘Printing’ remains indefinitely even though the paper is not stuck and the ink is right, then certainly there is a Print queue issue. There are certain ways that can be used to clear the print queue in Windows 10 .

- Why does a print job gets stuck in Windows 10?
- How To Clear Print Queue In Windows 10?
- Method 1: Manually Clearing and Restarting the Print Spooler
- Method 2: Clear Print Queue using a Batch File for the Print Spooler
- Method 3: Clear Print Queue Using Command Prompt
- Method 4: Use the Management Console
Why does a print job gets stuck in Windows 10?
The answer lies in the fact that the printing document isn’t directly sent for printing. The document is first received at the spooler , i.e., a program used to manage and queue the print jobs. This spooler is particularly helpful while rearranging the order of print jobs or deleting them entirely. A stuck print job prevents the documents in the queue from printing, which affects all the documents further down the queue.
Often you can solve the error by deleting the print job from the queue. To delete a stuck print job in Windows 10, go to ‘Printers’ in the setting and click on ‘ Open Queue .’ Cancel the print job causing a problem, and you are good to go. If you can’t delete a particular print job, then try deleting the entire print queue. If this doesn’t work either, then try restarting all your devices. Unplug all your connections and plug them to reboot your device completely. This is the first approach that you should have for a stuck print job. If these traditional methods don’t work, then here are some other detailed methods for clearing a print job in Windows 10.
How To Clear Print Queue In Windows 10?
There are a few methods that can be employed to clear a print job in Windows 10. Clearing and restarting the Print Spooler is one of the best methods to use for fixing the stuck print job. It doesn’t delete your documents but creates an illusion that the documents are being sent for the first time to the printer. The process is done by stopping the Print Spooler until you clear the entire temporary cache used by the spooler and then starting it again. This can be accomplished by using a manual method or by making a batch file.
Method 1: Manually Clearing and Restarting the Print Spooler
- Type ‘ Services .’ in the Windows search bar and open the ‘ Services ’ app.

- Find ‘ Print Spooler ’ in the menu and double-click to open the Properties .

- Click on ‘ Stop ’ in the Properties tab and minimize the window to use it again later.

- Open ‘ File Explorer ’ and go to the below address location:
C:\Windows\System 32\spool\PRINTERS

You may be asked for permission to access the location. Click on ‘ Continue ’ to move forward.
Once you reach the destination, select all the files and press Delete on your keyboard.
Now go back to the Spooler properties window and click on ‘ Start .’

Click on ‘ Ok ’ and close the ‘ Services ’ app.
This will restart the spooler, and all the documents would be sent to the printer for printing.
Method 2: Clear Print Queue using a Batch File for the Print Spooler
Creating a batch file is a viable option if your print jobs frequently get stuck. Using the Services app every now and then can be a hassle that can be solved by a batch file.
Open a text editor like Notepad on your computer.
Paste the commands below as separate lines.
Net stop spooler

Del/Q/F/S “%windir%\System32\spool\PRINTERS\*.*”

Net start spooler

- Click on ‘ File ’ and choose ‘ Save as .’ Name the file with the extension ‘ .bat ’ at the end and choose ‘ All files (.) ’ in the ‘ Save as type ’ menu. Click on Save , and you are good to go.

- Simply double-click on the batch file, and the work will be done . You can place it at the most accessible place on your desktop for easy access.
Method 3: Clear Print Queue Using Command Prompt
You can delete a stuck print job in Windows 10 by using Command Prompt as well. Using the method will stop and start the print spooler again.
- Type ‘ cmd ’ in the search bar. Right-click on the ‘ Command Prompt ’ app and choose the run as administrator option.

- Type the command ‘net stop spooler ’, which will stop the spooler.

- Again type the following command and hit Enter:
Del %systemroot%\system32\spool\printers\*/Q
This will do the same task as the methods above.
Start the spooler again by typing the command ‘ net start spooler ’ and press enter .
Method 4: Use the Management Console
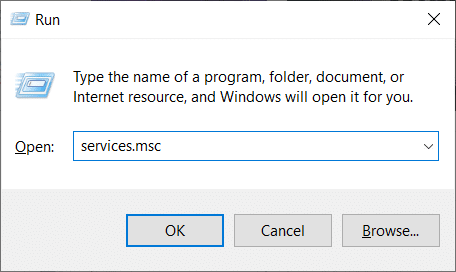
You can use the service.msc, shortcut in the management console to clear the print queue in Windows 10. This method will stop the spooler and clear it to delete a stuck print job:
Press the Windows Key + R key together to open the run window.
Type ‘ Services.msc ’ and hit Enter .
Note: You can also access the ‘ Services ’ window via Windows Management. Right-click the Windows icon and choose Computer Management. Choose Services and Application then double-click on Services.

- In the Services window, right-click on Print Spooler and select Properties.

- Click on the ‘ Stop ’ button to stop the Print Spooler service.

Minimize the window and open file explorer. Type the address ‘C:\ Windows\ System32\ Spool\ Printers’ or navigate to the address manually.
Select all the files in the folder and delete them. They were the files that were in the print queue at the instance.
Go back to the Services window and click on the ‘ Start ’ button.

Recommended:
- Fix Common Printer Problems in Windows 10
- Fix Printer Driver is unavailable on Windows 10
- How To Lock Or Unlock Cells In Excel?
- How to Fix Whatsapp Images Not Showing In Gallery
We hope the above guide was helpful and you were able to successfully clear the print queue in Windows 10. If you’re still stuck, then there may be compatibility issues with the printer and the data to be printed. Outdated printer drivers can also be an issue. You can also run the Windows Printer Troubleshooter to identify the correct problem. It will help you fix the errors in the print jobs . Follow the methods above to delete a stuck print job and clear the print queue in Windows 10, and you shouldn’t have any problems.
Windows updates are extremely important as they bring about a number of bug fixes and new features. Although, sometimes they might end up breaking a few things which worked just fine previously. New OS updates can often lead to some issues with external peripherals, particularly printers. Some common printer related problems you might experience after updating Windows 10 are printer not showing up in connected devices, unable to perform the print action, print spooler not running, etc.
Your printer woes can be due to a number of reasons. The most common culprits are outdated or corrupt printer drivers, problems with print spooler service, the new Windows update doesn’t support your printer, etc.
Fortunately, all your printer problems can be fixed by implementing some easy yet quick solutions. We have listed down five different solutions that you can try to get your printer to print again.

- How to fix various printer problems in Windows 10?
- Method 1: Run the Printer Troubleshooter
- Method 2: Delete the temporary files (Print Spooler) associated with your printer
- Method 3: Set a Default Printer
- Method 4: Update Printer Drivers
- Method 5: Remove and Add the Printer Again
How to fix various printer problems in Windows 10?
As mentioned earlier, there are a few different culprits that might be causing printer problems in Windows 10. Most users can solve these difficulties by running the built-in troubleshooter tool for printers. Other solutions include deleting temporary spool files, manually updating printer drivers, uninstalling and reinstalling the printer, etc.
Before we start implementing the more technical solutions, ensure that the printer and your computer are properly connected. For wired printers, check the condition of the connecting cables and make sure they are firmly connected & in their designated ports. Also, as trivial as it sounds, simply removing and reconnecting wires can also resolve any external device-related issues. Gently blow air into the ports to remove any dirt that might be clogging the connection. As for wireless printers, ensure that the printer and your computer are connected to the same network.
Another quick solution is to power cycle your printer. Turn off the printer and disconnect its power cable. Wait for about 30-40 seconds before plugging the wires back in. This will resolve any temporary issues and start the printer afresh.
If both of these tricks didn’t work, then it is time to move on to the advanced methods.
Method 1: Run the Printer Troubleshooter
The easiest and quickest way to solve any problem with a device or a feature is to run the troubleshooter associated with it. Windows 10 includes a troubleshooter tool for a wide variety of issues, and printer problems are also one of them. The printer troubleshooter automatically performs a number of actions like restarting the print spooler service, clearing corrupted spooler files, checking whether the existing printer drivers are outdated or corrupt, etc.
- The printer troubleshooter can be found within the Windows Settings application. To open Settings , press the Window key (or click on the start button) and then click on the cogwheel Settings icon above the power icon (or use the combination Windows key + I ).

- Now, click on Update & Security .
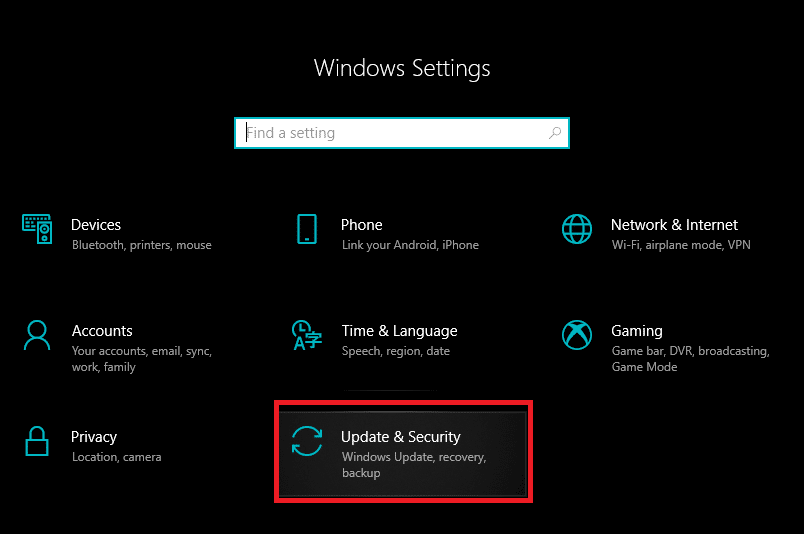
Switch to the Troubleshoot settings page by clicking on the same from the left-hand panel.
Scroll down on the right side until you find the Printer entry. Once found, click on it to open up available options and then select Run the troubleshooter .

Depending on the Windows version you are currently running, the Printer troubleshooter tool might be absent altogether. If that’s the case, click on the following link to download the required troubleshooter tool.
Once downloaded, click on the Printerdiagnostic10.diagcab file to launch the troubleshooter wizard, select Printer , and click on the Advanced hyperlink at the bottom left.

- In the following window, tick the box next to Apply repairs automatically and click on the Next button to start troubleshooting your printer.

Once you have completed the troubleshooting process, restart your computer, and then try using the printer.
Method 2: Delete the temporary files (Print Spooler) associated with your printer
Print spooler is a mediating file/tool that coordinates between your computer and the printer. The spooler manages all the print jobs you send to the printer and lets you delete a print job that is still being processed. Problems might be encountered if the Print Spooler service is corrupted or if the spooler’s temporary files become corrupt. Restarting the service and deleting these temporary files should help in fixing printer problems on your computer.
- Before we delete the print spooler files, we will need to halt the Print Spooler service that constantly runs in the background. To do so, type services.msc in either the run ( Windows key + R ) command box or the Windows search bar and hit enter. This will open up the Windows Services application .
Scan the list of Local Services to find the Print Spooler service. Hit the P key on your keyboard to jump ahead to the services starting with the alphabet P.
Once found, right-click on the Print Spooler service and select Properties from the context menu (or double-click on a service to access its Properties)
- Click on the Stop button to halt the service. Minimize the Services window instead of closing as we will need to restart the service after deleting the temporary files.

- Now, either open up the Windows File Explorer (Windows key + E) and navigate to the following path – C:\WINDOWS\system32\spool\printers or launch the run command box, type %WINDIR%\system32\spool\printers and press OK to reach the required destination directly.

Press Ctrl + A to select all the files in the printers folder and hit the delete key on your keyboard to delete them.
Maximize/switch back to the Services application window and click on the Start button to restart the Print Spooler service.
You should now be able to fix your printer problems and be able to print your documents without any hiccups.
Method 3: Set a Default Printer
It is also quite possible that your printer is working just fine, but you have been sending the print request to the wrong printer. This might be the case if there are multiple printers installed on your computers. Set the one you are trying to use as the default printer to resolve the issue.
- Press the Windows key and start typing Control Panel to look for the same. Click on Open when search results return.
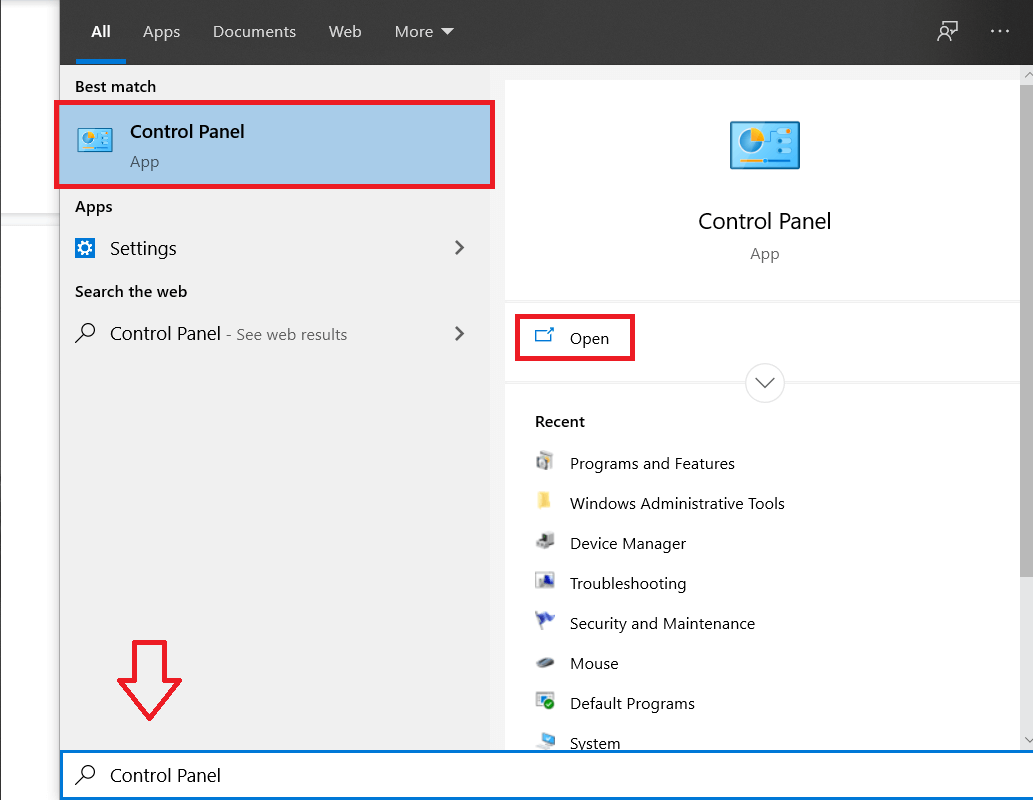
- Select Devices & Printers .

- The following window will contain a list of all the printers you have connected to your computer. Right-click on the printer you would like to use and choose Set as default printer .

Method 4: Update Printer Drivers
Every computer peripheral has a set of software files associated with it to communicate with your computer and the OS effectively. These files are known as device drivers. These drivers are unique for each device and manufacturer. Also, it is important to have the correct set of drivers installed in order to use an external device without facing any issues. Drivers are also constantly updated to stay compatible with the new Windows versions.
The new Windows update you just installed might not support the old printer drivers, and therefore, you will need to update them to the latest available version.
- Right-click on the start button or press Windows key + X to bring up the Power User menu and click on Device Manager .

Click on the arrow next to Print queues (or Printers) to expand it and have a look at all your connected printers.
Right-click on the problematic printer and select Update Driver from the ensuing options menu.

- Select ‘ Search Automatically for updated driver software ’ in the resulting window. Follow any on-screen instructions you might receive to install the updated printer drivers.

You can also choose to install the latest drivers manually. Visit the driver downloads page of your printer manufacturer, download the required drivers, and run the downloaded file. Printer driver files are usually available in .exe file format, so installing them doesn’t require any additional steps. Open the file and follow the instructions.
Method 5: Remove and Add the Printer Again
If updating drivers didn’t work, you might need to completely uninstall the existing drivers and the printer and then reinstall them. The process of doing the same is simple but rather lengthy but this seems to fix some of the common printer problems. Anyway, below are the steps to remove and add your printer back.
- Open the Settings application (Windows key + I) and select Devices .
Move to the Printers & Scanners settings page.
Find the problematic printer in the right-side panel and single click on it to access its options. Select Remove Device , let the process complete, and then close Settings.

- Type Print Management in the Windows search bar (Windows key + S) and press enter to open the application.

- Double-click on All Printers (in the left panel or right panel, both are fine) and press Ctrl + A to select all connected printers.

- Right-click over any printer and select Delete .

Now, it is time to add the printer back, but first, unplug the printer cable from your computer and perform a restart. Once the computer boots back on, properly reconnect the printer.
Follow step 1 and step 2 of this method to open Printer & Scanner settings .
Click on the Add a printer & scanner button at the top of the window.
- Windows will now automatically start looking for any connected printers. If Windows successfully detects the connected printer, click on its entry in the search list and select Add device to add it back otherwise, click on The printer that I want isn’t listed hyperlink.

- In the following window, select the appropriate option by clicking on its radio button (For example, select ‘My printer is a little older. Help me find it’ if your printer doesn’t use USB for connection or select ‘Add a Bluetooth, wireless, or network discoverable printer’ to add a wireless printer) and click on Next .

- Follow the following on-screen instructions to reinstall your printer .
Now that you have successfully reinstalled your printer, let’s print a test page to ensure everything is right back on track.
Open up Windows Settings and click on Devices .
On the Printers and Scanners page, click on the printer you just added back and would like to test, followed by a click on the Manage button.

- Finally, click on the Print a test page option. Muffle your ears & listen carefully for the sound of your printer printing a page and rejoice.

Recommended:
- Fix Windows 7 Updates Not Downloading
- 10 Best Extratorrent.CC Alternative in 2020
- Fix Fallout New Vegas Out of Memory error
The HomeGroup feature of Windows allowed users to share files and resources with other Windows computers over a small network, say their home or office network. With HomeGroup, users could easily share documents, images, media, printers, etc. over a local network easily. However, Microsoft removed this feature from Windows 10 (Version 1803) , which is why after this update, HomeGroup won’t appear in File Explorer, Control Panel or the Troubleshoot screen from this version onwards. Users will no longer be able to share their resources over a network using HomeGroup, but some other Windows will provide file and printer sharing options.

Note that the previously shared files or printers will still be available and will continue to be shared. You can access them through File Explorer. Type the name of the computer and the shared folder name in the following format: \homePC\SharedFolderName. Additionally, you can still access any shared printers through the Print dialog box.
Also, note that the HomeGroup option will still appear when you right-click on a file and select ‘Give access to’. However, it won’t do anything if you click on it.
In this article, we will talk about how you can share files and printers without HomeGroup.
- Share files and printers without HomeGroup on Windows 10
- Method 1: Use an App to Share
- Method 2: Use Onedrive
- Method 3: Share over a Network
- Share Your Files Or Folders
- Access The Shared Folder
- In Case Of Problem
- Sharing Printers
- Connect The Devices To This Printer
Share files and printers without HomeGroup on Windows 10
In the absence of HomeGroup, you can share files using one of the three given methods:
Method 1: Use an App to Share
If you want to share files with someone only a few times and wouldn’t require a regular connection, you can use the Windows Share functionality. To share files using this method,
Go to File Explorer.
Locate the folder where the file you want to share is present.
Select one or more files you want to share . You can share multiple files by pressing down the Ctrl key while selecting files.
Now, click on the ‘ Share ’ tab.
Click on ‘ Share ’.

- Choose the app that you want to share your file through.

Follow any further instructions provided.
Your file will be shared.
You can also send the selected files as an email by clicking on the Email in the Share tab.
Method 2: Use Onedrive
You can also share your OneDrive files saved on your PC. For this,
Go to File Explorer.
Move on to the OneDrive folder where the files you want to share are located.
Right-click on the file that you want to share.
Select ‘ Share a OneDrive link ’.

On doing this, a link to your file will be created and placed on your clipboard.
You can paste and send this link through your desired service like email.
Your file will be shared.
You can also right-click on your file and select ‘ More OneDrive sharing options ’ to configure expiration date, password, edit access, etc.
Method 3: Share over a Network
To share files over a local network, you can use this method. Before, sharing your files over a network, you will have to enable file and printer sharing options.
Enable Network Discovery And Sharing Options
To enable the sharing options,
Click on the Start button on your taskbar.
Click on the gear icon to open Settings.

Click on ‘Network & Internet’ in the settings window.
Click on ‘Sharing options’ .

The advanced sharing settings window will open.
Under the ‘ Private ’ section, click on the radio button for ‘Turn on Network discovery’ .
Ensure that ‘ Turn on automatic setup of networked connected devices ’ checkbox is also checked.

Also enable the ‘ Turn on file and printer sharing ’ radio button.
Further, expand the ‘All Networks’ block.
You can optionally turn on ‘ Public folder sharing ’ if you want people on your home network to be able to access or modify your default public folders.
You can also choose to enable password protected sharing if you need it.

Click on ‘Save changes’ .
Network discovery will be enabled on your computer.
Follow the same steps on each computer on your local network.
All the computers on your network will appear in the ‘ Network’ section of your File Explorer.

Share Your Files Or Folders
Once you have configured these settings on all your desired computers, you can share your files by following the steps below:
Go to File Explorer.
Go to the location of your file or folder that you want to share and right-click on it and select ‘Give access to’ from the menu. Click on ‘Specific people…’

- In the ‘Network access’ window, select the users that you want to share your folder with. If you select a specific user, then the user will have to provide the username and password to access the resource or the user should be logged in to an account with the same credentials on their device. If you select ‘ everyone ’ in the drop-down list, then your resource will be shared with everyone without having to enter credentials.

Click on the Add button after selecting the desired users.
To decide the access permissions, click on the drop-down menu under the ‘Permission Level’ column. Choose read if you want the user to only view the file and not modify it. Select read/write if you want the user to be able to read and make changes to the shared file.

Click on Share .
You will be given the link to the folder.

Note that other devices will be able to access the shared content only if the sharing device is active and connected to the network.
Access The Shared Folder
To access this shared content from some other device you should
Open File Explorer.
Copy and paste the shared link in the address bar.
Or,
Open File Explorer and navigate to the ‘Network’ folder.
Here, you will see the list of connected devices and their shared content or resources.
In Case Of Problem
If you are not able to access the shared content, it is possible that your device is not able to map the computer name of the sharing computer to its IP address . In such a case, you should replace the computer name in the path link directly with its IP address. You will find it in the ‘Network & Internet’ section of settings, under ‘ View your network properties ’.

If the problem persists, it is possible that your device’s firewall is blocking it. To see if this is the problem, you can temporarily disable the firewall on both the devices and try accessing the shared content then. To disable the firewall,
Open Settings.
Go to ‘Update & Security’ .
Click on the ‘Windows Security’ from the left pane.
Click on ‘Firewall & network protection’ under Protection areas.

- Windows Defender Security Center window will open . Click on ‘Private network’ under Firewall & network protection heading.

- Next, disable the toggle under Windows Defender Firewall.

Now, if you can access the shared content, it means that the problem was being caused by the firewall. To fix this,
Open Windows Defender Security Center window as above.
Click on Allow an app through a firewall.

- Ensure that ‘file and printer sharing’ is enabled for the private network.

Sharing Printers
Note that file and printer sharing options should be enabled on your computer. The steps for the same have been already discussed above.
To share with other users on a local network,
- Open settings by clicking on the gear icon in the Start menu. Click on ‘Devices’ .

- Select ‘Printers & scanners’ from the left pane. Select the printer you want to share and click on ‘Manage’ .

Click on ‘Printer properties’ . In the properties window, switch to the Sharing tab.
Type an identification name for this printer.

- Click on Apply. Then click on OK.
Recommended: How To Setup Network Files Sharing On Windows 10
Connect The Devices To This Printer
Open Settings by clicking on the gear icon in the Start menu .
Click on ‘Devices’ .
Select ‘Printers & scanners’ from the left pane.
Click on ‘Add a printer or scanner’ .

- If the printer does not appear, click on ‘The printer that I want isn’t listed’ .

- Click on ‘Select a shared printer by name’ and click on Browse.

Double click on the computer which is sharing the printer. If you don’t know the name of the computer, go to settings on that computer. Type the computer name in the search box and select ‘View your PC name’ . You will see the PC (computer) name under the device name.
Select the shared printer.
Click on Select.
Click on Next.

Click on Next again and then click on Finish.
Do the same on all the computers to which you want the printer to be shared.
For a device with an older v ersion of Windows.
Go to Control Panel.
Click on ‘View devices and printers’ under the ‘Hardware and Sound’ category.

Click on ‘Add a printer’ .
Select the printer if it appears and follow the given instructions.
If your printer does not appear, click on ‘The printer that I want isn’t listed’ .

Click on ‘Select a shared printer by name’ and click on Browse.
Double click on the computer which is sharing the printer.
Select the shared printer .
Click on Select.
Click on Next.
Click on Next again and then click on Finish.
Note that other users will be able to access the printer only when the computer sharing the printer is active.
These were a few ways in which you can easily share your files and printers to other computers without using HomeGroup on Windows 10.
The recent surge of online activity has prompted the downfall of the printer. In an era, where everything can be viewed online with ease, the relevance of the gigantic and bulky printer has started to decrease. However, we are yet to reach a stage where we can neglect the printing device altogether. Until then, if you do not possess the heavy Inkjet and want something printed urgently, here’s a guide to help you decipher how to print documents when you don’t have a printer.
- How to Print Documents When You Don’t Have a Printer
- Method 1: Print Documents as PDF files
- Method 2: Print Webpages as PDF files
- Method 3: Search for Wireless Printers Near You
- Method 4: Find Other Printing Services Around Your Location
- Method 5: Use Google Cloud Print
How to Print Documents When You Don’t Have a Printer
Method 1: Print Documents as PDF files
PDF is a universally accepted format that keeps the document exactly the same across different platforms and devices . There is a possibility that the PDF file of the document you need to print will do the trick instead. Even if softcopies are not an option in your situation, the PDF file makes it easy for you to save web pages and transfer them as documents for future printing. Here’s how you can print to PDF on your PC without a printer:
- Open the Word document that you want to print and click on the File option on the top left corner of the screen.
- From the options that appear, click on ‘Print.’ Alternatively, you can press Ctrl + P to open Print Menu
- Click on the ‘Printer’ drop-down menu and select ‘ Microsoft Print to PDF.’
- Once selected, click on ‘Print’ to continue.
- In the window that appears, type in the name of the PDF file and select the destination folder. Then click on ‘Save.’
- The PDF file will be printed without a printer in the destination folder.
Method 2: Print Webpages as PDF files
Browsers today have adapted to the requirements of the modern-day and introduced new features on their application. One such feature gives users the ability to print webpages as PDF documents on their PC. Here’s how you can print web pages as PDFs:
Open your browser and open the webpage you want to print.
Click on the three dots on the top right corner of the screen.
- From the various options, click on ‘Print.’ You can use the shortcut in the browser as well.
In the print window that opens up, click on the drop-down list in front of the ‘Destination’ menu.
Select ‘Save as PDF.’ You can then proceed to select the pages you want to download and the layout of the print.
- Once done, click on ‘Print’ and a window will appear asking you to select the destination folder. Select the folder and rename the file accordingly and then click on ‘Save’ again.
- The page will be printed as a PDF file without a printer.
Method 3: Search for Wireless Printers Near You
Even if you personally don’t own a printer, all hope is not lost. There is a remote possibility that someone in your neighbourhood or building owns a wireless printer. Once you have found a printer, you can ask the owner to let you take a print out. Here’s how you can scan for printers near you and print without owning a printer:
Press Windows Key + I to open the Settings app on your Windows device.
Click on ‘Devices.’
- From the panel on the left, click on the ‘Printers and Scanners’
- Click on ‘ Add a printer or scanner’ and your PC will find any printers that are operating near you.
Method 4: Find Other Printing Services Around Your Location
Some shops and services serve the specific purpose of getting print outs for their customers. You can search for print shops near your location and print documents there. Alternatively, you can head onto your University library or access the printer in your office to take urgent print outs. Printing options are also available in most internet cafes and public libraries. You can also use services such as PrintDog and UPrint that deliver large print outs to your home.
Method 5: Use Google Cloud Print
If you have a wireless printer at your home and are out of town, you can remotely print pages from your home printer. Head onto the Google Cloud Print website and see if your printer is eligible. Sign in to the app with your Google account and add your printer. Thereafter, while printing, click on the ‘Printers’ option and select your wireless printer to print documents remotely.
Q1. Where to print documents when you don’t have a printer?
With most documents beings shared and viewed through the screen, the printed page no longer holds the same value and the printer no longer seems worth the money. Having said that, there are still times where a hard copy of a document is required for a certain task. During instances like these, you can try using public printing services or ask your neighbours if they could give access to their printers for a brief period.
Q2. When you need to print something urgently, but there is no printer?
Such situations have happened to most of us. Try downloading the PDF of the document or webpage you want to print. The PDF should work as an alternative most of the time. If not, mail the PDF to any printing service near you and ask them to keep a print out ready. You will have to physically go and collect the printout but it is the fastest way possible.
Q3. How can I print from my phone without a printer?
You can print web pages and documents as PDF files from your phone and then print them as hard copies later. On the browser, tap on the three dots on the top right corner and select the ‘share’ option. From the various options available, tap on ‘Print’ and the webpage will be saved as a PDF. The same procedure can be used for Word documents.
Q4. Is there a printer that doesn’t need a computer?
Nowadays, wireless printers are the new norm. These printers often do not require physical connections with PCs or other devices and can download images and documents remotely.
Recommended:
- How To Clear Print Queue In Windows 10?
- Fix Common Printer Problems in Windows 10
- Share files and printers without HomeGroup on Windows 10
- How to Sync Google Calendar with Outlook
