
- How to Reduce PDF File Size Without Losing Quality
- Method 1: Reduce PDF File Size in MS Word
- Method 2: Reduce PDF File Size in Adobe Acrobat
- Method 3: Use Adobe Acrobat PDF Optimizer
- Method 4: Use Third-Party Software
- Method 5: Use Online Tools
- Method 6: Use In-built Compressor on Mac
How to Reduce PDF File Size Without Losing Quality
Whether you are using Windows or Mac, you must avoid scanning docs as PDF as it makes your file unnecessarily large. All the methods mentioned here are very easy and do not require any payment unless you opt for the paid versions. You can choose any of these methods according to your requirement & convenience.
Method 1: Reduce PDF File Size in MS Word
This method is the best option when you have a Word document that you need to convert to PDF. Follow the steps given below to reduce PDF file size in MS Word on Windows PC:
Open the Word document and press F12 key
Expand the Save as type dropdown menu.

- Select PDF option and click on Save.
Note: This process makes the size of PDF files comparatively smaller than the file converted using third-party conversion software.

- To reduce PDF file size to its minimum size, choose Minimum size (publishing online) in the Optimize for option.

- Click Save to reduce your PDF file size.
Method 2: Reduce PDF File Size in Adobe Acrobat
You can also use Adobe Acrobat Reader to reduce PDF file size without losing quality, as follows:
Note: You cannot analyze individual elements separately in this method.
Open the PDF file in Adobe Acrobat.
Go to File > Save as Other > Reduced Size PDF… , as highlighted.

- Choose Acrobat Version Compatibility as per your needs, and click OK.

- Next, click on Save to save your file in the desired location, as illustrated below.

- You will see a black box stating Reducing PDF size as shown.

Once all the steps are completed, this will reduce PDF File Size without losing any quality of the content and images within the file.
Method 3: Use Adobe Acrobat PDF Optimizer
By using Adobe Acrobat PDF Optimizer, you can reduce PDF file size with customization. Adobe Acrobat Pro DC allows you to see all the elements of the PDF file which are affecting its size. You can also see view how much space is being consumed by each element so that you can customize the size of the file, according to your preferences. Here’s how to do so:
Open your PDF file in Adobe Acrobat Pro DC.
Go to File > Save as Other > Optimized PDF … , as shown below.

- Now, click on Audit space usage… button on the top-right corner of the next screen.

in the pop-up that appears with the list of elements consuming space in the file, click on OK.
Choose elements given in the left pane to view details of each element, as illustrated.

You will be able to reduce PDF file size by following the above steps. If you do not have Adobe Acrobat Pro DC software then you can use any third party software to reduce PDF file size on Windows or Mac. Follow the succeeding methods to do the same.
Method 4: Use Third-Party Software
There are many third party software to reduce PDF file size. You can use any of these to reduce PDF file size without losing quality. If you are not sure which software to use, use 4dots Free PDF Compress , as explained below:
- Download 4dots Free PDF Compress and install it on your PC.
Note: 4dots Free PDF Compress software is only available for Windows. If you are a Mac user then you can download any other third party software.
- Once installation is complete, launch it and click on Add file(s) as shown below.

- Select your PDF file and click on Open .

- Your file will be added and all the details of the file will be shown in a table viz Filename, File size, File date, and File location on your device. Adjust image quality using the slider at the bottom of the screen, below the Compress Images option.

- Click on Compress from the top of the screen and click OK , as highlighted.

- Comparison of PDF size before and after compression will be visible. Click OK to finish the process.

Method 5: Use Online Tools
If you do not want to download any software or use Adobe Acrobat, then you can simply, use online tools to reduce PDF file size without losing quality. You just need to search the internet for such tools & upload your file. It will be compressed in no time. Thereafter, you can download it for further use. You can search for online PDF compressing tools in any web browser and you will find a lot of options. Smallpdf and Best PDF are the most popular ones.
Note: We have used Smallpdf as an example here. Smallpdf offers a 7-day free trial if you are a first-time user. You can also use the paid version for more options and tools.
Go to the Smallpdf webpage .
Scroll down to view Most Popular PDF tools and choose the Compress PDF option.

- Select a file from your device by clicking on CHOOSE FILES button as shown.
Note: Alternatively, You can drag and drop the PDF file in the red colored box.

- If you want to compress your file slightly, then choose Basic Compression , or else choose Strong Compression .
Note: The latter would require a paid subscription .

- After you have made your choice, your file will be compressed. Click on Download to download the compressed PDF file.

Method 6: Use In-built Compressor on Mac
If you are a Mac user, you are lucky because Mac comes pre-installed with an inbuilt PDF compressor to reduce PDF file size. Using the Preview App, you can reduce PDF file size and replace the original file with the new one.
Note: Make sure to copy your file before reducing its size.
Launch Preview App .
Click on File > Export To > PDF , as illustrated below.

- Rename the file as you wish and click Save to save the compressed file at the desired location.
Pro Tip: When you want to make a consolidated PDF file from different PDFs, you do not need to take a printout and then scan those. Different PDF files can be combined into one file electronically as well. You can either use Adobe or the options available online. PDF combined electronically will consume lesser space than the PDF made by scanning physical copies of documents.
Q1. How do I reduce the size of a PDF?
Ans. There are a lot of options to reduce the size of PDF, but the easiest & most commonly used is Adobe Acrobat Pro . As most people use Adobe Acrobat to read PDFs, so this method will be feasible to use. Follow the above Method 2 to reduce PDF file size in Adobe Acrobat Pro.
Q2. How do I reduce the size of a PDF so that I can email it?
Ans. If your PDF is too large to mail, you can either use Adobe Acrobat or online tools to compress it. Online tools like Smallpdf, ilovepdf, etc are very easy and quick to use. You just need to search for online PDF compression tools, upload your file and download it, when done.
Q3. How do I reduce the size of a PDF file for free?
Ans. All the methods mentioned in this article are free. So, you can opt for Adobe Acrobat (method 3) for Windows PC and an inbuilt PDF compressor (method 6) for MacBook.
Recommended:
- How to Export WhatsApp Chat as PDF
- Why is My Mac Internet So Slow All of a Sudden?
- How to Open a Pages File on Windows 10
- How to Transfer Music from CD to iPhone
If you’re facing issues in printing your PDF files on Adobe Reader then don’t worry as the problem can be easily solved by updating printer’s driver, setting your printer as the default printer, etc. But before continuing you should try to print another PDF file and if you’re able to print successfully then the PDF file you were earlier trying to print was corrupted. But if you still can’t print pdf files from adobe reader then continue with the advanced troubleshooting guide.
- Fix Can’t Print PDF Files from Adobe Reader
- Method 1: Miscellaneous Fixes
- Method 2: Update Printers driver
- Method 3: Set your Printer as the Default Printer
- Method 4: Try to print PDF as an image
- Method 5: Save another copy of the PDF file
- Method 6: Reinstall your Printer Drivers
- Method 7: Re-install Acrobat Reader
Fix Can’t Print PDF Files from Adobe Reader
Make sure to create a restore point just in case something goes wrong.
Method 1: Miscellaneous Fixes
1.Try to print the webpage you’re currently on, press Ctrl + P and print the document and see if you’re able to.

2.Instead of PDF file try to print a text or images file , if you’re are able to print then the problem is with Adobe Reader and updating it might fix the issue.

3.Power Cycle the Printer:
- Restart your PC and power off the Printer then disconnect it from the PC.
- Don’t start the Printer, just press and hold the power button of the printer for 10 seconds.
- Now connect the printer to the PC then power ON the PC and once the system starts, you can power ON your printer.
Method 2: Update Printers driver
To update the printer driver follow these steps.
1.Press Windows key + X then select Device Manager.

2.Expand Print queues then select the printer for which you want to update the drivers.
3.Right-click on the selected Printer and select Update driver.

4.Select Search automatically for updated driver software.

5.Windows will automatically install the latest drivers available for your printer.

Manually Install the Latest Printer Drivers
1.Press Windows Key + R then type “ services.msc ” and hit enter.

2.Find Print Spooler service then right-click on it and select Stop.

3.Again press Windows Key + R then type printui.exe /s /t2 and hit enter.
4.In the Printer Server Properties window search for the printer that is causing this issue, select it and then click on the Remove button.
5.Next, remove the printer and when asked for confirmation to remove the driver as well, select yes.

6.Now again go to services.msc and right-click on Print Spooler and select Start.

7.Next, navigate to your printer manufacturer’s website like HP , Dell , Canon , download and install the latest printer drivers from the website.
For example , in case you have an HP printer then you need to visit HP Software and Drivers Downloads page . Where you can easily download the latest drivers for your HP printer.
8.If you’re still not able to fix slow network printing error or can’t Print PDF Files from Adobe Reader then you can use the printer software that came with your printer. Usually, these utilities can detect the printer on the network and fix any issues that are causing the printer to appear offline.
For example, you can use HP Print and Scan Doctor to fix any issues regarding HP Printer.
Method 3: Set your Printer as the Default Printer
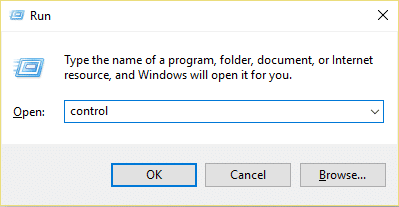
1.Press Windows Key + R then type control and hit Enter to open Control Panel.
2.From the Control Panel click on Hardware and Sound.

3.Next, click on Device and Printers.

- Right-click on your Printer and select Set as default printer.

5.Restart your PC to save changes.
Method 4: Try to print PDF as an image
1.First, open your PDF file in Acrobat Reader.

2.Now from the Adobe Reader toolbar click on the print icon or press Ctrl + P.
3.From the print window, click on the Advanced button.
4.In the Advanced Print Setup window checkmark “ Print As Image ” and click OK.
<img loading=“lazy” src=“https://techcult.com/wp-content/uploads/2019/10/From-the-print-window-click-on-the-Advanced-button.png" onerror=“this.onerror=null;this.src=‘https://blogger.googleusercontent.com/img/a/AVvXsEhe7F7TRXHtjiKvHb5vS7DmnxvpHiDyoYyYvm1nHB3Qp2_w3BnM6A2eq4v7FYxCC9bfZt3a9vIMtAYEKUiaDQbHMg-ViyGmRIj39MLp0bGFfgfYw1Dc9q_H-T0wiTm3l0Uq42dETrN9eC8aGJ9_IORZsxST1AcLR7np1koOfcc7tnHa4S8Mwz_xD9d0=s16000';" alt=“In the Advanced Print Setup window checkmark “Print As Image” and click OK - 38”>
5.Next, click the Print button and see if you’re able to print the PDF file as an image.

Method 5: Save another copy of the PDF file
1.Open the PDF file in Acrobat Reader then press Shift + Ctrl + S to open Save As dialog box.

Note: From the Acrobat Reader menu click on File and select Save As.
2.Navigate to where you want to save the file, type a new name and click Save.

3.Now try to print this newly created PDF and see if you’re able to Fix Can’t Print PDF Files from Adobe Reader.
Method 6: Reinstall your Printer Drivers
1.Press Windows Key + R then type control printers and hit Enter to open Devices and Printers.

- Right-click on your printer and select “ Remove device ” from the context menu.

3.When the confirm dialog box appears , click Yes.

4.After the device is successfully removed, download the latest drivers from your printer manufacturer website .
5.Then reboot your PC and once the system restarts, press Windows Key + R then type control printers and hit Enter.
Note: Make sure your printer is connected to the PC via USB, ethernet or wirelessly.
6.Click on the “ Add a printer ” button under Device and Printers window.

7.Windows will automatically detect the printer, select your printer and click Next.

- Set your printer as default and click Finish.

This is how you can update the driver and after this, you can try to print the documents once again.
Method 7: Re-install Acrobat Reader
1.Press Windows Key + I to open Settings then click on Apps.

2.From the left hand make sure to select Apps & features.
3.Now from the “ Search this list ” box type Acrobat in it.

4.Click on Adobe Acrobat Reader DC then click on the Uninstall button under it.

5.Now download the latest version Adobe Acrobat Reader from the official website .
6.Install the latest version of Acrobat Reader on your PC and Reboot your PC.
7.Again try to print the PDF file and this time you will be able to print it without any issues.
Recommended:
- Fix Windows Media Player Server Execution Failed Error
- 3 Ways to Delete Files Protected by TrustedInstaller
- How to Connect a Bluetooth Device on Windows 10
- How to Format Hard Drive on Windows 10
I hope the above steps were able to help you Fix Can’t Print PDF Files from Adobe Reader but if you still have any queries regarding this guide then feel free to ask them in the comment’s section.
