How to Switch Between Browser Tabs Using Shortcut Key: Most of us know how to switch between different programs in windows, we use shortcut key “ ALT + TAB “. While doing work, usually we open lots of tab in our browser at once. People normally use the mouse to switch between the tabs in the browser. But sometimes it is easier to use the keyboard if we are doing lots of typing and require frequent info from the different tabs in the browser.

In our browser also, there are lots of shortcut key, luckily for a different browser, most of these shortcut key is the same. Browsers like chrome have a different kind of shortcut key for navigating tabs in a unique way. You can just go to the first tab or last tab directly or you can switch one by one from left to right, you can even open the last tab you have closed by these shortcuts key.
- How to Switch Between Browser Tabs Using Shortcut Key
- Switch Between Google Chrome Tabs Using Shortcut Key
- Switch Between Internet Explorer Tabs Using Shortcut Key
- Switch Between Mozilla Firefox Tabs Using Shortcut Key
How to Switch Between Browser Tabs Using Shortcut Key
In this article, we will learn about these different shortcuts key to switch between the tabs in a different browser like Google Chrome, Internet Explorer and Firefox using the below-listed guide.
Switch Between Google Chrome Tabs Using Shortcut Key
- “CTRL+TAB” is the shortcut key to move from left to right tab in the browser, “CTRL+SHIFT+TAB ” can be used to move right to left between the tabs.
2.Some other key can also be used in chrome for the same purpose as “CTRL+PgDOWN” can be used to move from left to right. Similarly, “CTRL+PgUP” can be used to move right to left in chrome.
3.There is an additional shortcut key in chrome is “CTRL+SHIFT+T” to open the last tab you closed, this is a very useful key.
- “CTRL+N” is the shortcut key to open a new browser window.
5.If you want to move directly to tab between 1 to 8, just click key “CTRL + NO. OF TAB” . But it has one constrained which is you can only move between 8 tabs, if you press “ CTRL+9″, it will still take you to the 8 th tab.

Switch BetweenInternet ExplorerTabs Using Shortcut Key
Internet Explorer has almost the same shortcut key as chrome, it is very good as we don’t have to remember lots of keys.
1.If you want to move from left to right, use shortcut key “ CTRL+TAB” or “ CTRL+PgDOWN” and to move right to left shortcut key will be “ CTRL+SHIFT+TAB” or “ CTRL+PgUP” .
2.To move to a tab, we can use the same shortcut key “ CTRL + No. of Tab” . Here, also we have the same constrained, we can only use a number between 1 to 8 like ( CTRL+2 ).
- “CTRL+K” is the shortcut key can be used to open duplicate tab. It would be helpful to take reference.

So, these are some important shortcut key for Internet Explorer. Now, we will learn about Mozilla Firefox shortcut keys.
Switch BetweenMozilla FirefoxTabs Using Shortcut Key
1.Some of the shortcut keys which is common in Mozilla Firefox are CTRL+TAB, CTRL+SHIFT+TAB, CTRL+PgUP, CTRL+PgDOWN and associate one CTRL+SHIFT+T and CTRL+9.
- “CTRL+HOME” and “ CTRL+END” which will move the current tab to the start or the end, respectively.
3.Firefox has shortcut key “ CTRL+SHIFT+E” that opens Tab Group View, where you can choose any tab using left or right arrow.
- “ CTRL+SHIFT+PgUp” move current tab to the left and “ CTRL+SHIFT+PgDOWN” will move the current tab to the right.

These are all shortcut key which can be useful for switching between tabs while working.
Recommended:
- Logout of Gmail or Google Account Automatically (With Pictures)
- Forcefully Clear the Print Queue in Windows 10
- How to Fix Monitor Screen Flickering Issue
- Disable Indexing in Windows 10 (Tutorial)
I hope the above steps were able to help you in learning How to Switch Between Browser Tabs Using Shortcut Key but if you still have any questions regarding this tutorial then feel free to ask them in the comment’s section.
Forcefully Clear the Print Queue in Windows 10: Many of the printer users might have to face the circumstances where you are trying to print something but nothing happens. The reasons for not printing and the print job getting stuck can be many but there is one frequent cause that is when the printer queue has a stuck with its print jobs. Let me take a scenario where you previously tried to print something, but that time your printer was off. So, you skipped the printing of document at that moment & you forgot about it. Later or after few days, you again plan to give a print; but the job for printing is already listed in the queue and hence, as the queued job didn’t automatically get removed, you current print command will remain at the end of queue and won’t get print printed until all other listed jobs get printed.

There are cases when you can manually go in & remove the print job but this will keep on happening. In such type of scenario, you have to clear your system’s print queue manually following some specific steps. This article will show you how to Forcefully Clear the Print Queue in Windows 10 using the below-listed guide. In case your Microsoft Windows 7, 8, or 10 is having a lengthy list of corrupt print jobs, you can take adequate measure to Forcefully Clear the Print Queue by following the technique mentioned below.
- How to Forcefully Clear the Print Queue in Windows 10
- Method 1: Manually Clear Print Queue
- Method 2: Clear Print Queue Using Command Prompt
How to Forcefully Clear the Print Queue in Windows 10
Make sure to create a restore point just in case something goes wrong.
Method 1: Manually Clear Print Queue
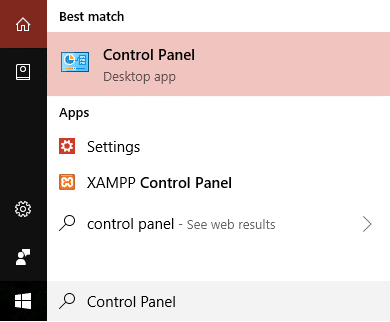
1.Go to Start and search “ Control Panel ”.
2.From “ Control Panel ”, go to “ Administrative Tools ”.

3.Double click the “ Services ” option. Scroll down in the list to search for “ Print Spooler ” service.

4.Now right-click on Print Spooler service and select “ Stop ”. In order to perform this, you have to be logged in as Administrator-mode.

5.It is to be noted that, at this stage, no user of this system will be able to print anything on any of your printers which are connected to this server.
6.Next, what you have to do is, to visit the following path: C:\Windows\System32\spool\PRINTERS

Alternatively, you can manually type “ %windir%\System32\spool\PRINTERS ” (without quotes) in your system Explorer’s address bar when your C drive is not having the default Windows partition.
7.From that directory, delete all the existing files from that folder . This action of your will clear all print queue jobs from your list. In case you are performing this on a server, it is a better thought to first make certain no other print jobs are in the list for processing, in association with any printers because the above step will also delete those print jobs from the queue as well.
8.One last thing left, is to go back to the “ Services ” window and from there right-click the Print Spooler service & choose “ Start ” for starting the print spooling service back again.

Method 2: Clear Print Queue Using Command Prompt
There is an alternate option also to perform the same entire cleaning queue process. Just you have to use a script, code it and execute it. What you can do is create a batch file (blank notepad > put the batch command > File > Save As > filename.bat as ‘All files’) with any file name (let suppose printspool.bat) and put the below-mentioned commands or you can even type them in the command prompt (cmd) also:
net stop spooler

del %systemroot%\System32\spool\printers\* /Q /F /S

net start spooler

Recommended:
- Logout of Gmail or Google Account Automatically (With Pictures)
- No Sound in Windows 10 PC [SOLVED]
- What is Checksum? And How to Calculate Checksums
- Disable Indexing in Windows 10 (Tutorial)
I hope the above steps were helpful and now you can Forcefully Clear the Print Queue in Windows 10 whenever you want but if you still have any questions regarding this tutorial then feel free to ask them in the comment’s section.
