Microphone Volume low in Windows? Here is how to boost it! You brought a new headphone to listen to your favorite songs or record your voice. While recording your voice or during a video chat, you notice that the mic volume of your headphone is not good . What could be the problem? Is it your new headphone hardware issue or software/driver issue? These two things strike in your mind at the time when you experience some audio problem with your gadgets in Windows. However, let us tell you that whether it is headphone mic or your system mic, mic related problems can be easily resolved without mulling over the software or hardware issues.

One of the most common problems that we all might have faced is not transmitting the right volume of voice to the other end user on voice or video call through our system. It is a fact that not all microphone has the same base volume to transmit your voice. However, there is an option to increase the mic volume in Windows. Here we will especially discuss the Windows 10 OS, which is the latest and one of the successful operating systems of Windows.
- How to Increase Microphone Volume in Windows 10
- Method 1 – Microphone Volume Setting
- Method 2 – Advanced Tab Setting Changes
- Method 3 – Communications Tab Setting Changes
How to Increase Microphone Volume in Windows 10
Make sure to create a restore point just in case something goes wrong.
Method 1 – Microphone Volume Setting
Step 1 – Right-click on the volume icon (speaker icon) on the taskbar on the right corner.
Step 2 – Here select the Recording Device option or Sounds . Now you will see a new dialogue box open on your screen with several options.
Step 3 – Here you need to locate the active microphone of your choice . Your system can have more than one microphone. However, the active one will have a green tick mark . Select and right-click on the active microphone option.

Step 4 – Now choose the properties option of the selected active microphone.

Step 5 – Here on the screen, you will see multiple tabs, you need to navigate to the “ Levels ” section.
Step 6 – The first thing that you need to change is to increase the volume up to 100 using the slider. If it solves the problems, you are good to go otherwise you need to make changes in the microphone boost section also.

Step 7 – If the problem is not yet solved in terms of transmitting the right volume of voice, you should go ahead and increase the microphone boost. You can increase it up to 30.0 dB.
Note: While increasing or decreasing the microphone boost, it is good to communicate with the other person via the same microphone so that you can get feedback about how your microphone is working or transmitting the right volume of voice or not.
Step 8 – Once done, just click on the Ok and apply the changes.
The changes will be applied immediately, so you can test your microphone instantly. This method will definitely help you to increase Microphone Volume in Windows 10, but if you’re still facing the issue then continue with the next method.
Method 2 – Advanced Tab Setting Changes
In case, above-mentioned steps did not result in solving your microphone problem, you can choose the ‘ Advanced ’ tab option from the Properties section of your active microphone that you have selected in step 4.
Under the advanced tab, you will be able to find two by default formats selection. However, rarely it impacts on the microphone settings but still, some users reported that their microphone problems solved by changing the Advanced settings. Here you need to uncheck “ Allow applications to take exclusive control of this device ” and “ Give exclusive mode applications priority ” then save the settings. Most probably, your microphone volume will be increased to the level so that it starts transmitting the right volume of voice to the end users.

Method 3–Communications Tab Setting Changes
If the above methods did not result in increasing the microphone volume, you can try this method to increase Microphone Volume in Windows 10. Here you need to select the “ Communications ” tab. If we start from scratch, you need to ‘right-click’ on the speaker icon on the taskbar and open recording device and choose the communication tab.
1.Right-click on Speaker Icon on the taskbar and click on Recording device or Sound.
2.Switch to the Communication tab and tick mark the option “ Do Nothing ”.

3.Save and apply changes.
Usually, here the default option is “ Reduce the volume of other sources by 80% ”. You need to change it to “ Do Nothing ” and apply the changes to check whether the problem is solved and you start getting the better microphone volume.
Most probably the above methods will help you in increasing the microphone volume of your system and/or headphone. All you need to do is follow the steps properly to ensure that you are connected with the microphone and active. It is necessary to ensure that the microphone you are trying to increase volume is active. It would be possible that you might have more than one microphone installed on your system. Therefore, you need to check which one you want to use to increase its volume so that you can make further changes in the same one in the settings.
Recommended:
- How to Change Default System Font in Windows 10
- Get Your Printer Back Online in Windows 10
- What is an MKV file and how to open it?
- Run Android Apps on Windows PC
I hope this article was helpful and now you can easily Increase Microphone Volume in Windows 10 , but if you still have any questions regarding this tutorial then feel free to ask them in the comment’s section.
How to Get Your Printer Back Online: There may be situations where you need to print any file for an urgent meeting and you need to submit those files in 30 minutes. So what you usually do is open the file and go to print option to print the document. But suddenly you noticed that in the bottom right corner of your system the status of your printer is showing as offline. This is a usual problem for users because even when your Printer is clearly ON and ready to print, the status is showing offline.
This is caused by the communication error viz The Active Directory Domain Services is Currently Unavailable error of the printer with your system. There is no particular cause for this error but the issue could be caused because of outdated or incompatible drivers, conflict of printer spooler services, a problem with physical or hardware connection of the printer to PC, etc. So without wasting any time let’s see How to Get Your Printer Back Online in Windows 10 with the help of the below-listed tutorial.
- How to Get Your Printer Back Online in Windows 10
- Method 1: Check Your Printer Connection
- Method 2: Update Printer Driver
- Method 3: Change the Printer Status
- Method 4: Restart Print Spooler Service
- Method 5: Use a Second Printer
- Method 6: Reinstall your Printer Drivers
How to Get Your Printer Back Online in Windows 10
Make sure to create a restore point just in case something goes wrong.
Method 1: Check Your Printer Connection
When there is an error showing your status of the printer as offline, the system wants to tell users that there is something wrong with the communication established between the printer and the system through the USB cable or network connection. To solve this issue the steps are:
- To restart your printer, off the power supply of the printer & then switch it ON again.
- Now again check the connection of your printer.
- If the connection of your system with the printer is made using a USB cable, make sure your cable is working properly and the connections to the ports are fitted tight. You could also switch the USB port to see if this resolves the problem.
- If the connection of your system with the printer is made through wired networks, check whether the connection to your cable is properly done or not. Also, you can check whether the signal to your printer is flashing or not.
- If the connection of your system with the printer is made through a wireless network, make sure your printer is connected to your computer network & the wireless icon will lit-up to show that you are connected.
If nothing works then you should try to run Printer Troubleshooter:
1.Type “troubleshooting” in Control Panel then click on Troubleshooting from the search result.
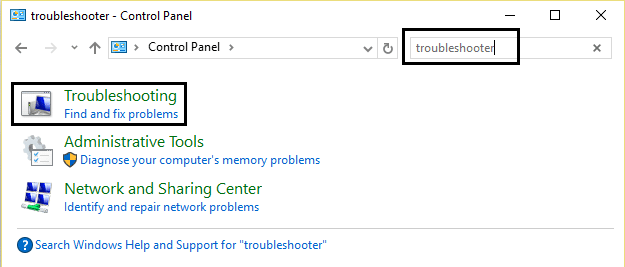
2.Next, from the left window pane select View all.
3.Then from the Troubleshoot computer problems list select Printer.

4.Follow on-screen instruction and let the Printer Troubleshooter run.
5.Restart your PC and you may be able to Get Your Printer Back Online in Windows 10, if not then continue with the next method.
Method 2: Update Printer Driver
1.Press Windows Key + R then type “ services.msc ” and hit enter.

2.Find Print Spooler service then right click on it and select Stop.

3.Again press Windows Key + R then type printui.exe /s /t2 and hit enter.
4.In the Printer Server Properties window search for the printer which is causing this issue.
5.Next, remove the printer and when asked for confirmation to remove the driver as well, select yes.

6.Now again go to services.msc and right-click on Print Spooler and select Start.

7.Next, navigate to your printers manufacturer website, download and install the latest printer drivers from the website.
For example , in case you have an HP printer then you need to visit HP Software and Drivers Downloads page . Where you can easily download the latest drivers for your HP printer.
8.If you’re still not able to fix Printer Offline Status then you can use the printer software that came with your printer. Usually, these utilities can detect the printer on the network and fix any issues that are causing the printer to appear offline.
For example, you can use HP Print and Scan Doctor to fix any issues regarding HP Printer.
Method 3: Change the Printer Status
1.Turn off your Printer and then again turn it back ON.
2.Now press the key combination Windows Key + I to open Settings.
3.Now click on “ Devices ” then from the left-hand side menu select “ Bluetooth & other devices ” option.

4.Under Related settings click on “ Devices and printers “.

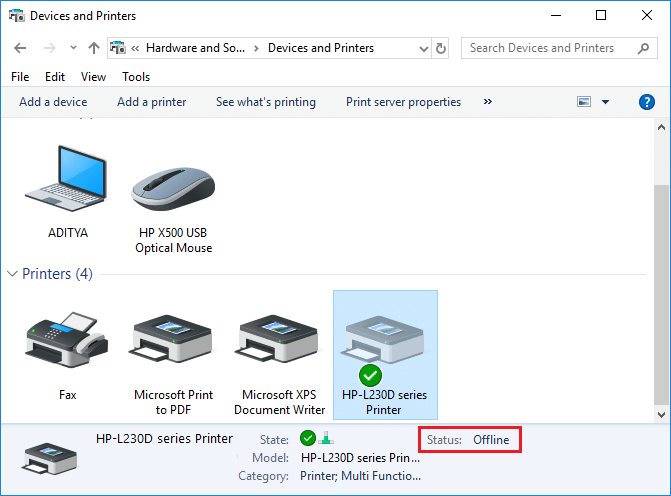
5.Then, you have to right-click on the printer icon with a green check-mark and choose “ See what’s printing ”.

Note: If there is no default printer set, then right-click on your printer and select “ Set as default printer “.

6.You will see the printer queue, see if there are any unfinished tasks and make sure to remove them from the list.

7.Now from the printer queue window, select your Printer and uncheck the “Use Printer Offline” & “ Pause Printer ” option.

Method 4: Restart Print Spooler Service
1.Use the shortcut key combination Windows Key + R to open the Run application.
2.Now type in there “ services.msc ” and hit Enter or click OK.
3.Scroll down to look for “ Print Spooler ” from the service utility window an check whether the status is running or not.
4.If you cannot see the status, you can right-click on Print Spooler and choose “ Start ”.
5.Or else, double-click on Print Spooler service & make sure the Startup type is set to Automatic and the service is running, then click on Stop and then again click on start in order to restart the service.

6.Click Apply followed by OK.
7.After that, again try to add the printer and see if you’re able to Get Your Printer Back Online in Windows 10.
Method 5: Use a Second Printer
This approach of solving the issue will work only when the printer is connected via a network to the PC (instead of the USB cable). Otherwise, you can manually set your IP address for your printer.
1.Press Windows Key + I to open Settings then click on Devices.
2.From the left-hand menu click on “ Bluetooth & other devices “.
3.Now from the right window pane click on “ Devices and printers “.
4.Right-click on your printer and select Printer properties from the context menu.

5.Switch to Ports tab then click on the “ Add Port… ” button.

6.Choose “ Standard TCP/IP Port ” under Available port types and then click on the New Port button.

7.On the Add Standard TCP/IP Printer Port Wizard click on Next .

8.Now type in the Printers IP Address and Port name then click Next.

Note: You could easily find the IP address of your printer on the device itself. Or you could find these details on the manual that came with the printer.
9.Once you successfully added the Standard TCP/IP Printer, click Finish.

See if you’re able to Get Your Printer Back Online in Windows 10 , if not then you need to reinstall your printer drivers.
Method 6: Reinstall your Printer Drivers
1.Press Windows Key + R then type control printers and hit Enter to open Devices and Printers.

- Right-click on your printer and select “ Remove device ” from the context menu.

3.When the confirm dialog box appears , click Yes.

4.After the device is successfully removed, download the latest drivers from your printer manufacturer website .
5.Then reboot your PC and once the system restarts, press Windows Key + R then type control printers and hit Enter.
Note: Make sure your printer is connected to the PC via USB, ethernet or wirelessly.
6.Click on the “ Add a printer ” button under Device and Printers window.

7.Windows will automatically detect the printer, select your printer and click Next.

- Set your printer as default and click Finish.

Recommended:
- How to Change Default System Font in Windows 10
- What is an MKV file and how to open it?
- Fix Destination Path Too Long Error
- How to Find My Router’s IP Address?
I hope this article was helpful and now you can easily Get Your Printer Back Online in Windows 10 , but if you still have any questions regarding this guide then feel free to ask them in the comment’s section.
