Fix Numeric Keypad Not Working in Windows 10: Many users are reporting that after upgrading to Windows 10 the number keys or numeric keypad is not working but the problem can be solved using simple troubleshooting steps. Now the number keys we are talking about are not the numbers which are found on the top of the alphabets on the QWERTY computer keyboard, instead, they are the dedicated numeric keypad on the right-hand side of the keyboard.

Now there is no particular reason which can cause Number keys Not Working issue on Windows 10 after the update. But first you need to enable the number pad feature in Windows 10 and then you need to follow the guide to fix the issue. So without wasting any time let’s see how to Fix Numeric Keypad Not Working in Windows 10 with the help of below-listed troubleshooting guide.
- Numeric Keypad Not Working in Windows 10 [SOLVED]
- Method 1: Enable the numeric keypad
- Method 2: Turn ON the Num Lock Key
- Method 3: Disable Use the numeric keypad to move mouse option
- Method 4: Perform Clean Boot
Numeric Keypad Not Working in Windows 10 [SOLVED]
Make sure to create a restore point just in case something goes wrong.
Method 1: Enable the numeric keypad
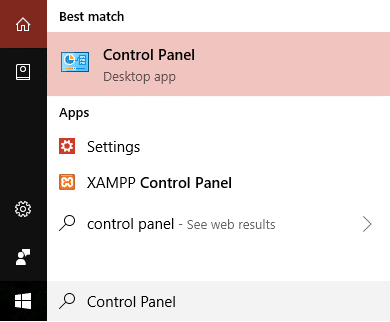
1.Type control in Windows Search then click on Control Panel to open it.
2.Now click on Ease of Access then click Ease of Access Center.

3.Under-Ease of Access Center click on “ Make the keyboard easier to use “.

4.First, uncheck the option “ Turn on Mouse Keys ” and then uncheck “ Turn on Toggle Keys by holding down the NUM LOCK key for 5 seconds “.

5.Click Apply followed by OK.
6.Reboot your PC to save changes.
Method 2: Turn ON the Num Lock Key
If the Num Lock Key is turned off then you won’t be able to use the dedicated numeric keypad on your keyboard, so enabling Num Lock seems to fix the issue.
On the numeric keypad look for the Num Lock or NumLk button , just press it once to enable the numeric keypad. Once the Num Lock is ON you will be able to use the numbers on the numeric keypad on the keyboard.

Method 3: Disable Use the numeric keypad to move mouse option
1.Press Windows Key + I to open Settings then click on Ease of Access.

2.From the left-hand menu click on Mouse.
3.Make sure to disable the toggle for “ Use numeric keypad to move mouse around the screen. “

4.Close everything and reboot your PC.
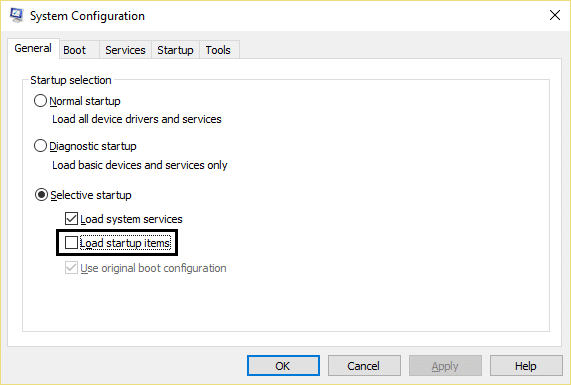
Method 4: Perform Clean Boot
Sometimes 3rd party software can conflict with Windows and can cause the issue. In order to Fix Numeric Keypad Not Working in Windows 10 , you need to perform a clean boot on your PC then again try to access Numpad.
Recommended:
- How to fix Printer not activated Error Code 20
- Fix Webcam not working after Windows 10 Anniversary Update
- Fix CD/DVD Drive not able to read discs
- Schedule Computer Shutdown using Task Scheduler
That’s it you have successfully Fix Numeric Keypad Not Working in Windows 10 but if you still have any queries regarding this guide then feel free to ask them in the comment’s section.
How to fix Printer not activated Error Code 20: If you’re facing the error message “Printer not activated – Error Code 20” then you’re at the right place as today we are going to see how to fix the issue. The issue is generally seen in systems in which user have upgraded from earlier version of Windows or using the QuickBooks software. In anyway case, let’s see how to fix Printer not activated Error Code 20 with the help of the below-listed guide.

- How to fix Printer not activated Error Code 20
- Method 1: Set the Default Printer
- Method 2: Re-install the USB Composite Device from Device Manager
- Method 3: Run Printer Troubleshooter
- Method 4: Registry Fix
- Method 5: Grant Permission using PowerShell
- Method 6: Reinstall QuickBook
How to fix Printer not activated Error Code 20
Make sure to create a restore point just in case something goes wrong.
Method 1: Set the Default Printer
1.Type control in Windows Search then click on Control Panel.
2.Click Hardware and Sound and then select Devices and Printers.

3.Right-click on your printer and select Set as a default printer.

4.Restart your PC to save changes.
Method 2: Re-install the USB Composite Device from Device Manager
1.Press Windows Key + R then type devmgmt.msc and hit Enter.

2.Expand Universal Serial Bus Controllers.
3.Right-click on USB Composite Device and select Uninstall.

4.If asks for confirmation select Yes/OK.
- Disconnect the Printer USB from the PC and then reconnect it.
6.Follow the instructions in the Found New Hardware wizard to install the drivers.

7.Right-click the printer icon, and then click Print Test Page to print a Windows self-test page.
8.Restart your PC to save changes.
Method 3: Run Printer Troubleshooter
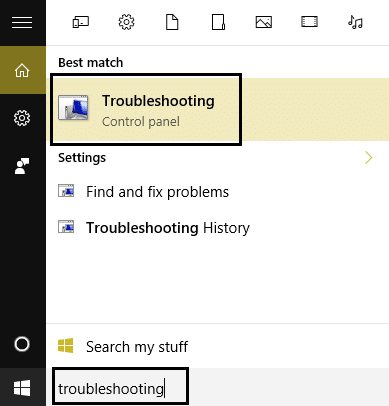
1.type “troubleshooting” in Windows Search bar and click on Troubleshooting.
6.Next, from the left window pane select View all.
7.Then from the Troubleshoot computer problems list select Printer.

8.Follow on-screen instruction and let the Printer Troubleshooter run.
9.Restart your PC and you may be able to Fix Printer not activated Error Code 20.
Method 4: Registry Fix
1.Press Windows Key + R then type regedit and hit Enter to open Registry Editor.

2.Navigate to the following registry key:
HKEY_CURRENT_CONFIG\Software
3.Right-click on Software folder then select Permissions.

4.Now in the permission window, ensure that Administrator and users have Full Control checked, if not then checkmark them.

5.Click Apply followed by OK.
6.Restart your PC to save changes and see if you’re able to fix the issue.
Method 5: Grant Permission using PowerShell
1.Type powershell in Windows Search then right-click on PowerShell and select Run as Administrator.

2.Now type the following command in PowerShell and hit Enter:
PowerShell.exe -NoProfile -NoLogo -NonInteractive -Command “$key = [Microsoft.Win32.Registry]::CurrentConfig.OpenSubKey(‘Software’,[Microsoft.Win32.RegistryKeyPermissionCheck]::ReadWriteSubTree,[System.Security.AccessControl.RegistryRights]::ChangePermissions); $acl =$key.GetAccessControl(); $rule = New-Object System.Security.AccessControl.RegistryAccessRule (‘Users’,’FullControl’,’ObjectInherit,ContainerInherit’,’None’,’Allow’); $acl.SetAccessRule($rule); $key.SetAccessControl($acl);”

3.Reboot your PC to save changes.
Method 6: Reinstall QuickBook
1.Press Windows Key + R then type appwiz.cpl and hit Enter.

2.Find QuickBook from the list and uninstall it.
3.Next, download QuickBooks from here .
4.Run the installer and follow on-screen instructions to install QuickBook.
5.Restart your PC.
Recommended:
- Fix BAD_SYSTEM_CONFIG_INFO Error
- Fix Webcam not working after Windows 10 Anniversary Update
- How to Fix PNP Detected Fatal Error Windows 10
- Fix ERR_EMPTY_RESPONSE Google Chrome Error
That’s it you have successfully Fix Printer not activated Error Code 20 but if you still have any queries regarding this post then feel free to ask them in the comment’s section.
