Fix Pin to Start Menu Option is Missing in Windows 10: In Windows 10 when a user right-clicks on files or folders, the context menu which comes up contains an option “Pin to Start Menu” which pins that program or file to the Start Menu so that it is easily accessible by the user. Similarly when a file, folder or a program is already pinned to Start Menu the above context menu which comes up by right-clicking shows an option “Unpin from Start Menu” which remove the said program or file from the Start Menu.

Now imagine Pin to Start Menu and Unpin from Start Menu options are missing from your context menu, what would you do? Well for starters you wouldn’t be able to pin or unpin files, folders or programs from the Windows 10 Start Menu. In short, you won’t be able to customize your Start Menu which is an annoying issue for Windows 10 users.

Well, the main cause of this program seems to be corrupted registry entries or some 3rd party program have managed to change the value of NoChangeStartMenu and LockedStartLayout registry entries. The above settings can also be changed via Group Policy Editor, so you have to verify from where the settings have been changed. So without wasting any time let’s see how to actually Fix Pin to Start Menu Option is Missing issue in Windows 10 with the below-listed steps.
- Pin to Start Menu Option is Missing in Windows 10 [SOLVED]
- Method 1: Registry Fix
- Method 2: Change the Settings from gpedit.msc
- Method 3: Delete Files and Folder in AutomaticDestinations
- Method 4: Run SFC and CHKDSK
- Method 5: Run DISM Tool
- Method 6: Run CCleaner and Malwarebytes
Pin to Start Menu Option is Missing in Windows 10 [SOLVED]
Make sure to create a restore point just in case something goes wrong.
Method 1: Registry Fix
1.Press Windows Key + R then type notepad and hit Enter.
2.Copy the following text and paste it in the notepad file:
Windows Registry Editor Version 5.00


[HKEY_CLASSES_ROOT\Folder\shellex\ContextMenuHandlers\PintoStartScreen]

@="{470C0EBD-5D73-4d58-9CED-E91E22E23282}"


[HKEY_CLASSES_ROOT\exefile\shellex\ContextMenuHandlers\PintoStartScreen]

@="{470C0EBD-5D73-4d58-9CED-E91E22E23282}"


[HKEY_CURRENT_USER\SOFTWARE\Microsoft\Windows\CurrentVersion\Policies\Explorer]

"NoChangeStartMenu"=-


[HKEY_LOCAL_MACHINE\SOFTWARE\Microsoft\Windows\CurrentVersion\Policies\Explorer]

"NoChangeStartMenu"=-


[HKEY_CURRENT_USER\SOFTWARE\Policies\Microsoft\Windows\Explorer]

"LockedStartLayout"=-


[HKEY_LOCAL_MACHINE\SOFTWARE\Policies\Microsoft\Windows\Explorer]

"LockedStartLayout"=-

3.Now click File > Save as from the notepad menu.
4.Select “ All Files ” from the Save as type dropdown.

5.Name the file as Pin_to_start_fix.reg (The extension .reg is very important) and save the file to your desired location.
- Double-click on this file and click Yes to continue.

7.Reboot your PC to save changes.
This should Fix Pin to Start Menu Option is Missing in Windows 10 but if it didn’t then continue to the next method.
Method 2: Change the Settings from gpedit.msc
Note: This method won’t work for Windows Home edition users.
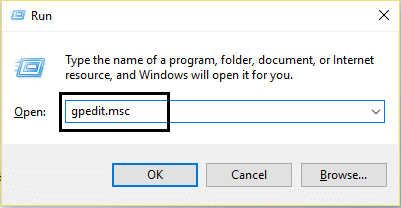
1.Press Windows Key + R then type gpedit.msc and hit Enter to open Group Policy Editor.
2.Navigate to the following setting by double clicking on each of them:
User Configuration > Administrative Templates > Start Menu and Taskbar

3.Find Remove pinned programs list from the Start Menu and Remove pinned programs from the Taskbar in the settings list.

4.Double-click on each of them and make sure both settings are set to Not configured.
5.If you have changed the above setting to Not configured then click Apply followed by OK.
6.Again find the Prevent users from customizing their Start screen and Start Layout settings.

7.Double-click on each of them and make sure they are set to Disabled.

8.Click Apply followed by OK.
9.Reboot your PC to save changes.
Method 3: Delete Files and Folder in AutomaticDestinations
1.Press Windows Key + R then type the following and hit Enter:
%appdata%\Microsoft\Windows\Recent\AutomaticDestinations
Note: You could also browse to the above location like this, just make sure you have enabled show hidden files and folders:
C:\Users\Your_Username\AppData\Roaming\Microsoft\Windows\Recent\AutomaticDestinations

2.Delete all the content of the folder AutomaticDestinations.
2.Reboot your PC and see if the issue Pin to Start Menu Option is Missing is resolved or not.
Method 4: Run SFC and CHKDSK
1.Press Windows Key + X then click on Command Prompt(Admin).

2.Now type the following in the cmd and hit enter:
Sfc /scannow

sfc /scannow /offbootdir=c:\ /offwindir=c:\windows (If above fails)

3.Again open Command Prompt with admin privileges and type the following command and hit Enter:
chkdsk C: /f /r /x

Note: In the above command C: is the drive on which we want to run check disk, /f stands for a flag which chkdsk the permission to fix any errors associated with the drive, /r let chkdsk search for bad sectors and perform recovery and /x instructs the check disk to dismount the drive before beginning the process.
4.It will ask to schedule the scan in the next system reboot, type Y and hit enter.
5.Wait for the above process to finish and then Restart your PC to save changes.
Method 5: Run DISM Tool
1.Press Windows Key + X then select Command Prompt (Admin).
2.Try these command sin sequence:
Dism /Online /Cleanup-Image /StartComponentCleanup Dism /Online /Cleanup-Image /RestoreHealth

3.If the above command doesn’t work then try on the below:
Note: Replace the C:\RepairSource\Windows with the location of your repair source (Windows Installation or Recovery Disc).
4.Reboot your PC to save changes and see if you are able to Fix Pin to Start Menu Option is Missing in Windows 10 or not.
Method 6: Run CCleaner and Malwarebytes
1.Download and install CCleaner & Malwarebytes.
- Run Malwarebytes and let it scan your system for harmful files.
3.If malware is found it will automatically remove them.
4.Now run CCleaner and in the “Cleaner” section, under the Windows tab, we suggest checking the following selections to be cleaned:
5.Once you’ve made certain the proper points are checked, simply click Run Cleaner, and let CCleaner run its course.
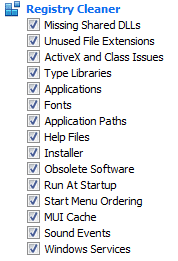
6.To clean your system further select the Registry tab and ensure the following are checked:
7.Select Scan for Issue and allow CCleaner to scan, then click Fix Selected Issues.
8.When CCleaner asks “ Do you want backup changes to the registry? ” select Yes.
9.Once your backup has completed, select Fix All Selected Issues.
10.Restart your PC.
- Fix Windows Update Error 0x80246002
- How To Fix Autoplay not working in Windows 10
- Fix Spinning Blue Circle Next to Mouse Cursor
- Fix Desktop Icons Changed to Tile View Mode
That’s it you have successfully Fix Pin to Start Menu Option is Missing in Windows 10 but if you still have any questions regarding this guide then feel free to ask them in the comment’s section.
Fix Spinning Blue Circle Next to Mouse Cursor: If you have recently upgraded to Windows 10 then chances are you may have faced this issue where a constant blue flashing loading circle appears next to your Mouse cursor. The main reason why this spinning blue circle appears next to your mouse pointer is because of a task that seems to be constantly running in the background and not letting the user to conduct their task smoothly. This may happen when a task running in the background is not completing as it should be and hence it keeps on using the Windows resource to load its processes.

User’s affected with this problem seems to be using Fingerprint scanner which is causing all the trouble for them but the issue not limited to this as this problem can also be caused because of outdated, corrupted or incompatible 3rd party software drivers. So without wasting any time let’s see how to actually Fix Spinning Blue Circle Next to Mouse Cursor issue in Windows 10 with the below-listed troubleshooting guide.
- Fix Spinning Blue Circle Next to Mouse Cursor
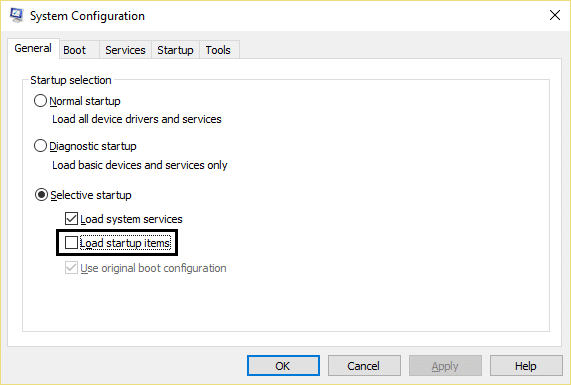
- Method 1: Perform a Clean Boot
- Method 2: Stop OneDrive Syncing process
- Method 3: Repair MS Office Installation
- Method 4: End Spooler process
- Method 5: Kill Nvidia Streamer Service
- Method 6: Temporarily disable Antivirus and Firewall
- Method 7: Disable Mouse Sonar
- Method 8: For HP users or for users who have biometric devices
- Method 9: Uninstall Asus Smart Gesture
Fix Spinning Blue Circle Next to Mouse Cursor
Make sure to create a restore point just in case something goes wrong.
Method 1: Perform a Clean Boot
Sometimes 3rd party software can conflict with Windows Cursor and therefore, the Spinning Blue Circle Next to Mouse Cursor can occur because of this issue. In order to fix Spinning Blue Circle Next to Mouse Cursor problem, you need to perform a clean boot in your PC and diagnose the issue step by step.
Method 2: Stop OneDrive Syncing process
Sometimes this issue can occur because of OneDrive syncing process, so in order to resolve this issue right-click on OneDrive icon and hit Stop Syncing. If you still stuck then uninstall everything related to OneDrive.This should Fix Spinning Blue Circle Next to Mouse Cursor issue without any problem but if you’re still stuck on the issue then continue with the next method.

Method 3: Repair MS Office Installation
- Type control in Windows Search then click on Control Panel from the search result.

- Now click Uninstall a program and select MS Office from the list.

Right-click on Microsoft Office and select Change.
Then select Repair from the list of options and follow the on-screen instruction to complete the repair process.

5.Reboot your PC to fix the issue.
Method 4: End Spooler process
If you have accidentally clicked the print option while there is no printer attached to your system this could cause the spinning blue circle next to the mouse cursor issue in Windows 10. What happens when you click the print option, the print process called as spool or spooler service started running in the background and as there is no printer attached it keeps on running even if you reboot your PC, it again picks up the spooling process in order to complete the print process.
- Press Ctrl + Shift + Esc key together to open Task Manager.

Find the process with the name spool or spooler then right-click on it and select End Task.
Close the Task Manager and check if the issue is resolved or not.
Method 5: Kill Nvidia Streamer Service
Open Task Manager and kill the service called Nvidia Streamer then check if the problem is resolved or not.
Method 6: Temporarily disable Antivirus and Firewall
Sometimes the Antivirus program can cause NVIDIA Drivers Constantly Crash and in order to verify this is not the case here, you need to disable your antivirus for a limited time so that you can check if the error still appears when the antivirus is off.
- Right-click on the Antivirus Program icon from the system tray and select Disable.

- Next, select the time frame for which the Antivirus will remain disabled.

Note: Choose the smallest amount of time possible for example 15 minutes or 30 minutes.
Once done, check if the error resolves or not.
Type control in Windows Search then click on Control Panel from the search result.
Next, click on System and Security.
Then click on Windows Firewall.

- Now from the left window pane click on Turn Windows Firewall on or off.

- Select Turn off Windows Firewall and restart your PC. This would definitely Fix Spinning Blue Circle Next to Mouse Cursor problem.
If the above method doesn’t work make sure to follow the exact same steps to turn on your Firewall again.
Method 7: Disable Mouse Sonar
- Again open Control Panel then click Hardware and Sound.

- Under Hardware and Sound click on Mouse under Devices and Printers.

- Switch to the Pointer Options and uncheck “ Show location of pointer when I press the CTRL key. ”

Click Apply followed by OK.
Reboot your PC to save changes.
Method 8: For HP users or for users who have biometric devices
- Press Windows Key + R then type devmgmt.msc and hit Enter to open Device Manager.

- Now expand Biometric Devices and then right-click on Validity Sensor.

Select Disable from the context menu and close Device Manager.
Reboot your PC and this should fix the issue, if not then continue.
If you’re on an HP laptop, launch HP SimplePass.
Click on the gear icon on the top and Uncheck LaunchSite under Personal Settings.

- Next, click Ok and close HP SimplePass. Restart your PC to save changes.
Method 9: Uninstall Asus Smart Gesture
If you have an ASUS PC then the main culprit in your case seems to be the software called Asus Smart Gesture. Before uninstalling you could end the process for this service from Task Manager, if it didn’t resolve the issue then you can go ahead with the uninstallation of Asus Smart Gesture software.
- Fix Reconnect your drive warning on Windows 10
- How To Fix Autoplay not working in Windows 10
- Fix Error 1962 No Operating System Found
- Fix Driver WUDFRd failed to load
That’s it you have successfully Fix Spinning Blue Circle Next to Mouse Cursor but if you still have any questions regarding this guide then feel free to ask them in the comment’s section.
