Discord is a great medium to connect to millions of people via the features like voice calls, video chat, and messaging. This platform allows you to interact with your friends and make some new ones too. If you have been using it all along and want to know what happens when you disable your Discord account, you are at the right place. It is indeed enlightening to engage in new conversations on Discord. However, it can sometimes become overwhelming to use it all day long, just like any other social media app. And it might also make you think about disabling your account for good. So, let us discuss what exactly to do for a disabled Discord account.

- What Happens When You Disable Your Discord Account?
- What happens if and when you disable Discord account?
- How to Disable Account From Discord Website?
- How to Deactivate Discord Account on Mobile?
- What Does It Look Like When You Disable Your Discord Account?
- What Does a Disabled Discord Account Look Like to Others?
- Does Deactivating Discord Account Delete Messages?
- Does Deactivating Discord Account Leave Servers?
- For How Long Can You Disable Your Discord Account?
- For How Long Is My Discord Account Disabled?
- Why Was My Discord Account Disabled?
- Is Discord Account Disabled For Spamming?
- Discord Account Disabled vs Banned. What’s the Difference?
What Happens When You Disable Your Discord Account?
The process of Discord account deactivation may be simple, but many users want to know what happens to their account and the dat a. Let us learn all this further in detail.
What happens if and when you disable Discord account?
Disabling an account is different from deleting it permanently. If you are wondering about what happens when you disable your account, here’s the answer to it. Your account gets put on hold . Still, you can re-enable your account whenever you wish, securing your data from being deleted.
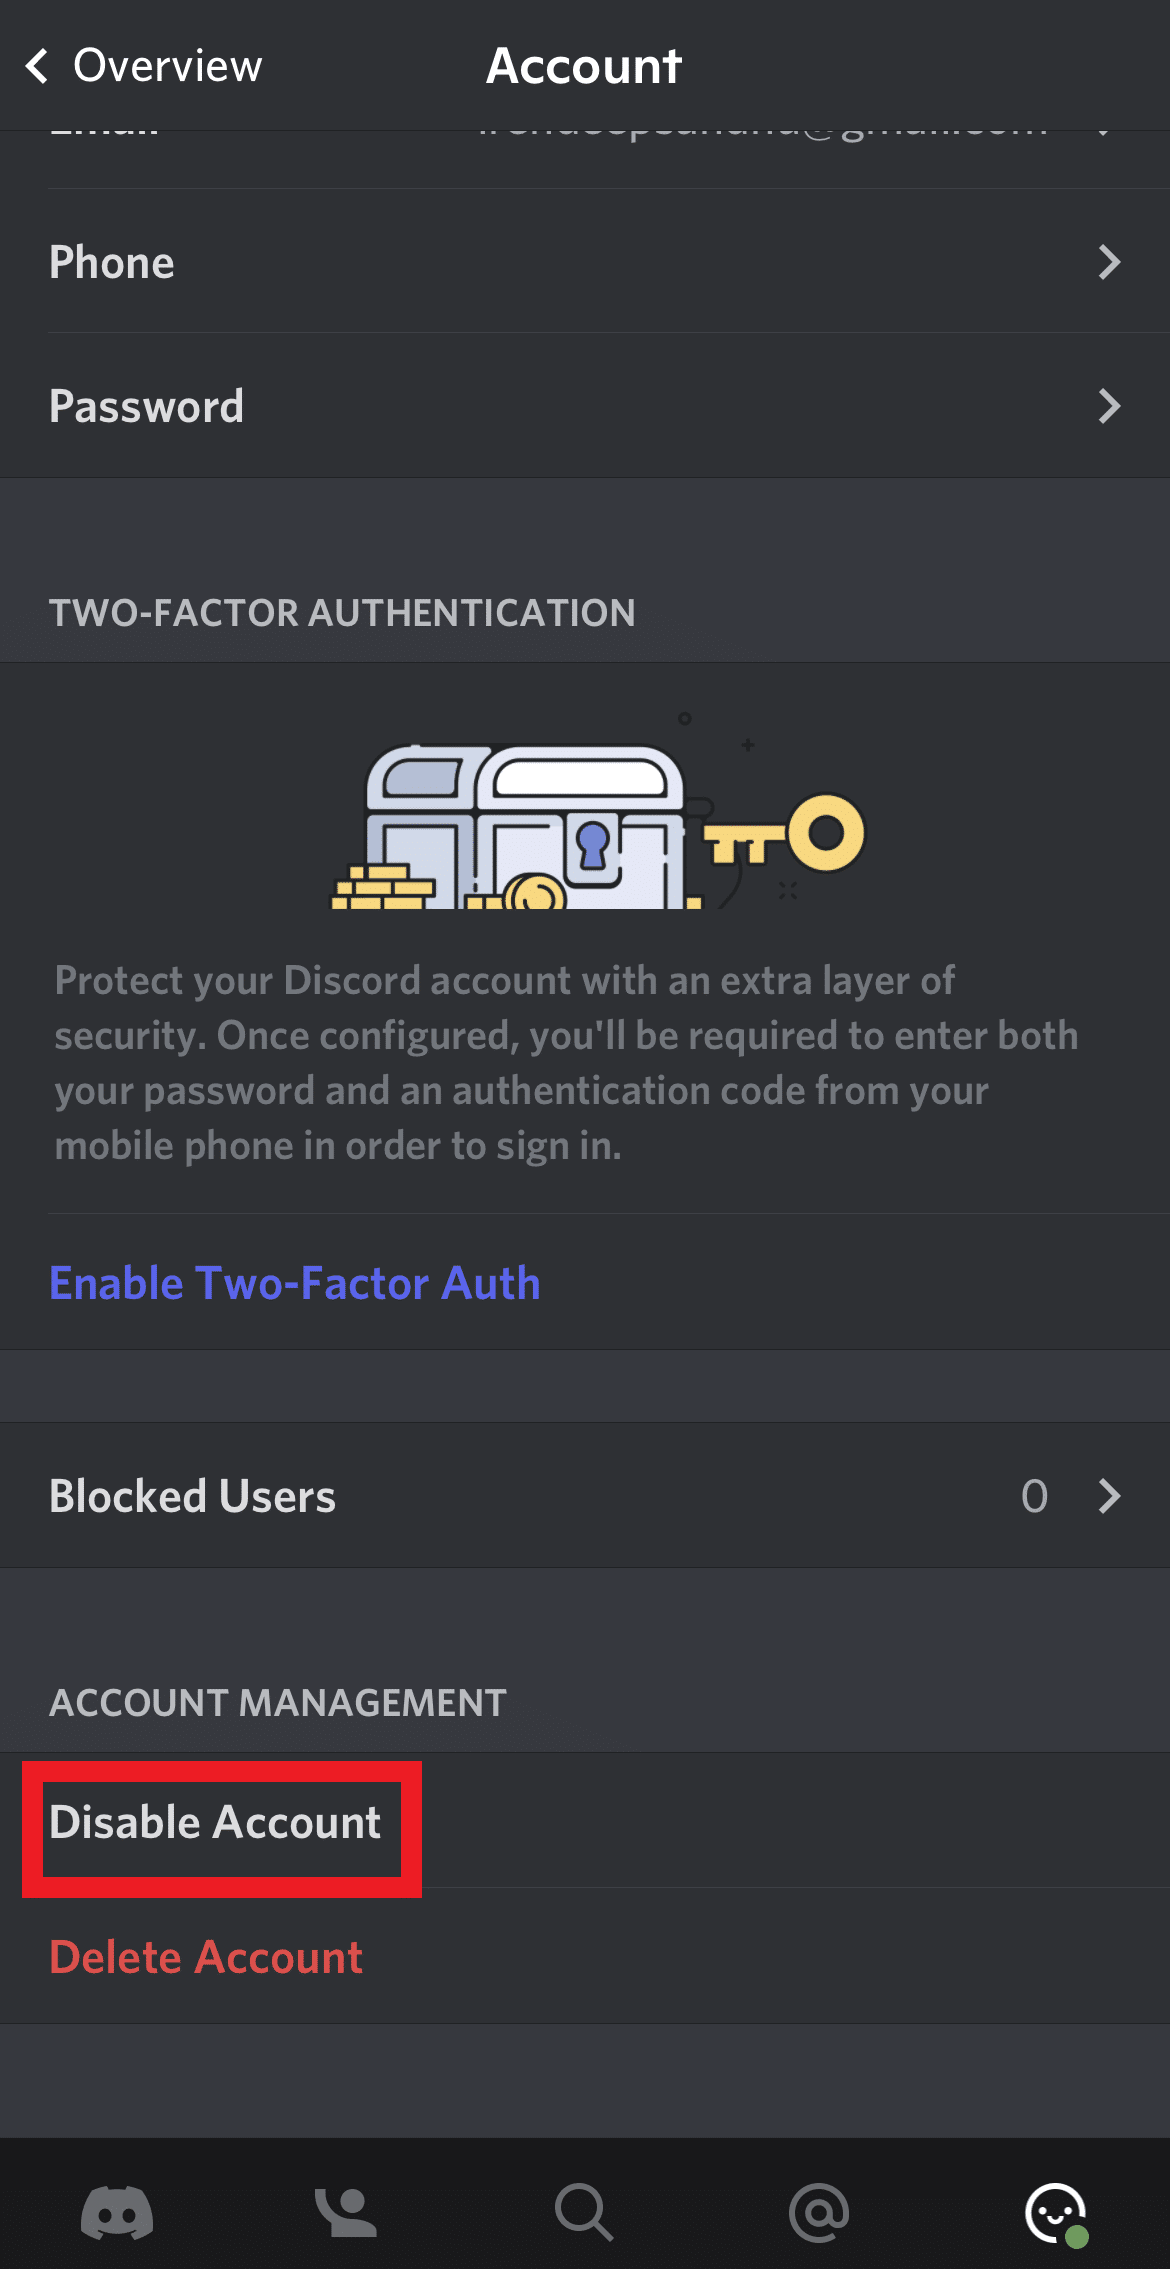
How to Disable Account From Discord Website?
Follow the steps mentioned below to deactivate your account from the Discord website.
- Log in to your account on the Discord website .

- Enter your EMAIL OR PHONE NUMBER and PASSWORD .

- Click on the User Settings gear icon in your profile.

- Click on Disable Account option.

Also Read : How to Disable Discord Notifications
How to Deactivate Discord Account on Mobile?
If you are using the Discord mobile application, then you can deactivate your account from it as well with the following steps.
Note: The following method was performed on iPhone 13 Discord app.
- Install the Discord mobile app on your mobile phone.

- Login to your Discord account in your mobile app.

- Tap on the Smiley face icon from the bottom right corner.
- Tap on the Account option.
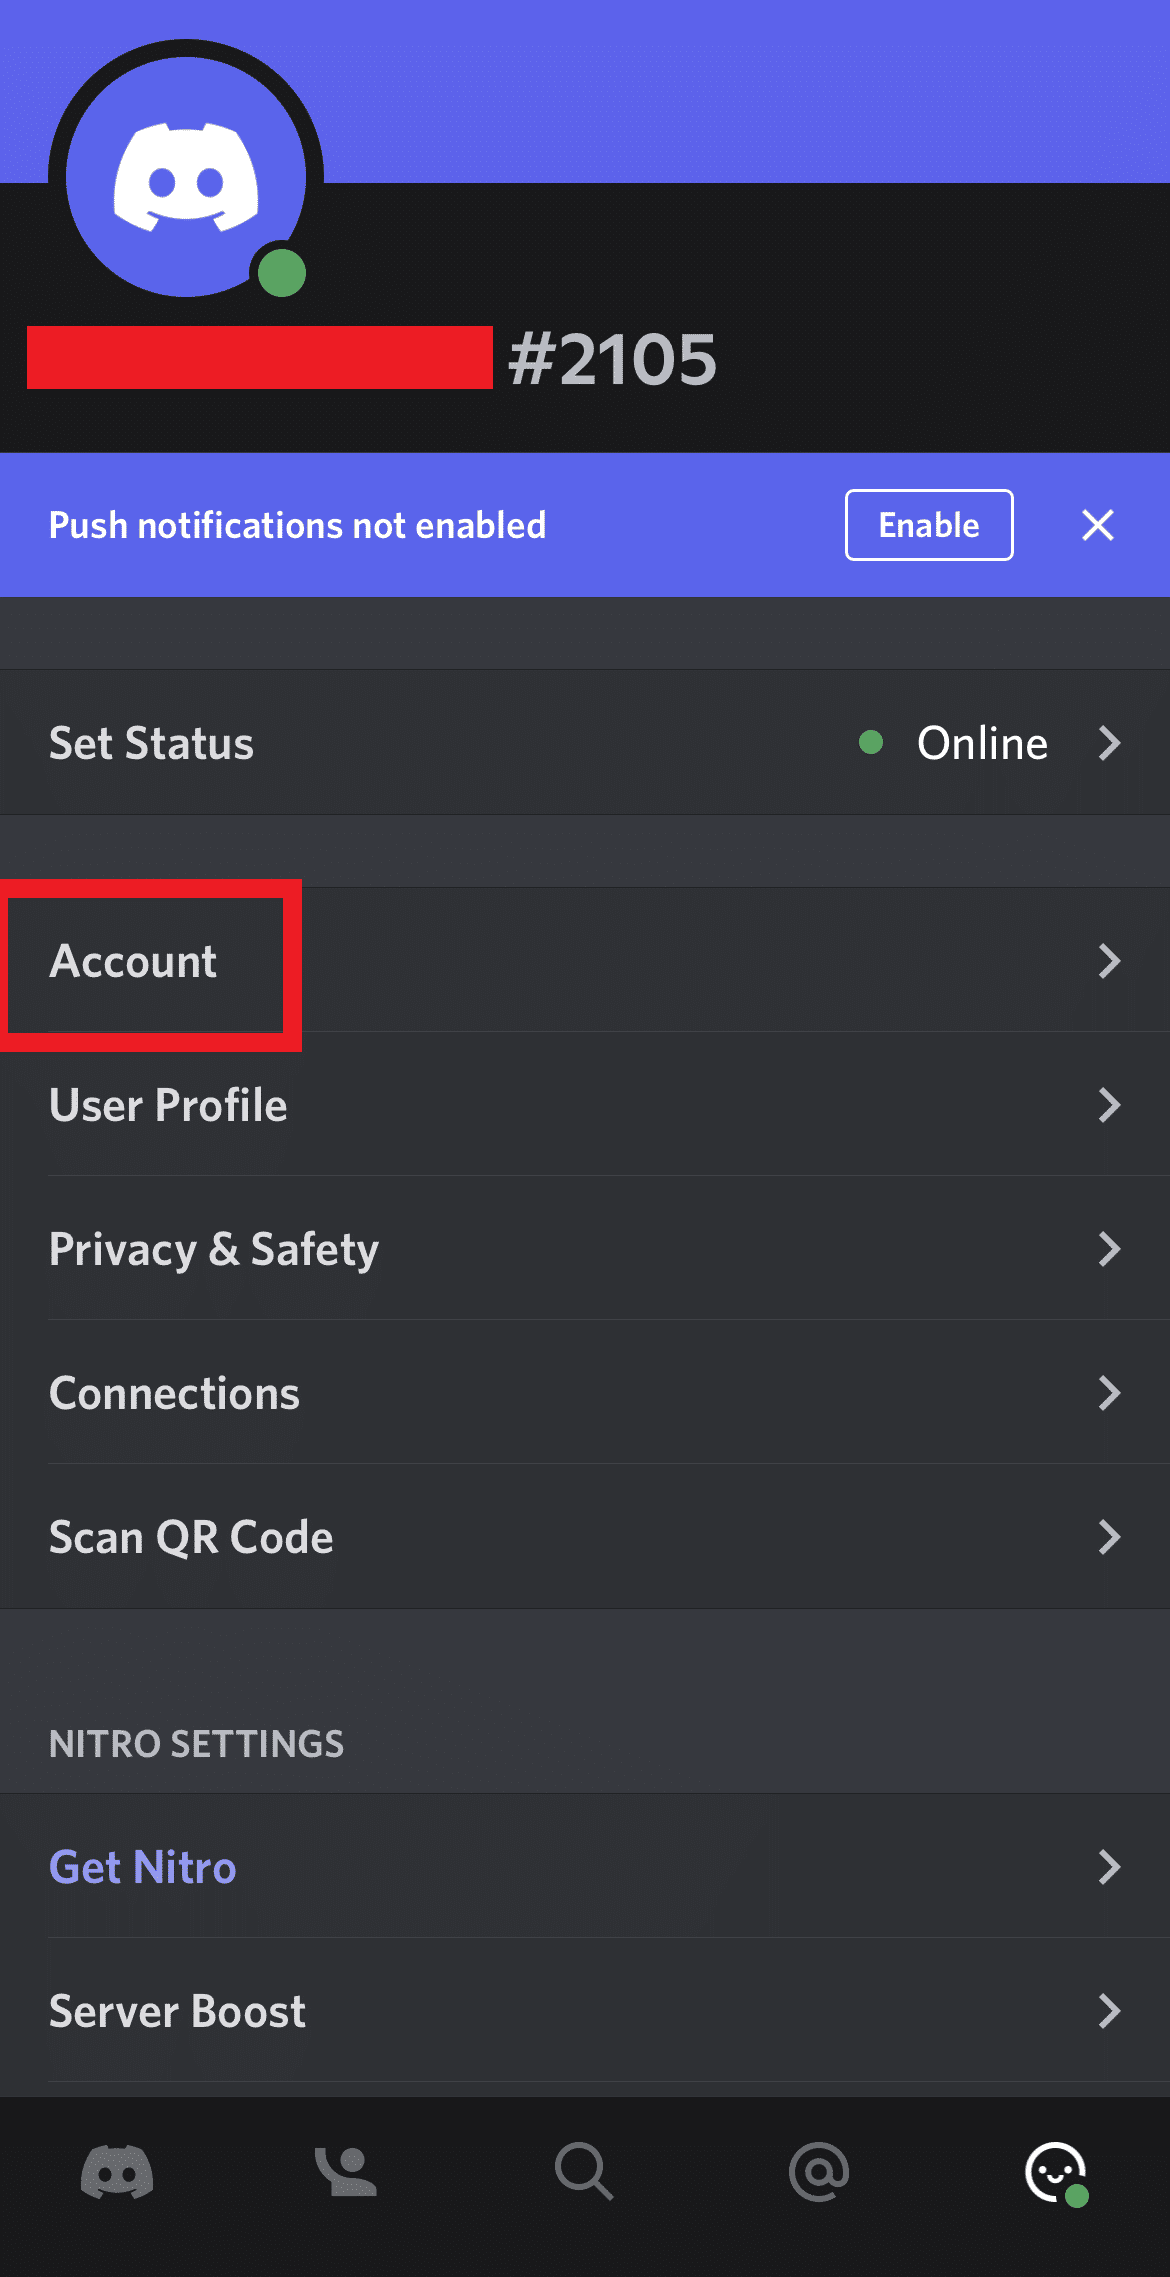
- Tap Disable Account option to deactivate the account.
Also Read : How to Delete Discord
What Does It Look Like When You Disable Your Discord Account?
If you have recently disabled your account, it will get deactivated. It will look like a regular deactivated account with no display of username or identity on the Discord platform.
However, after 2 years , your account will get permanently deleted . Hence, to secure data in your account, you would need to log in before that.
What Does a Disabled Discord Account Look Like to Others?
A deactivated account looks common, especially for the new Discord users. A disabled account looks the same as a deleted one to both new and existing users . Hence, if you have an account that has been disabled, other users will not be able to find you on the platform. However, after you re-enable your account, users or your friends can find you again.
Does Deactivating Discord Account Delete Messages?
No , Discord does not delete the messages from a deactivated account. All the data, chats, and pictures on your account are saved when you disable it.
Does Deactivating Discord Account Leave Servers?
No , deactivating the Discord account does not leave servers . It stays on Discord servers and groups it was a part of.
For How Long Can You Disable Your Discord Account?
According to Discord support , your account stays disabled for about 2 years . Once this period expires, your Discord account gets automatically deleted .
Also Read : How to Screen Share Netflix on Discord
For How Long Is My Discord Account Disabled?
Once disabled, your account will stay disabled for 2 years , in case of no re-enabling. After 2 years, it will automatically get permanently deleted .
WhyWas My Discord Account Disabled?
Your account may get disabled due to reasons which do not adhere to the Discord Community Guidelines . If you happen to conduct activities like bullying, cheating, abusing, or anything objectionable, your account will get disabled.

Is Discord Account Disabled For Spamming?
Yes , your account can get deactivated for spamming or any kind of abuse by Discord authorities.
Discord Account Disabled vs Banned. What’s the Difference?
- A disabled account retains all the data and information . It can be retrieved again by logging in on the platform.
- Whereas a Discord account is banned due to malicious activities on the platform and contradictory actions towards Discord’s community guidelines. Banning can be temporary or permanent as users can also lose their data from the banned Discord account.
Recommended:
- How to Share Battery on iPhone
- Where is the WPS Button on Canon Printer?
- Which is Better Between Discord vs TeamSpeak?
- How to Fix Discord Screen Share Lag
The Wi-Fi Protected Setup (WPS) button allows you to easily connect your Canon printer to a wireless network. However, locating this button can sometimes be confusing, as its placement varies across Canon printer models. This article will explain what the WPS button is, why it is useful for connecting your printer wirelessly, and guide you to finding its location on some common Canon printer models like the PIXMA, MAXIFY, and imageCLASS series. With step-by-step instructions and images highlighting button locations, you’ll learn where to access WPS on your specific Canon printer.

- Where is the WPS Button on Canon Printer?
- How to Set Up the Canon Printer to the WLAN using the WPS button
- Method 1: Through WPS Button
- Method 2: Through WPS Settings Menu
Where is the WPS Button on Canon Printer?
The Canon Printer comes with a WPS button that enables you to connect the Printer to a Local Area Network. The WPS method, also known as the Push button method is a method of connecting the Canon Printer to an access point Wireless Router or a Gateway. The WPS button will let you connect the Canon Printer to the Wireless Local Area Network (WLAN) on the building. The WPS button is available on the panel and is indicated by a Wireless icon on the button. This button is extremely useful if you have connected all the devices on a particular office building to a common network, and you can use any of the PCs to print the file using the same Printer.
How to Set Up the Canon Printer to the WLAN using the WPS button
Understanding the function and accessibility of this connection feature will make establishing wireless printing much simpler. So if you’ve been wondering, “Where is the WPS button on my Canon printer?”, read on for clear explanations tailored to your machine.
There are two methods to set up the Canon Printer to the Wireless Local Area Network on your building:
Method 1: Through WPS Button
The first method is using the WPS button on the Canon Printer and the setup process is very simple. All you need to do is to enable the buttons on the devices to let the devices automatically get connected to the network.
- Find the location of the WPS button on the Canon Printer panel .
Note: If the WPS button is activated on your Canon Printer, you can see the Wi-Fi lamp flash on rhythmically on the Canon Printer.
- Press the WPS button on the Wireless Router within 2 minutes and you should see the devices getting connected.
Note 1: If you haven’t activated the WPS button on the Wireless router within 2 minutes, the devices may not get connected.
Note 2: Turn off the Wi-Fi connection on all the unpaired devices while you are setting up the Canon Printer to the WLAN router for quick connectivity.

Method 2: Through WPS Settings Menu
If your Canon Printer has no WPS button on the panel, then, you can follow the options in this method to connect your Canon Printer to the WLAN network. You will be able to access the WPS settings using the options discussed below and you can easily connect the Printer to the Network.
Option I: Using HOME Button
The first option is to use the HOME button on the Canon Printer panel. If you are perplexed with the question of where is the WPS button on Canon Printer, you can use this option to access the WPS settings on the Canon Printer using the HOME button.
- Enter the Printer’s setup menu using the MENU button on the Canon Printer’s panel.

- Use the arrow keys to move to the WLAN icon on the screen and press the left function key beneath the arrow keys to select it.
- Navigate to the Wireless LAN Setup in the Settings screen using the arrow keys on the Canon Printer panel and then press the OK button.
Note 1: The Wireless LAN Setup may be also available as the Wireless Setup or the Network Setup on the screen.
Note 2: The Wi-Fi lamp on the bottom-left part of the Printer’s panel would flash on when the wireless connection of the Canon Printer is enabled.
- In the Wireless LAN setup screen, move to the WPS (Push button method) tab and press the OK button to select the option.

Press the OK button on the next screen to confirm the selection.
Press the WPS button on the Wireless Router for 2 minutes for the connection to take place.
Press the OK button on the Canon Printer within 2minutes to connect the Printer to the Wireless LAN network.
Option II: Using Setup Button
The second option to connect the Canon Printer to the WLAN is using the Setup button on the Canon Printer panel. If you cannot find the answer to the question of where is the WPS button on Canon Printer but can easily access the WLAN settings that will allow you to connect to the Wireless router.
Press the Setup button indicated by the Tools icon on the Canon Printer’s panel.
Move to the Wireless LAN setup tab on the screen and press the OK button on the Setup Menu.
Press the Stop/ Reset button on the Printer’s panel, select the Wireless LAN Setup Standard Setup option displayed on the screen, and press the OK button on the panel.

- Navigate to the specific network in the list of available networks on the screen and press the OK button twice.
Note: If the network is not displayed, use the arrow keys to select the Search again option on the screen and press the OK button.
- Enter the security Passphrase on the next screen using the numeric keys on the Printer panel and press the OK button.
Note: Press the * key to toggle between the Uppercase and lowercase characters in the numeric pad.
- Press the OK button to complete the setup of the Wi-Fi network to your Canon Printer.
Recommended:
- Fix Login Failed Your Account Cannot Play on this Platform Fortnite
- Which is Better Between 21:9 vs 16:9 Monitors?
- 13 Best Cheap Android TV Box
- Fix WD My Passport Ultra Not Detected on Windows 10
