Fix Windows 10 Creator Update fails to install: If you are unable to install latest Windows 10 Creators Update on your system then you are one of the many users who are stuck with Windows 10 Creators Update Installation. The issue is simple, you download Creators update and once the installation begins, it gets stuck at 75%. You have no option other than to force restart your system which will automatically restore your PC to the previous build, hence the Windows 10 Creator Update fails to install.

The issue is quite similar to when Windows 10 update fails and the basic troubleshooting steps can also be applied to our issue as well. So without wasting any time let’s see how to actually Fix Windows 10 Creator Update fails to install with the help of below-listed steps.
- Windows 10 Creator Update fails to install [SOLVED]
- Method 1: Run Windows Update Troubleshooter
- Method 2: Make sure Windows Update service is running
- Method 3: Temporarily Disable Antivirus and Firewall
- Method 4: Disable Fast Startup
- Method 5: Run System File Checker and DISM Tool
- Method 6: Rename SoftwareDistribution
- Method 7: Install Update with Media Creation Tool
- Method 8: Delete $WINDOWS.~BT Folder
Windows 10 Creator Update fails to install [SOLVED]
Make sure to create a restore point just in case something goes wrong.
Method 1: Run Windows Update Troubleshooter
1.Now type “troubleshooting” in Windows Search bar and click on Troubleshooting.
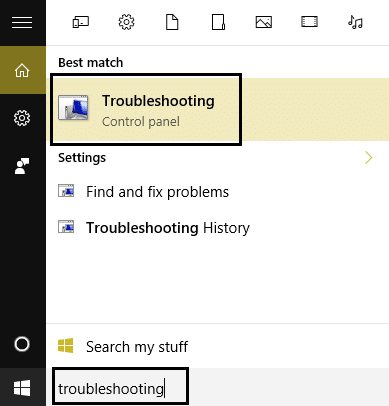
2.Next, from the left window pane select View all.
3.Then from the Troubleshoot computer problems list select Windows Update.
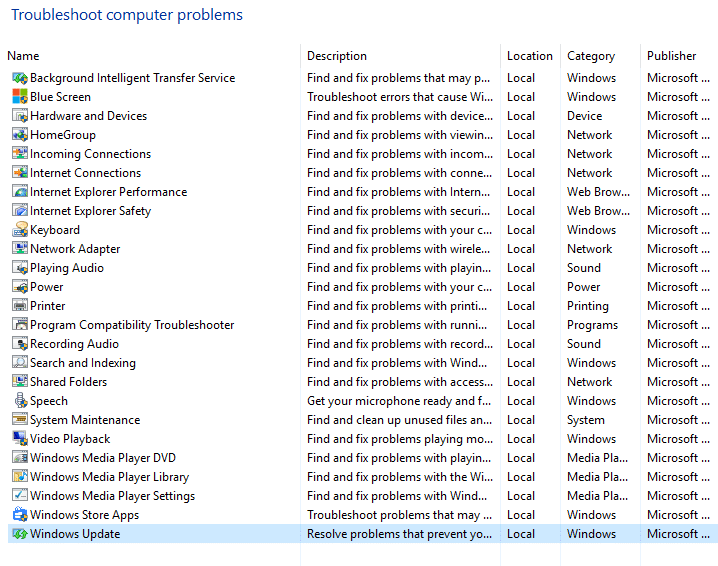
4.Follow on-screen instruction and let the Windows Update Troubleshoot run.
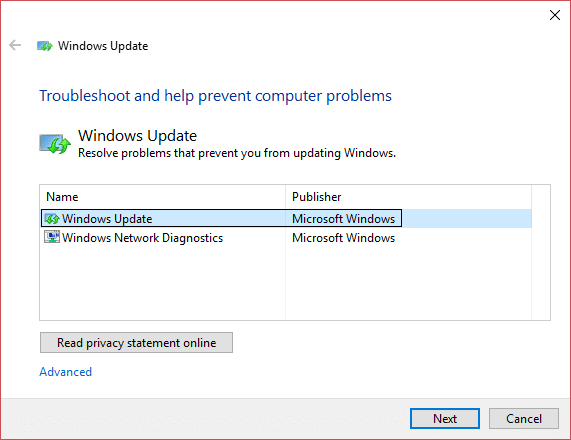
5.Restart your PC and you may be able to Fix Windows 10 Creator Update fails to install issue.
Method 2: Make sure Windows Update service is running
1.Press Windows Key + R then type services.msc and hit Enter.

2.Find the following services and make sure they are running:
Windows Update BITS Remote Procedure Call (RPC) COM+ Event System DCOM Server Process Launcher
![Windows 10 Creator Update fails to install [SOLVED] - 6](https://techcult.com/wp-content/uploads/2017/10/Fix-Background-Intelligent-Transfer-Service-wont-start.png)
3.Double-click on each of them, then make sure the Startup type is set to Automatic and click Start if the services are not already running.

4.Click Apply followed by OK.
5.Reboot your PC to save changes and again try to run Windows Update.
Method 3: Temporarily Disable Antivirus and Firewall
1.Right-click on the Antivirus Program icon from the system tray and select Disable.

2.Next, select the time frame for which the Antivirus will remain disabled.

Note: Choose the smallest amount of time possible for example 15 minutes or 30 minutes.
3.Once done, again try to update Windows and check if the error resolves or not.
4.Press Windows Key + I then select Control Panel.

5.Next, click on System and Security.
6.Then click on Windows Firewall.

7.Now from the left window pane click on Turn Windows Firewall on or off.

- Select Turn off Windows Firewall and restart your PC. Again try to open Update Windows and see if you’re able to Fix Windows 10 Creator Update fails to install issue.
If the above method doesn’t work make sure to follow the exact same steps to turn on your Firewall again.
Method 4: Disable Fast Startup
1.Press Windows Key + R then type “ powercfg.cpl ” and hit enter to open Power Options.

2.Click on Choose what the power buttons do in the top-left column.

3.Next, click on Change settings that are currently unavailable.

- Uncheck Turn on Fast startup under Shutdown settings.

5.Now click Save Changes and Restart your PC.
If the above fails to disable fast startup then try this:
1.Press Windows Key + X then click Command Prompt (Admin).

2.Type the following command in cmd and hit Enter:
powercfg -h off

3.Reboot to save changes.
This should definitely Fix Windows 10 Creator Update fails to install issue but if not then continue to the next method.
Method 5:Run System File Checker and DISM Tool
1.Press Windows Key + X then click on Command Prompt(Admin).

2.Now type the following in the cmd and hit enter:
Sfc /scannow

sfc /scannow /offbootdir=c:\ /offwindir=c:\windows (If above fails then try this one)

3.Wait for the above process to finish and once done restart your PC.
4.Again open cmd and type the following command and hit enter after each one:
a) Dism /Online /Cleanup-Image /CheckHealth

b) Dism /Online /Cleanup-Image /ScanHealth

c) Dism /Online /Cleanup-Image /RestoreHealth

5.Let the DISM command run and wait for it to finish.
- If the above command doesn’t work then try on the below:
Dism /Image:C:\offline /Cleanup-Image /RestoreHealth /Source:c:\test\mount\windows

Dism /Online /Cleanup-Image /RestoreHealth /Source:c:\test\mount\windows /LimitAccess
Note: Replace the C:\RepairSource\Windows with the location of your repair source (Windows Installation or Recovery Disc).
7.Reboot your PC to save changes and see if you’re able to Fix Windows 10 Creator Update fails to install issue.
Method 6: Rename SoftwareDistribution
1.Press Windows Key + X then select Command Prompt (Admin).
2.Now type the following commands to stop Windows Update Services and then hit Enter after each one:
net stop wuauserv net stop cryptSvc net stop bits net stop msiserver

3.Next, type the following command to rename SoftwareDistribution Folder and then hit Enter:
ren C:\Windows\SoftwareDistribution SoftwareDistribution.old ren C:\Windows\System32\catroot2 catroot2.old
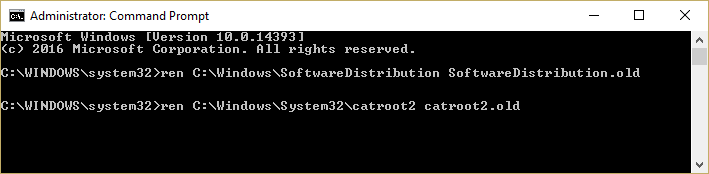
4.Finally, type the following command to start Windows Update Services and hit Enter after each one:
net start wuauserv net start cryptSvc net start bits net start msiserver

5.Reboot your PC to save changes and check if you are able to Fix Windows 10 Creator Update fails to install issue.
Method 7: Install Update with Media Creation Tool
- Download Media Creation Tool here.
2.Backup your data from system partition and save your license key.
3.Start the tool and choose to Upgrade this PC now.

4.Accept the license terms.
5.After the installer is ready, choose to Keep personal files and apps.

6.The PC will restart few times and you’re good to go.
Method 8: Delete $WINDOWS.~BT Folder
1.Press Windows Key + R then type msconfig and hit Enter to open System Configuration.
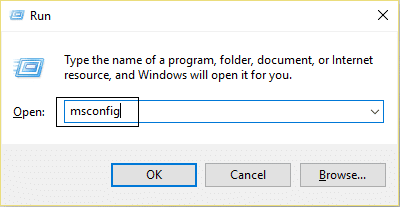
2.Switch to boot tab and check mark Safe Boot option.

3.Click Apply followed by OK.
4.Restart your PC and system will boot into Safe Mode automatically.
5.Open File Explorer and click View > Options.

6.Switch to the View tab and checkmark “ Show hidden files, folders, and drives. “
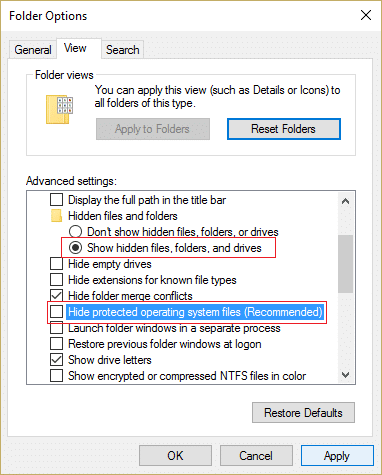
7.Next, make sure to uncheck “ Hide protect operating system files (Recommended). “
8.Click Apply followed by OK.
9.Navigate to Windows folder by pressing Windows Key + R then type C:\Windows and hit Enter.
10.Locate the following folders and permanently delete them (Shift + Delete):
$Windows.~BT (Windows Backup Files) $Windows.~WS (Windows Server Files)

Note: You may not able to delete the above folders then simply rename them.
11.Next, go back to the C: drive and make sure to delete the Windows.old folder.
12.Next, if you have normally deleted these folders then make sure to empty recycle bin.

13.Again open System Configuration and uncheck Safe Boot option.
14.Reboot your PC to save changes and again try to update your Windows.
15.Now download the Media Creation Tool once again and proceed with the installation process.
- Fix Brightness issues after Windows 10 Creators Update
- Fix Windows 10 Mail Error 0x80040154 or 0x80c8043e
- How To Fix Print Spooler Error 0x800706b9
- Fix There was a Problem Sending the Command to the Program
That’s it you have successfully Fix Windows 10 Creator Update fails to install but if you still have any queries regarding this post feel free to ask them in the comment’s section.
If you have issues with your Printer, then it must be because of Windows 10 unable to communicate with Print Spooler. The Print Spooler is a Windows program responsible for managing all the print jobs associated with your Printer. Only with the help of print spooler, you can initiate prints, scans, etc. from your Printer. Now users are unable to use their printers and when they go to services.msc window to start Print Spooler services they face the following error message:
Windows could not start the Print Spooler service on Local Computer.
Error 0x800706b9: Not enough resources are available to complete this operation.

Now you know all about the error, it’s time we should see how to fix this annoying issue. So without wasting any time let’s see how to Fix Print Spooler Error 0x800706b9 with the help of below-listed troubleshooting guide.
- Fix Print Spooler Error 0x800706b9
- Method 1: Run Printer Troubleshooter
- Method 2: Start Print Spooler Services
- Method 3: Run CCleaner and Malwarebytes
- Method 4: Registry Fix
- Method 5: Delete all the files in PRINTERS folder
- Method 6: Create a New User Account
Fix Print Spooler Error 0x800706b9
Make sure to create a restore point just in case something goes wrong.
Method 1: Run Printer Troubleshooter
- Open Control Panel and search Troubleshooting in the Search Bar on the top right side and click on Troubleshooting.
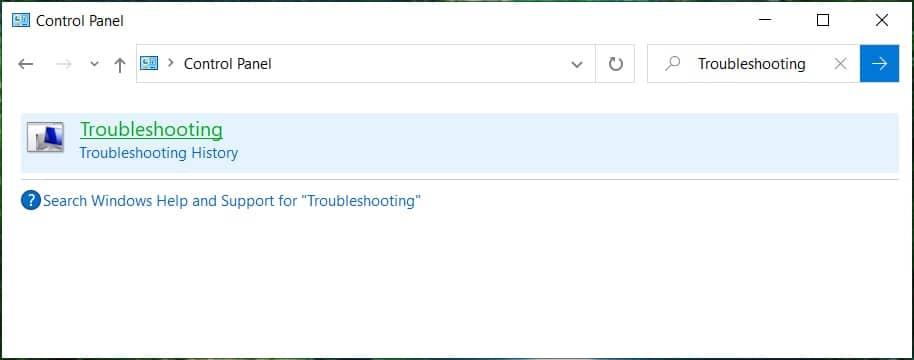
Next, from the left window, pane select View all.
Then, from the Troubleshoot computer problems list select Printer.

Follow on-screen instruction and let the Printer Troubleshooter run.
Restart your PC, and you may be able to Fix Print Spooler Error 0x800706b9.
Method 2: Start Print Spooler Services
- Press Windows Key + R then type services.msc and hit Enter.
Find Print Spooler service in the list and double-click on it.
Make sure the Startup type is set to Automatic, and the service is running, then click on Stop and then again click on start to restart the service.

Click Apply, followed by OK.
After that, again try to add the printer and see if you’re able to Fix Print Spooler Error 0x800706b9.
Method 3: Run CCleaner and Malwarebytes
Download and install CCleaner & Malwarebytes.
Run Malwarebytes and let it scan your system for harmful files. If malware is found, it will automatically remove them.

Now run CCleaner and select Custom Clean .
Under Custom Clean, select the Windows tab then make sure to checkmark defaults and click Analyze .
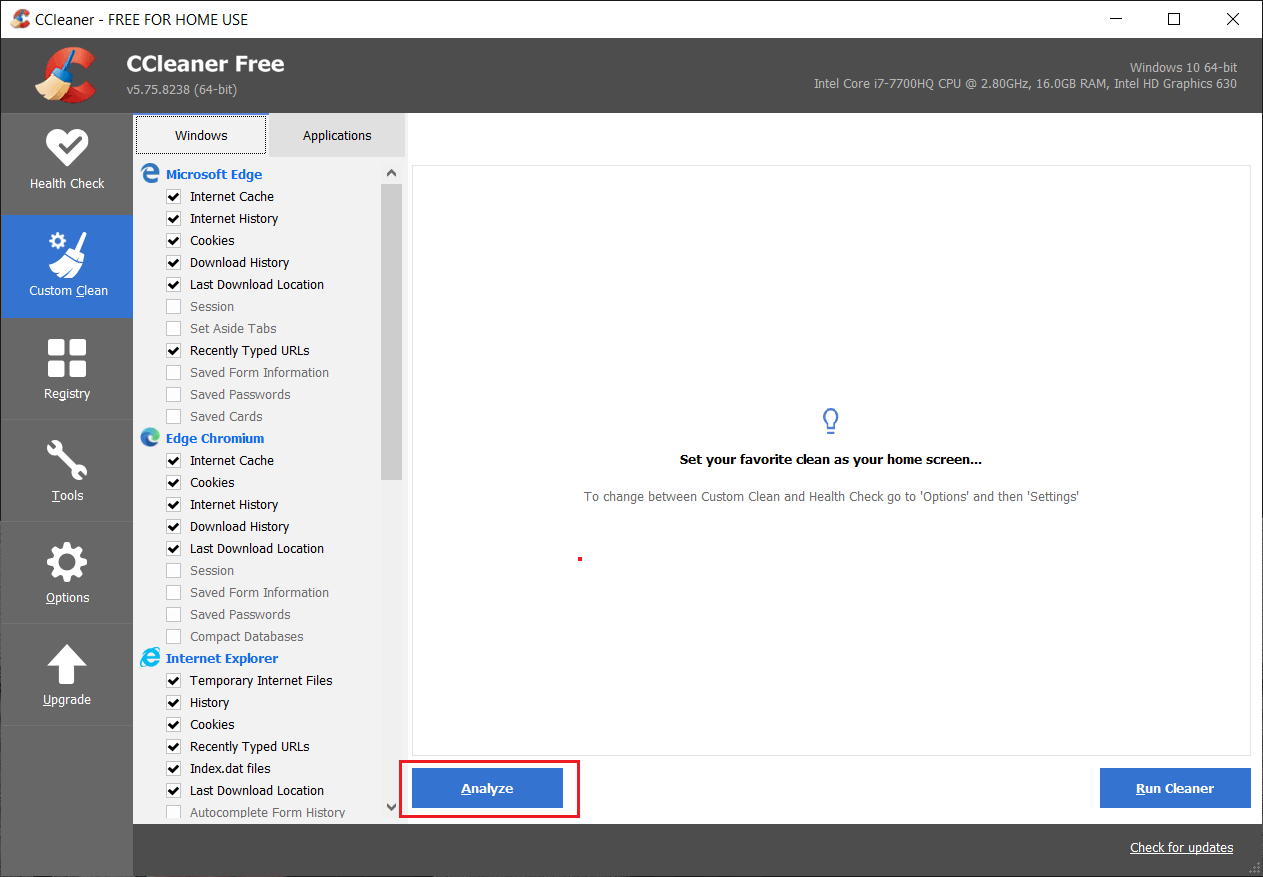
- Once Analyze is complete, make sure you’re certain to remove the files to be deleted.
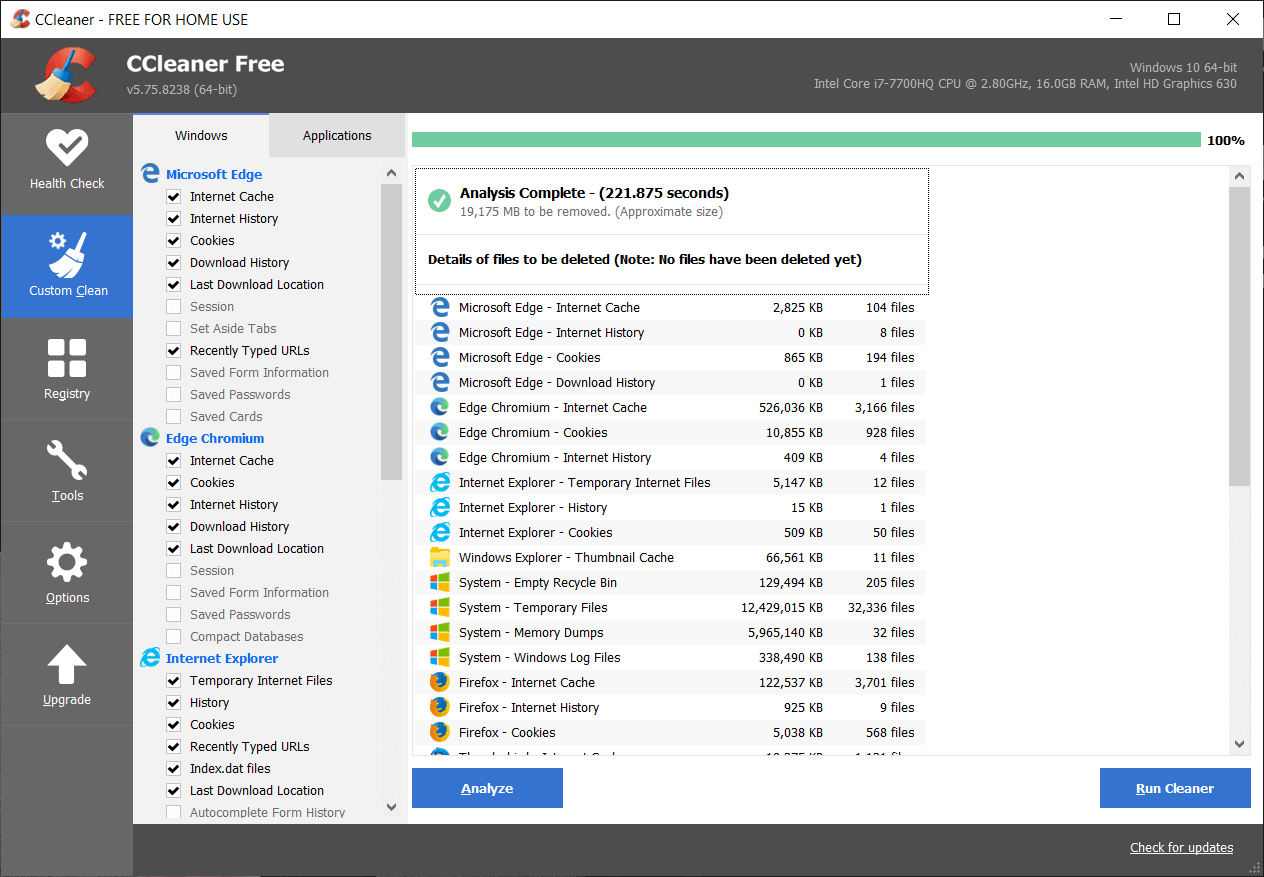
Finally, click on the Run Cleaner button and let CCleaner run its course.
To further clean your system, select the Registry tab , and ensure the following are checked:
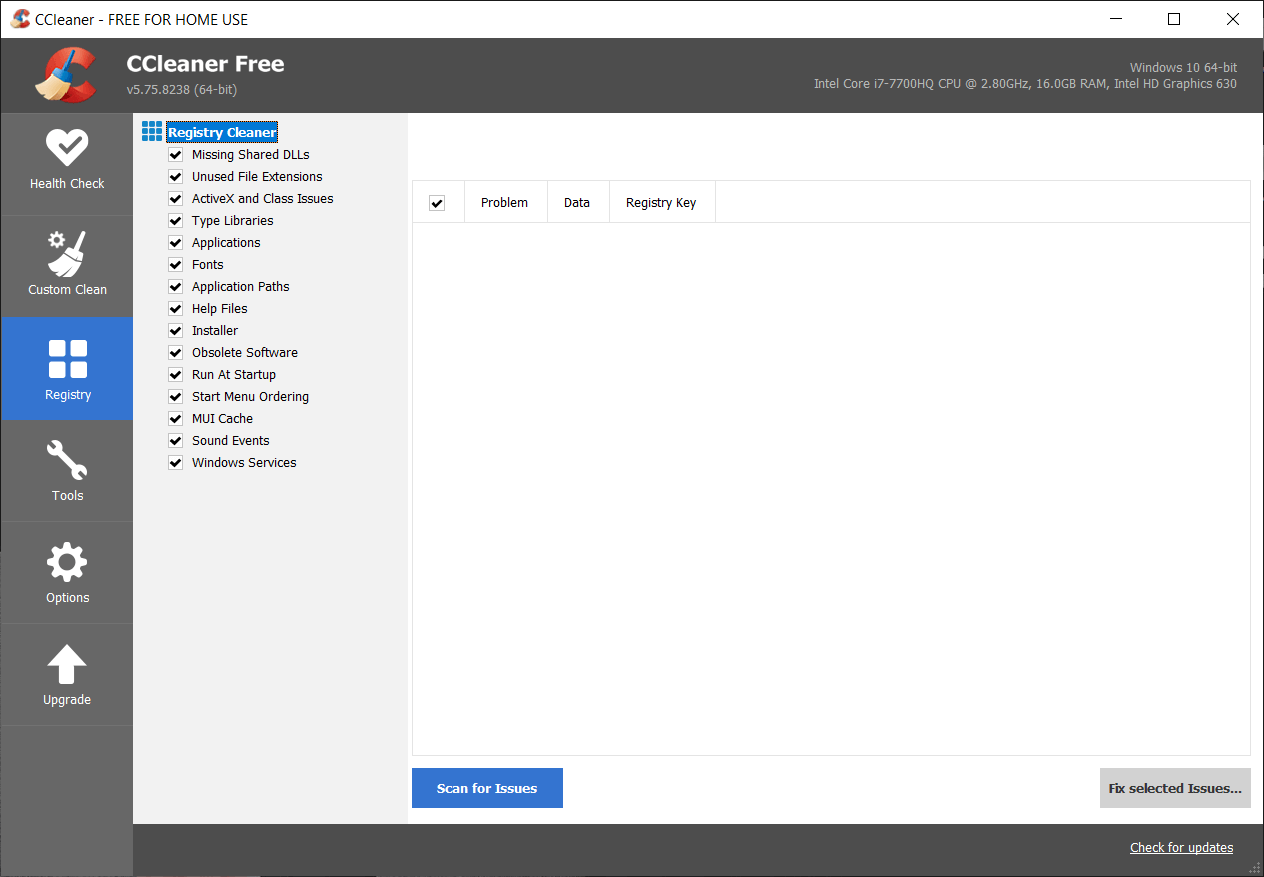
- Click on the Scan for Issues button and allow CCleaner to scan, then click on the Fix Selected Issues button.
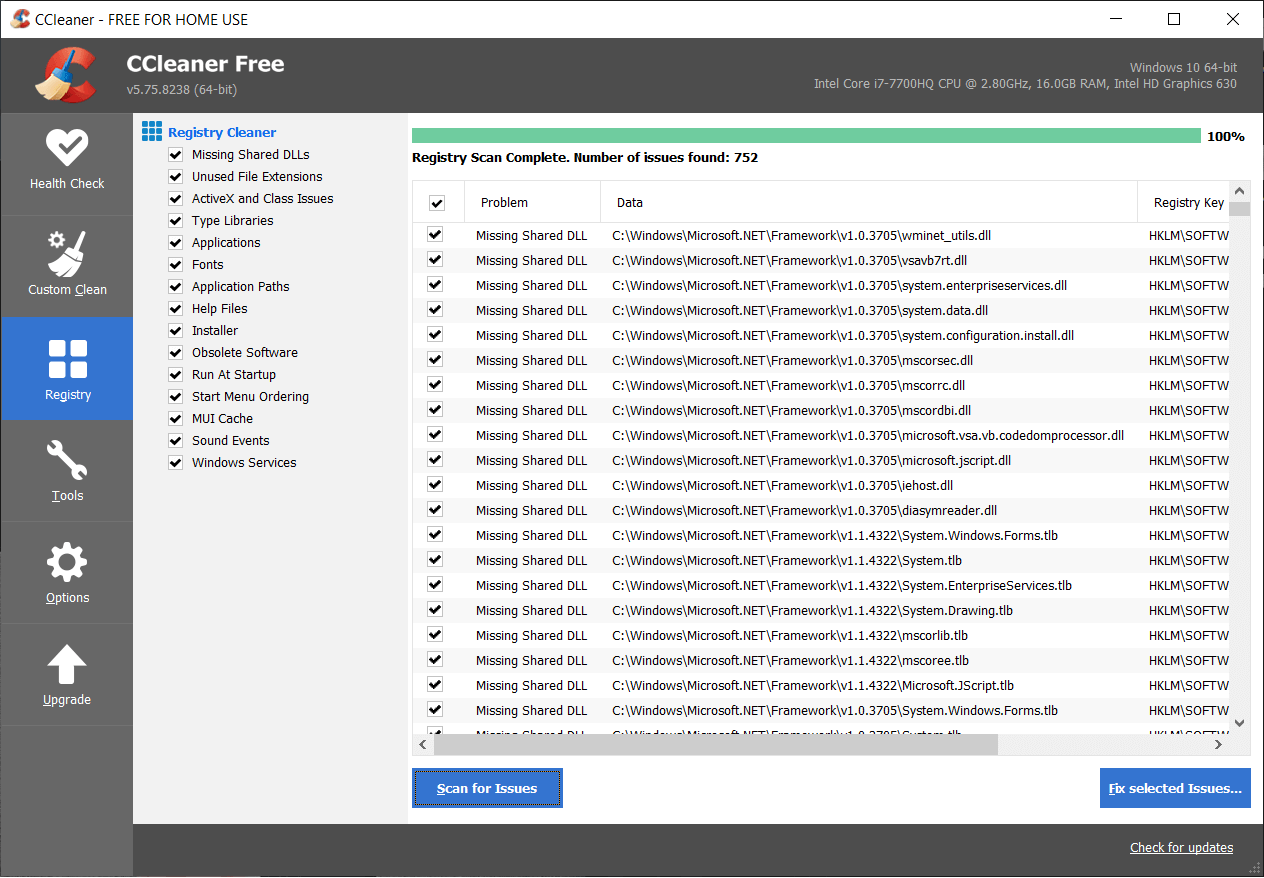
When CCleaner asks “ Do you want backup changes to the registry? ” select Yes .
Once your backup has completed, click on the Fix All Selected Issues button.
Restart your PC to save changes.
Method 4: Registry Fix
- Press Windows Key + R then type regedit and hit Enter to open Registry Editor.

- Navigate to the following registry key:
HKEY_LOCAL_MACHINE\SYSTEM\CurrentControlSet\Services\Spooler
- Make sure to highlight Spooler key in the left window pane and then in the right window pane find the string called DependOnService.

- Double click on the DependOnService string and change its value by deleting the HTTP part and leaving the RPCSS part.

Click OK to save changes and close Registry Editor.
Reboot your PC and see if the error is resolved or not.
Method 5: Delete all the files in PRINTERS folder
- Press Windows Key + R then type services.msc and hit Enter.
- Find Print Spooler service then right-click on it and select Stop.
- Now in the File Explorer navigate to the following folder:
C:\Windows\system32\spool\PRINTERS
Note: It will ask to continue then click on it.
Delete all the files in PRINTERS folder (Not the folder itself) and then close everything.
Again go to services.msc window and s tart Print Spooler service.

- Reboot your PC and see if you can Fix Print Spooler Error 0x800706b9.
Method 6: Create a New User Account
- Press Windows Key + I to open Settings and then click Accounts.

2.Click on Family & other people tab in the left-hand menu and click Add someone else to this PC under Other people.

- Click, I don’t have this person’s sign-in information in the bottom.

- Select Add a user without a Microsoft account in the bottom.

- Now type the username and password for the new account and click Next.

Sign in to this new user account and see if the Printer is working or not. If you are successfully able to Fix Print Spooler Error 0x800706b9 in this new user account, then the problem was with your old user account which might have got corrupted, anyway transfer your files to this account and delete the old account to complete the transition to this new account.
Recommended:
- Fix Can’t turn on Windows Firewall Error code 0x80070422
- How To Fix Windows 10 Mail Error 0x80040154 or 0x80c8043e
- Fix Something Went Wrong While Syncing Mail App In Windows 10
- Fix There was a Problem Sending the Command to the Program
That’s it you have successfully Fix Print Spooler Error 0x800706b9 but if you still have any questions regarding this post feel free to ask them in the comment’s section.
